| As we mentioned earlier in our survey of GDI+ architecture, when you draw, you need to make use of drawing tools, such as pens and brushes, which are defined by their own classes in the .NET Framework. The Pen class defines objects that are used to draw lines and curves. A pen has a width, dash style, and a color (or in fact can have an associated brush). There are several brush classes, which are used for drawing the interior of a shape. In this section we will examine some of the details of working with pens and brushes. We begin with pens, which are simpler. Pens Pens are used to draw lines and curves. Compared to brushes, pens are quite simple objects. There is a single class, Pen , in the System.Drawing namespace that is used for creating custom pens. As is usual in GDI+, there are several overloaded constructors. The two most important ones take a color or a brush as the first parameter and a width as the second parameter. The width is a Single number. Here are two ways of specifying a red pen of width 3:  Dim pen1 as New Pen(Color.Red, 3) Dim pen2 as New Pen(Brushes.Red, 3) Dim pen1 as New Pen(Color.Red, 3) Dim pen2 as New Pen(Brushes.Red, 3) Being able to specify a brush allows great variety to the custom pens that you can create, since you can create a brush from any of the various brush classes that we will examine in the next section. DashStyle Although you cannot specify it in a constructor, pens can have a dash style , which is specified by a read/write property DashStyle . The type of this property is the DashStyle enumeration, which has the following possible values: -
Custom -
Dash -
DashDot -
DashDotDot -
Dot -
Solid The sample program at the end of this section allows you to create pens with the various dash styles. Standard Pens Besides all the various kinds of custom pens you can create, there are a number of standard pens that correspond to the standard colors. The Pens class has a read-only property for each of the standard colors: Pens.Black , Pens.Red , Pens.Blue , and so forth. Each standard pen has width 1. Drawing with Pens Once you have created a pen, you can draw with it using various drawing methods such as DrawLine , DrawArc , DrawBezier , and so on. The program PenDemo illustrates drawing a line with various pens, where you can specify the color, width, and dash style of the pen. Figure 11-4 shows a screen capture of the running program with a red pen of width 5 and a DashDotDot dash style. A horizontal line is drawn in a label control, using the specified pen. Figure 11-4. Demonstration program illustrates different pens. 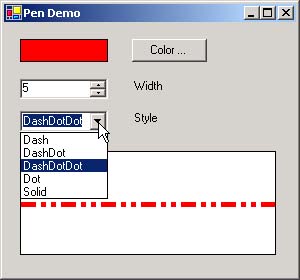 This program illustrates painting directly on a control. Normally, in Windows Forms you can simply use a control as is, and you don't have to be concerned with painting. But if you do need to do painting yourself, it is easy to accomplish by adding a handler for the Paint event for the control. In code such as this you have to be careful about what happens in response to the initial Paint event, when things may not have been fully initialized yet. In this program, we check that the pen has been created before we attempt to use it. We use this style of program extensively in this chapter so that we can compactly illustrate drawing using various GDI+ classes, with suitable controls to allow the user to choose options. We could draw on any kind of control; we use a label control. To show the drawing surface, we set the background color to white and the BorderStyle to FixedSingle . Here is the code for the Paint event handler. Private Sub lblRect_Paint(ByVal sender As Object, _ ByVal e As PaintEventArgs) Handles lblRect.Paint Dim g As Graphics = e.Graphics Dim p1 As New Point(0, lblRect.Height / 2) Dim p2 As New Point(lblRect.Width, lblRect.Height / 2) If Not m_pen Is Nothing Then g.DrawLine(m_pen, p1, p2) End If End Sub There are member variables to hold the current color and pen. Private m_color As Color = Color.Red Private m_pen As Pen There is a NumericUpDown control, nudWidth , to specify the width and a combo box, cmbStyle , to specify the style. The handler for the Load event performs initializations. Private Sub Form1_Load(ByVal sender As Object, _ ByVal e As EventArgs) Handles MyBase.Load Label1.BackColor = m_color nudWidth.Value = 5 cmbStyle.Text = "Dash" m_pen = MakePen() lblRect.Invalidate() End Sub The helper method MakePen creates a pen having the specified characteristics. Function MakePen() As Pen Dim width As Integer = nudWidth.Value Dim pen As New Pen(m_color, width) pen.DashStyle = Style Return pen End Function The read-only property Style is used to obtain the DashStyle of the pen as selected in the combo box. Private ReadOnly Property Style() As DashStyle Get Select Case cmbStyle.Text Case "Dash" Return DashStyle.Dash Case "DashDot" Return DashStyle.DashDot Case "DashDotDot" Return DashStyle.DashDotDot Case "Dot" Return DashStyle.Dot Case "Solid" Return DashStyle.Solid End Select End Get End Property The handler for clicking the Color button updates the color through the helper method UpdateColor . It shows this color on an adjacent label control, and then creates a new pen with this color. Finally, it invalidates the label control where the line is drawn, forcing a repaint. Private Sub btnColor_Click(ByVal sender As Object, _ ByVal e As EventArgs) Handles btnColor.Click UpdateColor(m_color) Label1.BackColor = m_color m_pen = MakePen() lblRect.Invalidate() End Sub The UpdateColor helper method takes a color as a reference argument. It brings up a color common dialog to let the user specify a color. Private Sub UpdateColor(ByRef col As Color) Dim dlg As New ColorDialog() Dim status As DialogResult dlg.Color = col status = dlg.ShowDialog If status = DialogResult.OK Then col = dlg.Color End If End Sub Finally, there are event handlers for changing the Nume ricUpDown control and the combo box. These handlers create a new pen having the specified characteristics and then invalidate the label control to force a repaint. The simple form of Invalidate shown here invalidates the entire label control. You can also invalidate a region to optimize the performance of painting. We will say more about invalidation later in the chapter when we discuss clipping. Private Sub nudWidth_ValueChanged(ByVal sender As Object, _ ByVal e As EventArgs) Handles nudWidth.ValueChanged m_pen = MakePen() lblRect.Invalidate() End Sub Private Sub cmbStyle_SelectedIndexChanged(_ ByVal sender As Object, ByVal e As EventArgs) _ Handles cmbStyle.SelectedIndexChanged m_pen = MakePen() lblRect.Invalidate() End Sub Brushes The Brush class in the System.Drawing namespace is an abstract class. To create a brush object, you need to instantiate one of the derived classes. The derived classes such as SolidBrush , HatchBrush , and so forth cannot be inherited. SolidBrush The simplest kind of brush is a SolidBrush . This class is in the System.Drawing namespace. A solid brush is completely described by a Color , which is passed as an argument to the constructor. m_brush = New SolidBrush(m_color) The program ColorDemo\Version 2 illustrates use of a solid brush. Version 2 uses a brush to paint the label control lblColor , which will paint over the text in the control. The result is that an opaque color will completely obscure the text, and a transparent color will let the text show through. Here is the code for Version 2. We show in bold the lines that are changed from Version 1. Routines that are unchanged are left out. Private m_color As Color Private m_brush As Brush ... Private Sub btnRefresh_Click(ByVal sender As Object, _ ByVal e As EventArgs) Handles btnRefresh.Click Dim r As Integer = Convert.ToInt32(txtRed.Text) Dim g As Integer = Convert.ToInt32(txtGreen.Text) Dim b As Integer = Convert.ToInt32(txtBlue.Text) Dim a As Integer = Convert.ToInt32(txtAlpha.Text) m_color = Color.FromArgb(a, r, g, b) m_brush = New SolidBrush(m_color) lblColor.Invalidate() End Sub ... Private Sub ShowColor() txtRed.Text = m_color.R txtGreen.Text = m_color.G txtBlue.Text = m_color.B txtAlpha.Text = m_color.A m_brush = New SolidBrush(m_color) lblColor.Invalidate() End Sub Private Sub lblColor_Paint(ByVal sender As Object, _ ByVal e As PaintEventArgs) Handles lblColor.Paint Dim g As Graphics = e.Graphics Dim rect = New Rectangle(0, 0, Me.Width, Me.Height) If Not m_brush Is Nothing Then g.FillRectangle(m_brush, rect) End If End Sub End Class The use of the brush is very easy. Whenever a color is assigned, a solid brush of that color is created. The Invalidate method is called to force the label control to be repainted. An event handler is added for the Paint event for this control. A rectangle is constructed , which is the size of the control, and the rectangle is painted by calling FillRectangle . HatchBrush Another kind of brush is a HatchBrush . This class is in the System.Drawing.Drawing2D namespace. A hatch brush is completely described by a hatch style, a foreground color, and a background color, which are passed as arguments to the constructor. The hatch style belongs to the HatchStyle enumeration, and the colors are of type Color . m_brush = New HatchBrush(HatchStyle.DiagonalCross, _ m_ForeColor, m_BackColor) The program HatchBrushDemo illustrates use of a hatch brush. The general logic of the program is similar to Version 2 of ColorDemo . You can experiment by selecting colors and a hatch style. The combo box lets you pick a few of the many possible hatch styles. Figure 11-5 shows a screen capture of the running program with white foreground, black background, and a diagonal cross-hatch style. Figure 11-5. Demonstration program illustrates different hatch brushes. 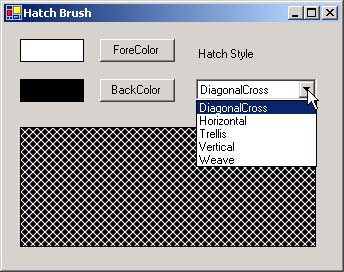 Gradient Brushes Another kind of brush are gradient brushes, which can change color gradually as you move across the shape. There are two classes of gradient brush, both in the System.Drawing.Drawing2D namespace: You can consult the SDK documentation for details about the PathGradientBrush class. There are several overloaded constructors for LinearGradientBrush . For example, you can construct a linear gradient brush from two points and two colors, representing starting and ending points and colors. lgbrush = New LinearGradientBrush(pt1, pt2, color1, color2) The program GradientBrush illustrates use of a linear gradient brush. The general logic of the program is similar to HatchBrushDemo . You can experiment by selecting starting and ending colors. Figure 11-6 shows a screen capture of the running program with a gradient that shades from white to black. Figure 11-6. Demonstration program illustrates different linear gradient brushes. 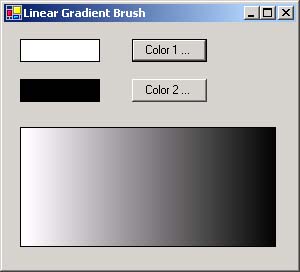 TextureBrush The TextureBrush class defines brushes that can be used to fill a shape based on a pattern stored in a bitmap. We will discuss bitmaps later in the chapter, and then you should be able to create your own texture brushes based on the SDK documentation. Standard Brushes Besides all the various kinds of custom brushes you can create, there are a number of standard solid brushes that correspond to the standard colors. The Brushes class has a read-only property for each of the standard colors, such as Brushes.Black , Brushes.Red , and Brushes.Blue . | 