| Our drawing code up until now has been straightforward, but it is not as efficient as it could be. In OnPaint we always redraw the entire client rectangle, whether it is necessary or not. The PaintEventArg argument that is passed to OnPaint and to paint event handlers contains a property ClipRectangle , which indicates the rectangle in which to paint. By paying attention to this clipping rectangle , you can make your painting code more efficient. There are two ways in which the clipping rectangle can be set. The first is by the systemfor example, when part of a window is obscured by another window and then uncovered. The second is by the program through a call to the Invalidate method of the Control class. This method has several overloaded versions. Either a Rectangle or a Region [2] can be passed as a parameter to Invalidate . As part of a window gets covered up and calls to Invalidate are made, an invalid region is built up that represents what must be repainted. The clipping rectangle is the smallest rectangle that contains the invalid region. [2] The Region class is used to describe the interior of a graphics shape that consists of rectangles and paths. The program InvalidateDemo illustrates various scenarios in which portions of a window can become invalidated and repainted. To illustrate what is being painted on any given call to OnPaint , an array of brushes of different colors is created, and each time OnPaint is called, a different brush is used, cycling through all the brushes. Version 1 of this program just paints the entire client area with the current brush.  Public Class Form1 Inherits System.Windows.Forms.Form #Region " Windows Form Designer generated code " ... Private m_back As Brush() = {Brushes.Beige, _ Brushes.Blue, Brushes.Coral, Brushes.Cyan, _ Brushes.Gold, Brushes.Green, Brushes.Ivory, _ Brushes.Magenta, Brushes.Red, Brushes.Yellow} Private Function NextBrush() As Brush Static Dim nexti As Integer = -1 nexti += 1 If nexti >= m_back.Length Then nexti = 0 End If Return m_back(nexti) End Function Protected Overrides Sub OnPaint(_ ByVal e As System.Windows.Forms.PaintEventArgs) Dim g As Graphics = e.Graphics Dim crect As Rectangle = New Rectangle(_ New Point(0, 0), Me.ClientSize) g.FillRectangle(NextBrush(), crect) MyBase.OnPaint(e) End Sub End Class Public Class Form1 Inherits System.Windows.Forms.Form #Region " Windows Form Designer generated code " ... Private m_back As Brush() = {Brushes.Beige, _ Brushes.Blue, Brushes.Coral, Brushes.Cyan, _ Brushes.Gold, Brushes.Green, Brushes.Ivory, _ Brushes.Magenta, Brushes.Red, Brushes.Yellow} Private Function NextBrush() As Brush Static Dim nexti As Integer = -1 nexti += 1 If nexti >= m_back.Length Then nexti = 0 End If Return m_back(nexti) End Function Protected Overrides Sub OnPaint(_ ByVal e As System.Windows.Forms.PaintEventArgs) Dim g As Graphics = e.Graphics Dim crect As Rectangle = New Rectangle(_ New Point(0, 0), Me.ClientSize) g.FillRectangle(NextBrush(), crect) MyBase.OnPaint(e) End Sub End Class As an experiment, build and run this program. Minimize the window and restore it. Do this several times. Each time, you will see a different color displayed, as the entire client area has become invalidated when the window was minimized. As a second experiment, create several instances of another Windows program (e.g., Notepad). Then cover different portions of the InvalidateDemo main window with the other windows, and then minimize these other windows. You should see rectangular areas that are uncovered painted with a different color. (As you drag a window over the InvalidateDemo window, you may also see a pattern of changing colors, reflecting numerous Paint events.) Spy++ and Windows Messages Visual Studio .NET comes with a useful tool for investigating the underlying Windows platform. You can start Spy++ from the Tools menu. You can then "spy" on a window, observing all the Windows messages that are sent to the window, by the following procedure (which we also introduced in Chapter 7): -
Use the menu Spy Find Window to bring up the Find Window dialog. -
Select the Messages radio button from the Show group . -
Drag the Finder tool  over the window you want to spy on and release the mouse button. over the window you want to spy on and release the mouse button. -
Click OK in the Find Window dialog. Now as you interact with the window you are spying on, you will see Windows messages displayed in the spy window, as illustrated in Figure 11-8. Figure 11-8. Spy++ displays Windows messages for window you are spying on.  | The Windows messages you are seeing represent a low-level view of the Windows operating system, and with the .NET Framework, you are working at a much higher, more abstract level. With the Spy++ tool, you can observe WM_PAINT messages, which correspond to Paint events. Invalidating a Window Programmatically The changing colors we observed in our demonstration program represent the effect of the window being covered by another window, resulting in a portion of the window becoming invalid. Another scenario for a portion of a window to become invalid is for the method Invalidate to be called. As discussed previously, this method has several overloaded versions, and either a Rectangle or a Region can be passed as a parameter to Invalidate . Version 2 of the InvalidateDemo program illustrates drawing a square at the point where the mouse is clicked. Code is added to store a starting point and a size . The Load event is handled to initialize the square, and the MouseDown event is handled to change the starting point to the location where the mouse was clicked. Invalidate is called with no parameters, which results in the entire client area being invalidated. Public Class Form1 Inherits System.Windows.Forms.Form #Region " Windows Form Designer generated code " ... Private m_start As Point Private m_size As Size ... Protected Overrides Sub OnPaint(_ ByVal e As System.Windows.Forms.PaintEventArgs) Dim rect As Rectangle = _ New Rectangle(m_start, m_size) Dim g As Graphics = e.Graphics Dim crect As Rectangle = New Rectangle(_ New Point(0, 0), Me.ClientSize) g.FillRectangle(NextBrush(), crect) g.DrawRectangle(Pens.Black, rect) MyBase.OnPaint(e) End Sub Private Sub Form1_Load(ByVal sender As Object, _ ByVal e As System.EventArgs) Handles MyBase.Load m_start = New Point(5, 5) m_size = New Size(50, 50) End Sub Private Sub Form1_MouseDown(ByVal sender As Object, _ ByVal e As System.Windows.Forms.MouseEventArgs) _ Handles MyBase.MouseDown m_start = New Point(e.X, e.Y) Invalidate() End Sub End Class Build and run the program. Try clicking the mouse at different locations. You should see the square drawn at the new location, and the background color of the entire client area is changed. Invalidating a Specific Rectangle Invalidating the entire client area is normally not the best thing to do, because the clipping region is not optimized, and the entire client area is always repainted. Version 3 of InvalidateDemo illustrates a better approach, where only the new square is added to the invalid region. Private Sub Form1_MouseDown(ByVal sender As Object, _ ByVal e As System.Windows.Forms.MouseEventArgs) _ Handles MyBase.MouseDown m_start = New Point(e.X, e.Y) Dim rect As Rectangle = New Rectangle(m_start, m_size) Invalidate( rect ) End Sub Build and run this program. Now the entire client area is not repainted. Although the Paint event code still fills the client rectangle, it is clipped to the invalid region. Figure 11-9 illustrates several squares drawn with different colors in response to a number of mouse clicks. Figure 11-9. Output is clipped to the invalid region. 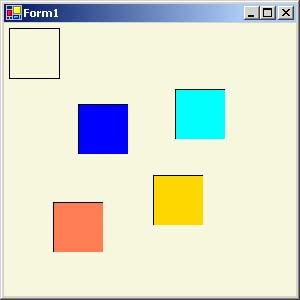 Who Does the Clipping? There are two aspects to optimizing drawing code. The first is to be careful when you call Invalidate to pass the proper clipping rectangle (or region). The second is to make use of this information in OnPaint to restrict your drawing code to the clipping rectangle. Our example program illustrates the first optimization but not the second. This optimization is done for you automatically by GDI+, as long as you help by passing the proper clipping rectangle or region to your Invalidate calls. Your OnPaint code blasts out pixels everywhere, but GDI+ clips for you. In the second optimization, you are more smart in your OnPaint code. For example, suppose you are looping over a list of shapes. If one of your shapes lies totally outside of the invalid rectangle, there is no need to draw it. Is this second optimization worth the effort? It depends on how long drawing the element takes as opposed how long the logic takes to test whether the element should be drawn. A reasonable approach is to not implement the second optimization right away. If the drawing code appears sluggish , you may then wish to investigate whether you can gain an improvement by performing the second optimization. |
