Saving Images for the Web
| The full-blown version of Photoshop ships with a second program called ImageReady, which is used to optimize images for the Web. It helps you find the best combination of file format, image size, and image quality to place the image on a Web page so it will load quickly and look as good as possible. Elements has a feature, which is simply called Save for Web. In a related vein, Elements allows you to optimize images before sending them in email. We'll look at these options now.
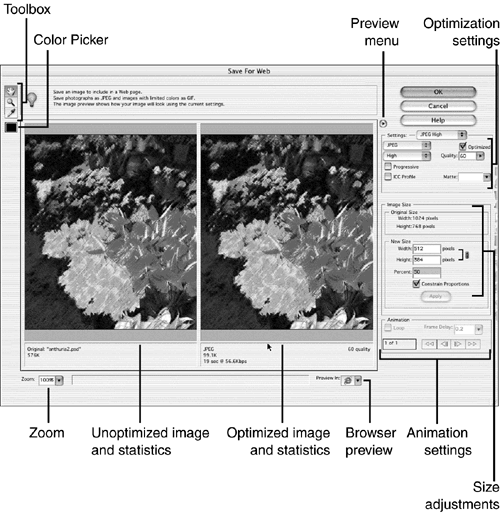
Optimizing Images for the WebElements makes optimizing a photo or a graphic easy and almost automatic. Instead of saving your work in the usual way, choose File, Save for Web or click the Save for Web button. You'll open a dialog box like the one in Figure 22.5. Figure 22.5. You can see how your changes affect the quality of the art, and decide what's acceptable. Here you can try out different ways of saving your picture, and see which method gives you the smallest file with the least degradation to the image. Yes, degradationevery time you save a picture as a file smaller than it was originally, you lose some data. If you save the same picture several times in the compressed format, you can end up with so much lossand so little data remainingthat your photo starts to look like a seventh generation photocopy, barely visible. This is not a good thing to do. Always save the original in a noncompressed format like PSD. When you convert it for the Web, compress it and save it only once. There are three formats that all Web browsers can open automatically: JPEG, GIF, and PNG. If your browser has a QuickTime plug-in installed, it can also open TIFFs, but there's no guarantee that everyone with whom you want to share your pictures has QuickTime available. After displaying your image in the Save for Web dialog box, Elements suggests a suitable image format compatible to the Web. You can change to a different format if you don't like the displayed results. I'll get to those formats shortly, but first let me explain a bit more about the dialog box. The left pane shows your unoptimized image. On the right is your image as it might appear after optimization. Your considerations don't stop there, however. By clicking the right-pointing arrow and opening the Preview menu, you can change to various modes that simulate how your graphic will look when optimized and then displayed on a generic Windows monitor, a Mac monitor, or with its color profile. (You might select this if you are using a profile and you want to see how the image will look when printed.) Notice that the file size for both the original and optimized images is displayed underneath each pane. From this same menu, you can adjust the download time to match what you think most of your visitors will be using. By default, 28.8Kbps modem speed is used to calculate the download times shown below the optimized image. You can zoom in or out of the image using the Zoom list at the bottom left. You can also zoom in by selecting the Zoom tool from the toolbox in the upper left and clicking with it on the image. Press Cmd/Alt and click with the Zoom tool to zoom out. You can move the image within the frame by dragging with the Move tool, to view hidden sections of it. If you have more than one Web browser installed (which you might, if you are seriously testing graphics for the Web), you can switch from one to another using the list on the lower right. Finally, after adjusting the view, you're ready to change from one optimization type to another. Select the type you want, such as JPEG Medium, from the Settings list. The options displayed in the Optimization Settings area have been set to values that typically provide the best quality image for that setting. However, you can still adjust the individual options as needed. In the following sections, I'll explain each of these options. JPEG (Joint Photographic Experts Group)As you may recall from our discussion for file formats earlier in this chapter, JPEG is the most commonly used Web file format. Depending on your needs, JPEG is probably the best file format for you, too. It is great for photographs and other continuous tone (full-color) images, primarily because it lets you use 16 million different colors. (Of course, some Web browser programs, and some older monitors , can't handle that color depth. Instead, they display a reasonable approximation of your artwork.) JPEG maintains color information, but does however employ a lossy compression scheme, which means that you can adjust and reduce the file sizeat the expense of the image quality. It does this by examining adjacent pixels and averaging them against those closest . When you select JPEG High, JPEG Medium, or JPEG Low format from the Settings list, the options appear. The differences between high, medium, and low relate to the quality of the result, and thus, the amount of lossy compression. With Low, you'll get a smaller file, but with a greater loss of clarity. If your image will only be seen in a very small format, that may not be a big deal, and with some graphics, even Low compression results in a nice-looking image. After selecting the JPEG format you want from the Settings list, you can change other options as desired. You can choose Optimize to compress the file as much as possible in that format; however, you should be aware that some older browsers do not support this extra-optimized JPEG format. Adjust the quality level (compression level) by opening the list and dragging the slider. Choose Progressive to display the image in a browser, first at low quality, then gradually improving until the image is displayed in its saved format. Select ICC Profile to save the color profile ( assuming you're using one) with the image; some browsers can use the profile to do simple color corrections for the user 's monitor on the fly. If your image includes areas that are transparent, they must be filled with some color because the JPEG format doesn't support transparency. Open the Matte list and select a color that closely matches your Web page background. GIF (Graphics Interchange Format)If you save an image as a GIF file, you lose color information. The millions of colors present in a photograph are reduced to a palette of only 256 colors. That's how GIFs shrink files. If your picture happens to have relatively few colorsfor instance, if it's a drawing rather than a photoyou won't lose any quality. In fact, if you know that there are only six colors, you don't even need to save the other 250. Obviously, GIF is not as good as JPEG for continuous tone art, but it's great for line art, logos, and anything with limited color. GIF also lets you save files with transparent backgrounds, which is extremely useful when you are creating Web buttons or other round graphics and you want the background of the Web page to appear around their edge. Furthermore, you can animate a GIF. Even though GIF supposedly uses 256 colors, the reality is that there are only 216 of them that Mac and Windows computers have in common. These are said to be "Web-safe" colors, because they'll look the same on both kinds of machines. So in the process of converting to GIF, a color table of the most common 256 colors in the image is generated. When a color exists in the image but not on the table, a close color is chosen . When selecting GIF from the Settings list, your first consideration is whether or not to use dithering. In Elements, and in other graphics programs, dithering mixes colors so that when you convert an image to a GIF or to an 8-bit PNG, you don't notice the missing colors. When you select a GIF that uses dithering (or PNG, as you'll see in the next section), you can select the dithering method and the dither amount. A higher amount dithers more colors, but might increase file size. After selecting a GIF dithering option from the Settings list, you can select the following dither options from the drop-down list in the Optimization Settings area:
After selecting a GIF with or without dithering, adjust the individual options if desired. Select Interlaced to display a lower-resolution version of the image quickly, while the higher-resolution version is downloading. Choose a method for generating the list of colors for the color table from the second drop-down list. You have these choices:
In the Colors box, you can enter a number lower than 256 and reduce the number of colors in the color table, and thus, the file size. The Web and Custom color table methods allow you to select Auto from this list, in order to have Elements tell you the optimal number of colors that provides the best quality in a small file size. To preserve transparency in your image, you must turn on the Transparency option; otherwise , transparent and semitransparent pixels are filled with the Matte color you select. Turning on Transparency creates jagged edges on round objects, so you might consider leaving it off, and instead selecting a Matte color that closely matches your Web background color. For animated graphics, make sure the Animate option is selected. PNG (Portable Network Graphics)There are two kinds of PNG: 8-bit and 24-bit. The PNG-8 format uses 8-bit color, which means that each image can contain only 256 different colors. Like GIF, PNG-8 compresses solid areas of color very well while preserving sharp detail, such as that in line art, logos, or illustrations with type. Because PNG-8 is not supported by older browsers (although it is supported by the not-so-old versions of those same browsers), it might be a good idea to avoid this format for situations in which your image must be accessible to as much of the Web-viewing audience as possible. The PNG-8 format uses a lossless compression method, with no data discarded during compression. However, because PNG-8 files are 8-bit color, optimizing an original 24-bit imagewhich can contain millions of colorsas a PNG-8 will degrade image quality. PNG-8 files use more advanced compression schemes than GIF, and can be 10%30% smaller than GIF files of the same image, depending on the image's color patterns. The PNG-24 file format uses 24-bit color and is suitable for continuous tone images. PNG-24 also uses a lossless compression scheme. However, PNG-24 files can be much larger than JPEG files of the same image. The PNG-24 format is recommended only when working with a continuous tone image that includes multilevel or variable transparency, such as you'd have in an antialiased image on a transparent layeran image whose edges are blurred with varying levels of transparency so that the edges are smoother and less jagged. You might also use varying levels of transparency to blend the edge of an object with its background, again smoothing out the transition. (Multilevel transparency is supported by the PNG-24 format, but not the JPEG format.) If you'd consider GIF for an image, consider PNG-8 as well. It might give you a smaller file, and can do the job well. If you're thinking about JPEG, consider PNG-24 if your picture has multilevel transparency. If it's a straight image, JPEG will probably give you a smaller, more efficient file. If you select PNG-8 from the Settings list, you'll be presented with options similar to those described in the GIF section. If you select PNG-24 instead, you'll see only some of those options listed. Choose Interlaced to display a lower-resolution version of your image as the higher-resolution one is downloading. Select the Transparency option to preserve transparency in your image, or select a Matte color with which to fill them.
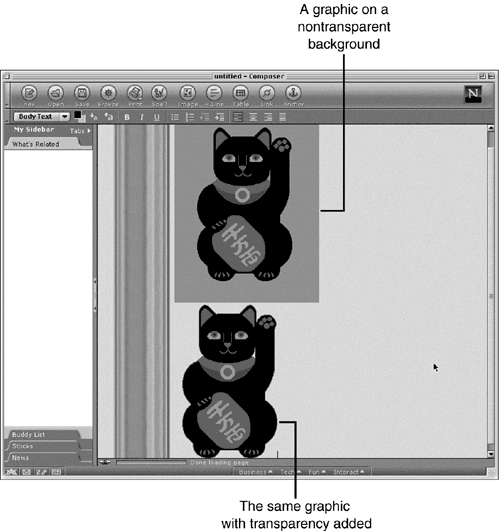
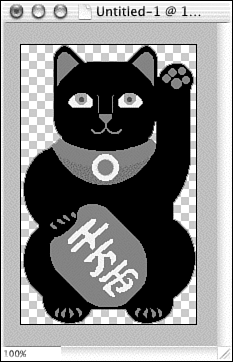
Making Transparent GIFsOne trick of Web graphics, to make them appear something other than rectangular, is to focus on a subject inside the image space and try to make the edges disappear. In this case, the last thing you want is to paste down a graphic and have it show up in a white or colored square instead of on your page background. Figure 22.6 shows what this looks like. Figure 22.6. This is one of biggest problems beginners face, and it's also one of the easiest to solve. To make a transparent GIF, follow these steps:
|
EAN: 2147483647
Pages: 349


