| Dragging edit points is one way to trim in the Timeline. You can also drag an edit point and ripple the remaining edits in the sequence at the same time without having to delete a gap or use an additional track. You do this with the Ripple tool. The Ripple tool is the fourth tool from the top in the Tool palette. 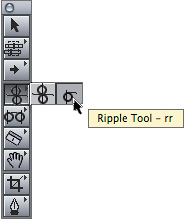
When you use the Ripple tool to trim an edit point, you can drag an In or Out point of one clip into its neighboring clip. All the clips that follow are automatically pushed down or pulled up the length of the trim. You can also use shortcuts along with the Ripple tool to trim and ripple specific amounts. Using the Ripple Tool Using the Ripple tool, like dragging an edit point, adjusts either the head or tail of a clip in a sequence in either a forward or backward direction, making the clip longer or shorter. Any change you make with the Ripple tool will cause a change in the overall length of the sequence. 1. | In the Browser, duplicate the Amanda Starting sequence, as you did earlier in this lesson. Name the new sequence Ripple Trimming, and double-click to open it in the Timeline.
This is the same sequence that was loosely cut. This time, you will trim the edit points using the Ripple tool.
| 2. | In the Tool palette, click and hold the Roll tool (fourth from the top). When you see the Ripple tool icon, which looks like a single roller, click it. You can also press the keyboard shortcut RR to select this tool.

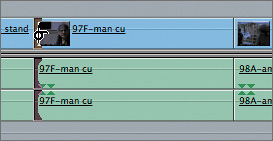
| 3. | Don't click or drag, but just move your pointer over the middle of the 97F-man cu clip.
The Ripple tool has an X on it, indicating that the tool can't be applied to this area. You can only use the Ripple tool on an edit point.
| 4. | Move the Ripple tool toward the clip's Out point.
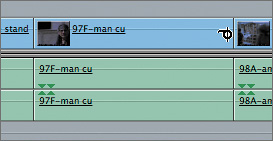
When the Ripple tool gets close to the Out point, the X disappears, and the tail of the Ripple icon points toward the inside of the clip you will be trimming.
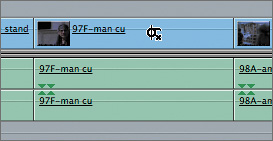
| 5. | Move the Ripple tool to the clip's In point, and click the inside edge of the In point.
When the Ripple tool is positioned over the In point, the tail points inward toward the body of the clip you are trimming. This is a visual clue so you know which clip you are adjusting. When the In point is correctly selected, just the In point of this clip is highlighted.
| 6. | Play this clip and stop the playhead just before the man says, "Hey, bro." Now drag this edit point right to snap to the playhead location.
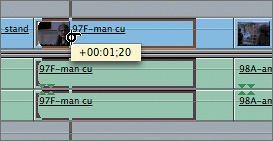
As you drag with the Ripple tool, an information box appears with just the trim amount. There is no gap left over, and all the clips in the sequence are pulled up by the amount of the trim.
NOTE Both the audio and video of a linked clip are trimmed together, just the same as when you dragged the edit point with the default Selection tool. | 7. | Play the previous clip in the sequence, the 97D-coffee stand clip.
This clip stops early before Amanda settles on watching the man. You will need to trim the Out point to lengthen this clip. Since you need to add more of this clip into the sequence, using the playhead for placement will not be helpful here.
| 8. | Click the Out point of the 97D-coffee stand clip.
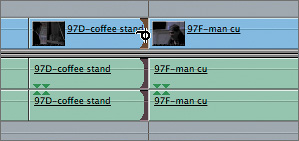
Now the tail of the Ripple icon points inward to this clip, not to the 97F-man cu clip.
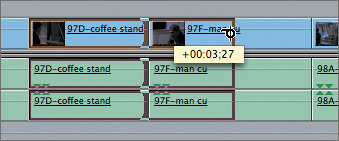
| 9. | Drag this Out point to the right about 4 seconds, but don't release the mouse.
As you drag, the clip boundary box in the Timeline expands to indicate the new length of the clip.
In the Canvas image area, you see a two-up display. The image on the left updates the new Out point as you drag. The image on the right displays the first frame of the clip that follows in the sequence.

NOTE When you drag an edit point to the end of the original source clip's limits, a note will appear in the information box, indicating you've reached the media limit on that clip. | 10. | Release the mouse.
The following clips in the sequence are pushed down the Timeline toward the right the length of the trim.
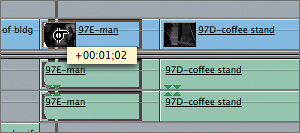
| 11. | Move the playhead back to the 97E-man clip, and play this clip. Park the playhead just before the man says, "Thank you, bro."
Notice that even though you have the Ripple tool selected, when you move the playhead in the ruler area of the Timeline, the default pointer appears.
| 12. | Using the Ripple tool, drag the In point of the 97E-man clip to the right to snap to the playhead location.
When you drag a clip's edit point to make it shorter using the Ripple tool, the boundary box of the clip shortens to display a representative clip length. When you release the mouse, all the clips that follow are pulled up toward the left by the trim amount.
|
TIP If you don't want the Ripple tool to snap to the playhead, press N to turn off snapping as you trim a clip.
Rippling with Durations and Shortcuts Sometimes you may have a fixed trim amount in mind. It could be a few frames, or 10, or 30. Just as you typed a move duration in the Timeline to move a clip, you can also type a trim amount to trim a clip. You can also use a few keyboard shortcuts to trim an edit point. 1. | Play the first clip in the sequence, the 97A-out of bldg clip.
This clip has a lot of pad at the head of the clip. You will trim 5 seconds off the head of this clip, which will start the clip 5 seconds later.
| 2. | Use the Ripple tool to click the inner edge of that clip's In point.
| 3. | Type 5.00, or 5. (5 followed by a period).
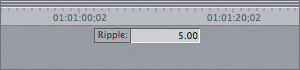
A Ripple information box appears in the center of the Timeline with the amount of the trim.
| 4. | Press Return to enter that trim amount.
The selected In point is trimmed forward by that amount, and no gap is created.
| 5. | To find the next clip to trim, you will use a Find command. Press Shift-Z to see the sequence in full view. Move the playhead to the head of the sequence, and press Cmd-F. In the Find dialog, enter 98B-man in the Find field. Click the Find All button (not the Find button).
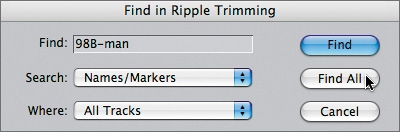
In the Timeline, the playhead jumps forward to the first 98B-man clip and highlights all clips named 98B-man in this sequence.
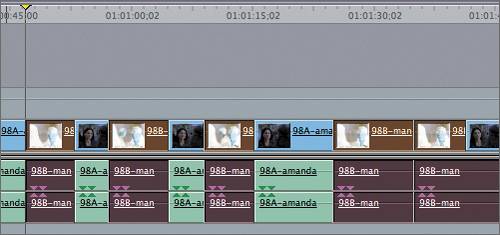 | 6. | Move the playhead to the third highlighted 98B-man clip. Deselect the highlighted clips, and press Option-+ to zoom into the playhead location. Play this clip.
At the end of this clip, you hear Amanda say, "Ahh." She says it again on camera in the following clip so you can trim it from this clip.
| 7. | To ripple using a keyboard shortcut, click the Out point of this 98B-man clip, and press the [ (left bracket) key.
Pressing the left bracket key trims the selected Out point one frame to the left, or one frame earlier. The following clips in the sequence are pulled up by one frame. You can press the bracket key repeatedly to trim additional frames. However, you will need more than a few frames to trim off Amanda's "Ahh."
| 8. | To trim by a slightly larger amount, press Shift-[ (left bracket).
The Out point jumps a default number of frames.
NOTE Using Shift with a bracket key applies a multi-frame trim size to the trim. You can change this amount (from 1 frame up to 99 frames) in the Editing tab of the User Preferences window. | 9. | If necessary, press Shift-[ a few times to remove Amanda's "Ahh." You can also add frames back by pressing ] (right bracket) or Shift-].
Any change you make using these keyboard shortcuts ripples the following clips in the sequence.
TIP You can also press the < or > keys to trim the selected edit point one frame backward or forward. You can use Shift with these keys to trim the multi-frame trim amount. | 10. | Press A to restore the default Selection tool.
|
|