| You can adjust the audio level of a clip directly in the Timeline after editing it into the sequence, or in the Viewer before placing it in a sequence. Adjusting levels in the Timeline adjusts audio for each sequence clip but does not change the audio level for the master clips in the Browser. Let's adjust the audio levels of the current sequence clips in the Timeline. Working with Clip Overlays To adjust the audio level in the Timeline, you first need to see a visual representation of the overall audio level. To do this, you will work with the Clip Overlays function in the Timeline. As a viewing option, Clip Overlays can be turned off and on whenever you like during the editing process. | | 1. | If you completed the previous "Project Tasks" steps, continue working in the Audio Needs Work sequence. If not, open the Changing Audio Levels sequence, which has the "Project Tasks" changes already made.
| 2. | Find the Clip Overlays control in the Timeline next to the Track Height control.
 | 3. | Click the Clip Overlays control to turn on the clip overlay lines.
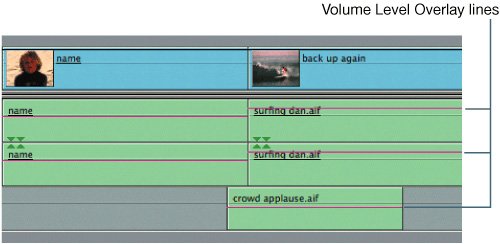 A thin pink line appears in each audio clip, representing the overall volume of that clip. This line is called the Volume Level Overlay line. There is also a black overlay line for the video portion of the clip, but you will work with that in a later lesson. A thin pink line appears in each audio clip, representing the overall volume of that clip. This line is called the Volume Level Overlay line. There is also a black overlay line for the video portion of the clip, but you will work with that in a later lesson.
| | | 4. | Press Option-W to turn the overlay lines in the Timeline off and on. Leave Clip Overlays on.
Note In the Timeline, the control appears to be sunken or depressed when active and raised when not active or selected. You can adjust the overall volume of a clip by dragging the Volume Level Overlay line up and down. Let's correct the out-of-range audio clips in the current sequence.
| 5. | Play the name clip in the sequence, and look at its current audio level in the Audio Meters.
This clip is at a good level. It does not need adjusting.
| 6. | Play the surfing dan.aif clip and look at its level in the Audio Meters. To hear it by itself, turn off sound for the entire A3 track.
Tip The sound bites and music are the primary audio tracks in this short sequence. It is important to set their levels first. Then you can add or mix in the desired levels of the two sound effects. This music clip is so loud that it's peaking at a constant 0 dB in the Audio Meters. The audio level must be brought down to an acceptable range.
| 7. | Move your pointer over the clip's pink Volume Level Overlay line in the A1 track of the surfing dan.aif clip.
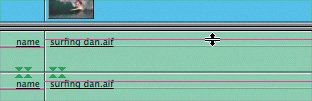 The pointer turns into the up-down resize arrow.
| | | 8. | Begin to drag the line down to lower the sound.
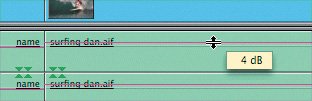 As you drag down, an information box appears, indicating the new dB level. This is a relative level of sound for just this clip.
Note As you move one Volume Level line, the line on A2 also moves. This will be explained in the following exercise. | 9. | Drag the Volume Level line down to 0 dB and let go. Play the clip again and watch the Audio Meters to see if the sound is in the proper range.
The audio level is still a little too high.
| 10. | Drag the Volume Level line down until the clip's audio level plays back between 12 and 9 dB in the Audio Meters.
|
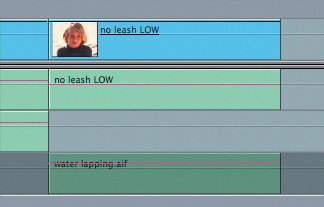
Working with Stereo Pairs When you edit a stereo music track from a CD, a clip with two tracks will appear in the Timeline because it's a stereo track. The same is true with DV and HDV footage. When you capture from these sources, the audio is captured as a stereo pair. In the Timeline, whenever you select one of the tracks in a stereo pair, both tracks are selected. Also, adjustments made to one track of a stereo pair are automatically applied to the other track. There are times, however, when you need to work with only one track of the stereo pair. 1. | Play the no leash LOW clip in the Timeline.
The audio level for this clip is too low and needs to be adjusted.
| 2. | Select the A1 track of this clip.
If Linked Selection is active in the Timeline, all the tracks of the clip will be highlighted.
| 3. | Click the Linked Selection control to turn it off, or press Shift-L.
| | | 4. | Deselect the no leash LOW clip and then reselect the A1 track.
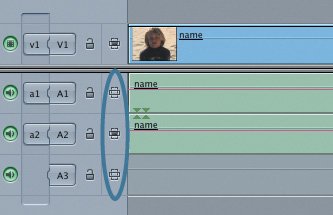
Both of the audio tracks are selected together.
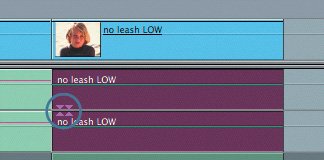 Between the two audio tracks are stereo pair indicators. These triangles indicate that the two tracks are bound together as a stereo pair.
| 5. | Raise and lower the audio level on the A1 track or the A2 track.
The Volume Level lines in both tracks move when you adjust either one of the stereo pair.
| 6. | To take a closer look at the audio levels, turn on the waveform display by pressing Cmd-Option-W.
The flat line indicates that there is no audio on the A2 track. All usable audio is on the A1 track.
| 7. | Turn off the waveform display, and bring the audio Volume Level line of the stereo pair back to 0 dB.
|
Separating a Stereo Pair In the preceding steps, the no leash LOW clip was originally recorded with a single microphone feeding only one channel. But when it was captured, both channels of the tape source were captured together. The goal now is to separate out and delete the A2 track, which doesn't have any audio, and duplicate the A1 track to help pump up the volume on this clip. In order to do this, the stereo pair indicators must be turned off so that you can access each of these tracks separately. | | 1. | With the no leash LOW audio tracks selected, choose Modify and look at the Stereo Pair menu option. If a checkmark is present, select the option to turn off Stereo Pair.
This option will turn off stereo pair status on two clips that are currently a stereo pair. Or it will turn on stereo pair status for two clips that are not currently a stereo pair. The check indicates that stereo pair is the current status of the selected clips. When you select this option, the checkmark is removed, and the stereo pair status is turned off for the selected items, allowing you to make changes to individual audio tracks.
 The stereo pair indicators have disappeared from between the two tracks. The two tracks can now be adjusted separately.
Note If you select a clip in the Timeline with just one audio track, such as one of the mono sound effects, the Stereo Pair menu option is dimmed. | 2. | Deselect the tracks, and click the A2 audio clip to select just that one track. Delete the A2 audio clip.
 | | | 3. | To duplicate the good audio, click the A1 audio clip and press Cmd-C to copy it. Move the playhead to where you will edit the copied clip, at the head of the no leash LOW clip.
|
The next step is to paste the audio clip you just copied to the A2 destination track. Since this is not a new source, you do not use the clip's source control to patch it to the A2 track. Instead, you use the Auto Select controls to indicate which track will be used. When copying and pasting clips within the Timeline, the clip is automatically placed on the highest track for which the Auto Select control is turned on. For this exercise, you will toggle off the Auto Select control for all audio tracks other than A2. 4. | Toggle off the Auto Select controls for each audio track except A2.
 | | | 5. | Press Cmd-V.
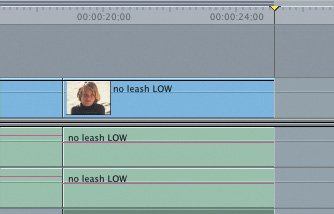 The copied clip from the A1 track is pasted onto the A2 track at the playhead location.
| 6. | Play this clip and look at the Audio Meters.
Notice that both tracks are playing on the same side or channel of the Audio Meters. In the next step, you will change this.
| 7. | To make these two audio tracks a stereo pair, Shift-click the A1 track so that both A1 and A2 are selected, and choose Modify > Stereo Pair, or press Option-L.
Now, if you click just one audio track, they are both selected again.
Tip All the linking keyboard shortcuts involve the letter L. | 8. | Press Cmd-S to save these changes to your project.
| 9. | Now turn the Linked Selection function back on in the Timeline.
When you click the V1 portion of this clip, all three tracks are highlighted.
| 10. | Toggle all Auto Select controls back on.
|
Keeping Linked Clips in Sync When video and audio are captured together, the audio is in sync with the video, meaning that when someone speaks, the correct sound comes out of that person's mouth at the correct time. With Linked Selection on, the video and audio portions of a clip are always adjusted together. They will get out of sync only if you lock one track and make an adjustment to other tracks in the same clip. But if Linked Selection is off, adjusting just the video or audio portion of a clip can cause the tracks to go out of sync from each other. | | 1. | Copy the name clip and paste it about five seconds past the end of the current sequence. Deselect the clip.
Note It might be helpful as you are working through this exercise to turn off the clip overlay and waveform displays. They are not required and may make certain items harder to see. | 2. | Toggle off Linked Selection in the Timeline.
| 3. | With the default Selection tool, drag the video of the name clip to the right about two seconds and play the clip. Deselect the clip.
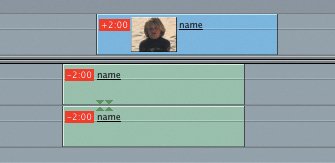 A red out-of-sync indicator appears with a positive duration in the video track to indicate the amount of the forward move. In the audio tracks, a negative duration of the same amount appears to indicate how far behind or out of sync the audio tracks are from the video.
| 4. | Press Cmd-Z to undo this move.
Tip An easy fix for any mistake, such as when you throw your clips out of sync, is to undo what you just did by pressing Cmd-Z. | | | 5. | Choose Edit > Redo, or press Shift-Cmd-Z, to redo the move and return the clip to its previous out-of-sync configuration.
In the out-of-sync clip, if you really don't want to move the video from this location, you must decide what to do with the audio. You have three choices:
Leave the audio where it is, and it will remain out of sync. Move the audio's position in the Timeline to be aligned with the video again and return to sync. Slip the audio so that the portion under the video clip is in its original sync.
| 6. | Ctrl-click the red out-of-sync indicator in one of the audio tracks and choose Move into Sync from the shortcut menu.
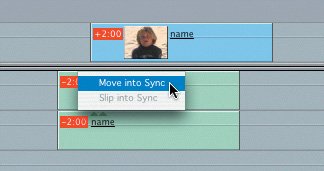 Both audio tracks are literally moved in the Timeline to catch up with the video. The red out-of-sync indicators are removed from the clip.
| 7. | Now drag the audio portion of the clip to the right two seconds and play the clip.
The audio is obviously out of sync from the video.
| | | 8. | Ctrl-click one of the audio out-of-sync indicators, and this time choose Slip into Sync from the shortcut menu. Play the clip.
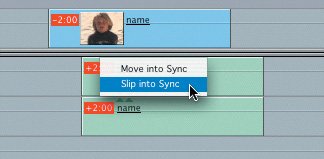 Slipping a track back into sync will not change its location in the Timeline. This adjusts the selection of audio material so that it slips back into sync with the video.
| 9. | Turn Linked Selection back on and delete this extra name clip.
|
|