Quickly Formatting Shapes and Diagrams
|
When you think about what makes up a shape’s format, it helps to understand the following two attributes of a shape (shown in Figure 2-17):
-
Its line, which forms the border around 2-D shapes or the line of a 1-D shape. You can change the line weight (its thickness), color, pattern (such as dashed or dotted lines), and line end (such as an arrowhead).
-
Its fill, which is the color and pattern of a shape’s interior. Of course, a 1-D shape such as a connector doesn’t have an interior.
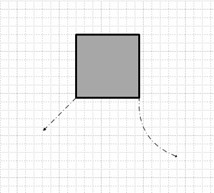
Figure 2-17: The square is a 2-D shape formatted with a fill pattern and thick line weight. The lines are 1-D shapes formatted with line ends and patterns.
You can format individual shapes to change their appearance, or you can change the look of an entire diagram all at once with timesaving formatting tools. For example, you can apply an attractive background and border to your diagram, as Figure 2-18 shows. The following sections describe other techniques for quickly formatting shapes and diagrams.
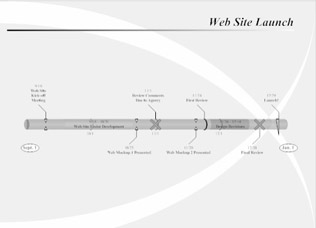
Figure 2-18: You can format individual shapes or use backgrounds, borders, and color schemes to format entire diagrams at once.
Creating Line and File Patterns
Can’t find the pattern you need? You can create your own. For example, many technical diagrams require industry-standard line and fill patterns to convey information.
| Cross Reference | For details, see “Creating Your Own Line and Fill Patterns,” page 693. |
Formatting with the Formatting Toolbar
One way to change the way a shape looks is to select the shape and then select an option from the Formatting toolbar, shown in Figure 2-19. The Formatting toolbar contains more tools than might be apparent at first glance. Some buttons include a drop-down arrow that indicates a list of additional formatting options. If you click the drop-down arrow on the button, you’ll see the options. If you click the button, you’ll apply the last format that was selected.
![]()
Figure 2-19: You can quickly change text, line, and fill attributes for shapes with the tools on the Formatting toolbar.
For example, to make the connecting lines of a network diagram thicker, select a line, and then click the drop-down arrow on the Line Weight button to display a drop-down list of line weight options. Click the one you want to apply to the selected shape.
To format several shapes at once, select all the shapes you want to format, and then format them as you would any shape. For sample techniques, see Table 2-6. You may also copy a shape’s format to another shape (or shapes) by using the Format Painter button on the Standard toolbar.
| Task | Technique |
|---|---|
| Format all the shapes in a group | Select the group, and then choose a format, such as line or fill color. |
| Format several shapes at once | Select all the shapes, and then choose the format you want them all to have. |
| Quickly repeat formatting | Format one shape, select other shapes, and then press F4. |
| Copy a shape’s format to another shape | Select a formatted shape. Click the Format Painter button on the Standard toolbar. Click a shape to paste the format. |
| Copy a shape’s format to several shapes | Select a formatted shape. Double-click the Format Painter button on the Standard toolbar. Click each shape to which you want to copy the formatting. To stop formatting, click the Format Painter button again or press Esc. |
| Tip | If you don’t see the Formatting toolbar buttons, choose View, Toolbars, Formatting. |
| Cross Reference | For details about formatting with styles, see “Understanding Text, Line, and Fill Styles,” page 681. |
| Tip | Hide shape borders If you don’t want the edges of a shape to stand out, you can remove its border (in Visio terms, its line). To do this, select the shape, click the drop-down arrow on the Line Pattern button on the Formatting toolbar, and then choose No Line. Or use the Line command on the Format menu. |
A shape cannot be stretched or resized
If you select a shape and gray box handles appear, the shape has been protected against resizing. The shape might be designed specifically not to resize because it’s based on an industry-standard size. Or the shape might include a custom property that you should use to resize it. If this is the case, right-click the shape, choose View, Custom Properties to display the Custom Properties dialog box, and see whether there are options for changing the shape’s size. You might also want to right-click on the shape, then select Format, Protection to see the shape’s enabled protections.
You can remove locks by using the Protection command on the Format menu or by right- clicking as just described. Just be aware that a shape might not interact correctly with other shapes if you remove its locks. Usually they are there for a reason. However, you can always press Ctrl+Z to reverse the effects of your action if the results aren’t what you expected.
A shape won’t accept formatting
There could be several reasons for this problem. Try these solutions:
-
Is the shape a group? Select it, and then choose Format, Behavior. If the Group Behavior options are available (not dimmed), you’ve got a group. Groups have special formatting behavior. Typically, you can subselect a shape in a group, and then apply a format, such as fill color, to that shape only. For details, see “Editing Shapes in a Group,” page 671.
-
Is the shape locked? Visio shapes can be protected against formatting. When you try to apply a style to a protected shape, you might see an error message or you might see nothing at all. For details, see “Formatting Locked Shapes,” page 687.
Formatting with the Format Commands
Sometimes it’s easier to format shapes with the commands on the Format menu. In the Line and Fill dialog boxes, you can apply several formats at once, which can be more efficient than clicking one toolbar button after another. To see line formatting options, select a shape, and then choose Format, Line. The Line dialog box appears, as Figure 2-20 shows. When you format a line, you can change its line pattern, such as dotted or solid; line weight, or thickness; color and transparency; line cap, making the ends rounded or square; and line ends. Line ends are a little tricky in that you have to remember which end of the line is the beginning (the handle with the ) and which is the end (the handle with the +). You can also round shape corners.
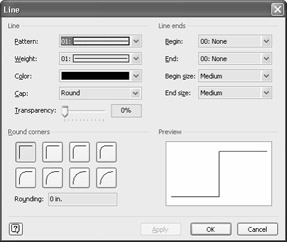
Figure 2-20: To apply multiple line attributes at once, use the Line dialog box, which lets you preview the effect of an option.
To see fill formatting options, select a shape, and then choose Format, Fill. The Fill dialog box appears, as Figure 2-21 shows. If you choose a pattern, the Pattern Color options become available so that you can choose the color that applies to the pattern alone. The Color options apply to the area behind the pattern. You can also apply a shadow to a shape in the Fill dialog box. The depth of a shape’s shadow is a function of the page properties, which means that all the shapes on a page have the same shadow depth. To change it, choose File, Page Setup, and then click the Page Properties tab to see the Shape Shadow Offset option.
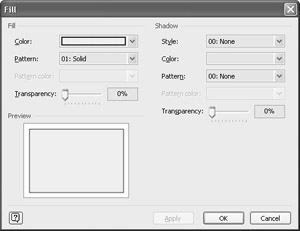
Figure 2-21: To apply multiple fill attributes at once, use the Fill dialog box.
| Tip | Reverse the direction on arrow points If you apply an arrowhead or other line end to a line and it points the wrong way, you can quickly remedy the situation by reversing the line’s ends. To do this, select the line, and then choose Shape, Operations, Reverse Ends. When you select a line, you see its endpoints, which indicate its beginning and end and tell Visio which way to apply line ends. The beginning endpoint is marked with an . The ending endpoint (for lack of a better expression) is marked with a +. |
Working with Color Schemes
The quickest way to add overall polish to a business diagram is to apply a color scheme. Visio includes several schemes of coordinated colors that you can apply automatically to all the shapes in your diagram. For example, you can apply the Coffee color scheme to a flowchart to instantly update all the shapes with different shades of brown and tan. To apply a color scheme, right-click on a page and select Color Schemes to display the Color Schemes dialog box, as Figure 2-22 shows. Choose a scheme and click Apply to see the results. If you don’t like the colors, choose a different scheme, and then click Apply again. When you find the one you like, click OK.

Figure 2-22: The Color Schemes dialog box lets you apply a set of coordinated colors to an entire diagram.
| Note | If you don’t see the Color Schemes command, you’re working in a diagram that is not designed to support color schemes. If you drag a shape from another drawing that does not support color schemes on to one that does, they might not display the color schemes properly. |
| Note | You can press Ctrl+Z to undo the results of the Color Schemes command and return to the colors you had before. |
You cannot apply a color scheme to some drawing types. Color schemes are intended for use with business diagrams, such as flowcharts, organization charts, timelines, and calendars. Most of the technical diagram types in Visio Professional do not support color schemes. The following templates include shapes that are designed to work with color schemes:
| Audit Diagram | Calendar | Marketing Charts And Diagrams |
| Basic Shapes | Cause And Effect Diagram | Organization Chart |
| Basic Flowchart | Charts And Graphs | PERT Chart |
| Basic Network | Cross-Functional Flowchart | SDL Diagram* |
| Block Diagram | Data Flow Diagram* | Timeline |
| Block Diagram with Perspective | Gantt Chart | TQM Diagram |
| New Feature Brainstorming Diagram | IDEFO Diagram* | Work Force Diagram |
| *Available in Visio Professional | ||
Even if your diagram type does not support color schemes, you can still use the Tools, Color Palette command to make numerous colors available in a drawing. This technique gives you a varied palette for even the advanced software, engineering, or database diagrams of Visio Professional.
For details about how Visio works behind the scenes when a color scheme is applied, see “Working with Color in Visio,” page 706.
The Color Schemes command is missing or nothing happens
when a color scheme is applied
The Color Schemes command appears when you right-click only when you’re working in a diagram type that supports color schemes. Otherwise, you can choose Tools, Color Palette to add colors to a diagram, but the shapes in the diagram won’t automatically take on the color scheme.
Color schemes are designed primarily to work with business diagrams. The Color Schemes command has no effect on shapes in office layouts, directional maps, and most of the engineering, network, software, and database shapes specific to Visio Professional.
Applying Transparent Colors
Transparent colors are a great formatting option in Visio. Lines, fills, and even text can have transparent color so that objects beneath show through. The trick is to use the commands on the Format menu—the toolbar buttons apply only solid colors. Select a shape, and then choose Text, Line, Fill, or Shadow from the Format menu. A Transparency slider adjusts the level of transparency for the color selected in the Color box, as Figure 2-23 shows. You can use the slider, or type a number in the box, such as 50 for 50 percent transparency—the higher the percentage, the more transparent the color.
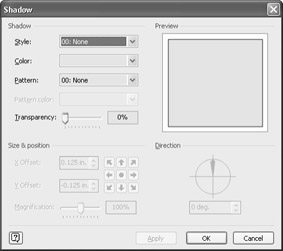
Figure 2-23: Like the Fill, Line, and Text dialog boxes, the Shadow dialog box includes an option for making a shape’s color transparent.
Setting shape shadows
Transparent colors are especially useful for creating shadows behind shapes. You can apply a shadow to a selected shape with either the Fill or Shadow command on the Format menu. To change the amount of shadow that appears, choose File, Page Setup; click the Page Properties tab; and then specify the amounts in the Right and Down boxes for Shape Shadow Offset.
Adding Backgrounds and Borders
You can add a background to your diagrams for instant polish. When you drop a background shape onto a diagram, Visio fills the background of the page with an attractive design.
If the Backgrounds stencil is not open, click the Open Shapes button on the Standard toolbar, and then click Visio Extras, Backgrounds. Drag a shape from the Backgrounds stencil onto your page. Visio automatically adds a background and sizes the background shape to fill the entire page.
Background shapes create background pages
Technically, Visio inserts a new background page when you add a background shape to a foreground page, applies the background shape to it, and then assigns the background page to your current foreground page. That’s why you might notice a new page tab after using a background shape—it’s for the new background page.
|
EAN: 2147483647
Pages: 209