Adding and Editing Pages
|
For many diagrams, it’s helpful to show details on additional pages or to spread out information across several pages. To add pages to a diagram, choose Insert, New Page. The Page Setup dialog box appears and displays the Page Properties tab. If you simply click OK, you’ll create a new page that inherits the settings of the page currently displayed in the drawing window. You don’t necessarily have to know more than that until it comes time to print, and that’s when it really helps to understand the way that Visio deals with pages. You can review page setup options at any time by choosing File, Page Setup as Figure 2-12 shows. These options affect how much room you have for your diagram and how it will print.

Figure 2-12: When you insert a page, you can give it a name, change its size and orientation, and specify other properties. In a multiple-page diagram, each page can have different properties.
| Tip | You can also insert a page without using the drop-down menu. Simply right-click on the page tabs at the bottom of the drawing screen and choose Insert Page. |
If you start your diagram with a template, a number of decisions have already been made for you about the size and orientation of pages. Each page in a drawing file can be sized and oriented differently. When you insert a new page, you can choose its attributes and give it a name, which appears on the page tab at the bottom of the Visio window, as Figure 2-13 shows. To move among pages, click a page tab.
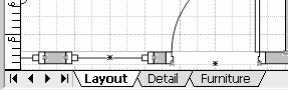
Figure 2-13: When you insert a page, you can change its size, its orientation, and other properties. In a multiple-page diagram, each page can have different properties.
Here’s what the three main tabs of the Page Setup dialog box do:
-
On the Page Properties tab, you can give the page a name, choose its measurement units, and change the depth of shadows cast by shapes when you use the Shadow command.
-
On the Drawing Scale tab, you can set a scale for the page, such as in an office layout, floor plan, or other drawing that represents real-world measurements.
-
On the Page Size tab, you can change the page orientation and preview how the page compares with the size and orientation of the paper currently specified for your printer.
The Page Setup dialog box also includes tabs for Print Setup, where you decide how your page will print; Layout And Routing, where you decide how your shapes will be laid out and how connectors will route; and Shadows, where you set the parameters for how shadowed shapes will display shadows.
| Cross Reference | For details about setting up a drawing scale, see “Setting Up Measurements in a Diagram,” page 421. |
If you’ve ever used a page layout or design application like Adobe PageMaker, you might be familiar with the concept of a pasteboard. It’s the gray area around the drawing page. In Visio, you can use this area as useful storage space when you’re arranging shapes on the page. Each page has its own pasteboard. You can drag shapes to the pasteboard that you want to keep around but don’t want to print or use just yet in a diagram. You don’t hear much about the pasteboard in Visio, but it’s useful nonetheless.
Adding, Rearranging, and Removing Pages
You can work with the page tabs to quickly add pages, change their order, or remove pages you no longer need. Table 2-5 summarizes the techniques.
| Task | Technique |
|---|---|
| Add a page | Right-click a page tab, and then click Insert Page. Choose settings in the Page Setup dialog box, and then click OK to insert a new page after the one that’s displayed. |
| Remove a page | Right-click the page tab for the page you want to remove, and then click Delete Page. |
| Rearrange pages | Right-click any page tab, and then choose Reorder Pages. In the Page Order box, select a page, and then click the Move Up or Move Down button to change its order in the list. Click OK. |
| Tip | Add pages in Drawing Explorer You can also add a page in the Drawing Explorer. If the Drawing Explorer is not visible, choose View, Drawing Explorer Window. Right-click the Foreground Page folder or Background Page folder, and then choose Insert Page, which opens the Page Setup dialog box and displays the Page Properties tab. |
Using Background Pages
Each Visio drawing or diagram contains at least one page: its foreground page. A drawing might also contain one or more background pages. You can assign background pages to other pages in the Page Setup dialog box. A background page appears behind another page, like the bottom page in a stack of transparencies. Whatever’s on the bottom shows through on the top page. In Visio, a background page can include borders, titles, company logos, or other shapes that you want to reuse, as Figure 2-14 shows. What’s especially convenient is that you can assign one background page to more than one page so that the shapes on the background page show up in as many of your drawing’s pages as necessary.
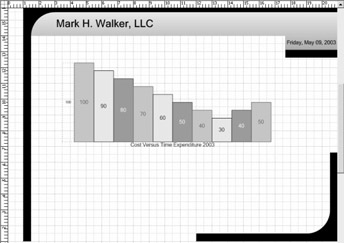
Figure 2-14: You can use a background page for consistent design elements, such as a logo, that appears on multiple pages of a drawing file.
Follow these steps to create a background page and assign it to a foreground page:
-
Right-click a page tab, and then click Insert Page.
-
On the Page Properties tab, click Background. In the Name box, type a name for the background page, and then click OK.
-
Display the page to which you want to assign the background, and then choose File, Page Setup.
-
Click the Page Properties tab. In the Background box, click the drop-down arrow to display the list, select the name of the background page you just created, and then click OK.
Resizing Pages
You can use the Page Setup command to change the size of a drawing page, but there’s a satisfying, visual method of resizing pages by dragging that’s worth checking out. This method is especially useful when you need to quickly enlarge the page to fit a diagram that’s expanded. When you resize a page, you’re changing the size of only the drawing page on display. In a drawing file with several pages, you have to resize each page separately.
Dragging to Resize a Page
To resize a page by dragging, click the Pointer tool on the Standard toolbar. Zoom out so that you can see the whole page. For example, in the Zoom list, click Page. Point to an edge or near corner of the drawing page, and then press the Ctrl key so that a double-headed arrow appears, as Figure 2-15 shows. Now you can drag the page edge to the desired size. If you want to verify the size of the page you’ve just created, you can glance at the rulers or choose File, Page Setup, click the Page Size tab, and then see the results. If you place the cursor too close to the page’s edge the rotation cursor appears. Don’t panic, just slide your cursor down the edge of the page until the double-headed arrow cursor appears, and then resize the page.
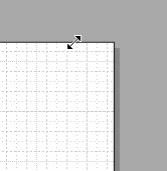
Figure 2-15: You can drag any edge of the drawing page to resize it. You must press the Ctrl key while you drag.
| Tip | If you watch the ruler as you drag, you’ll see a dotted line that shows you the page size. |
Specifying the Page Size
You can specify an exact page size by choosing File, Page Setup. Click the Page Size tab, shown in Figure 2-16. You can use a predefined size, type a custom size, or choose Size To Fit Drawing Contents, which automatically adjusts the page size to fit your diagram. Click OK to apply the settings.
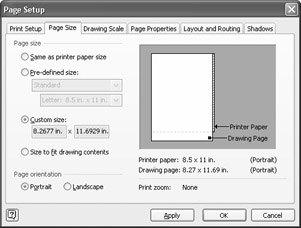
Figure 2-16: To change the size of the drawing page, use the Page Size tab of the Page Setup dialog box.
| Note | Changing the page size can affect the way your diagram prints. For details, see “Printing Diagrams of Any Size,” page 242. |
Rotating Pages
Just as you can drag to resize a page, you can drag to rotate a page. The difference is primarily in the tool you use. In most business diagrams, there’s no particular reason to rotate a page. The feature is really intended for technical drawings, where it’s often useful to provide alternative views of an image. For example, in an architectural design, you might want to see your plan in an orthogonal view (that is, displayed at a 90-degree angle). You can do this by rotating the page. All rotation does is move the page with respect to the rulers.
Before you rotate a page, zoom out so that the entire page is visible. In the Zoom list on the Standard toolbar, choose Page.
New Feature You used to need the Rotation tool to turn a drawing, but now, to rotate a page move the Pointer tool to a corner of the page and press and hold Ctrl. The cursor changes into the rotational indicator. Click and hold the left mouse button and drag the corner in the direction in which you want to rotate the page.
| Tip | Move the ruler’s zero point Visio rotates a page around its zero point, which is the lower left corner of the page. However, you can move the zero point by pressing Ctrl as you drag the blue crosshair at the ruler intersection. For details, see “Changing the Zero Point,” page 432. |
|
EAN: 2147483647
Pages: 209