Using Space Shapes to Start a Floor Plan
|
If you’re documenting an existing floor plan, you already know where the rooms go. However, if you’re designing a new space, you probably want to start with some conceptual designs that you can refine before committing to wall placement. You can use one of the space shapes to approximate room locations, which you can easily rearrange as you experiment with your design.
Space shapes have two distinct purposes:
-
You can rough out the areas you want with space shapes, and then convert the shapes to walls to create a building shell and rooms, as Figure 18-3 shows.
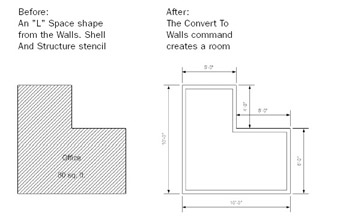
Figure 18-3: You can easily convert a space shape into walls and even add dimension lines, as shown here, guides, and other options. -
You can use space shapes as they are to designate space within existing rooms, such as in an office. This specialized use is associated with space plan drawings, in which space shapes can track facilities information. Space plan drawings are described in detail in Chapter 26, “Managing Facilities with Space Plans.”
New Feature The Visio 2003 Space Plan Wizard makes creating and designating spaces much easier. We’ll cover this new feature in Chapter 26.
You can also draw a rough space plan using the drawing tools. As long as you start your drawing using a template from the Building Plan folder, Visio includes the command to convert shapes you draw into walls.
In Visio Professional, space shapes can be used for tracking people and assets in a floor plan. When you want to use space shapes in this way, you don’t convert the space shapes into walls. Instead, you drag space shapes into an existing building plan to designate offices. The space shapes automatically size themselves to fit an office created by using Visio wall, door, and window shapes.
To convert any plan—floor, home, plant, or office—into a space plan for tracking assets, moving employees, and managing facilities information, choose Tools, Add-Ons, Building Plan, Enable Space Plan. Visio displays the Category Explorer window and adds commands to the Plan menu for working with data.
| Cross-Reference | For details about creating this type of space plan, see Chapter 26, “Managing Facilities with Space Plans.” |
Designing Space in a Building Plan
Depending on which product edition you have, you can designate space in a building plan in one of the following ways:
-
Drag space shapes onto the drawing page.
-
Draw lines, arcs (with the Pencil tool), and rectangles to represent rooms or the outline of the floor plan, and then convert the shapes to space and walls.
Either way, Visio automatically creates walls based on the perimeters defined by
your spaces.
Using Space Shapes
To start a new building plan and define spaces using space shapes, follow these steps:
-
Choose File, New, Building Plan, and then choose the template you want.
Tip You can also start from an existing floor plan. Make sure the Walls, Doors And Windows or the Walls, Shell And Structure stencil is open.
-
If you’re starting a new drawing, choose File, Page Setup. On the Page Size tab, verify that the drawing uses the size settings you want, and make any changes. Then click the Drawing Scale tab, and verify that the scale is the one you want, and make any changes. Click OK.
Cross-Reference For details about setting up page size and drawing scale, see “Setting Up Measurements in a Diagram,” page 421.
-
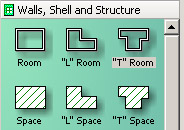
Drag the Space, “L” Space, or “T” Space shape onto the drawing page.
In Visio Standard, the Space shape is on the Walls, Doors And Windows stencil. In Visio Professional, the space shapes are on the Walls, Shell And Structure stencil.
The size of the area is displayed on the shape.
Note To define space within an existing structure, drop the space shape away from the existing walls, and then move it into position. Otherwise, if you drop the shape onto a building shell or other walls, the space is automatically sized to fill the area.
-
To adjust the size of the space, drag a handle on the space shape.
-
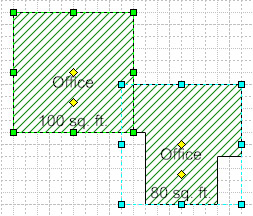
To create a uniquely shaped area, overlap multiple space shapes.
-
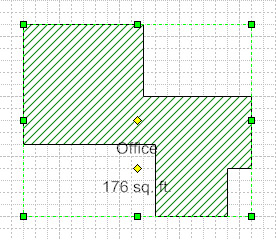
To combine multiple, contiguous space shapes into one space, select all the shapes, right-click, and then select Union from the shortcut menu.
Visio combines the area of all the spaces into one space shape. You might need to adjust the position of the shape’s text.
-
To change where the text appears on the space shape, drag the yellow control handle.
If you want to convert the space shapes to walls, or add walls to them, see “Converting Space Shapes into Walls,” page 518.
| Tip | You can change the formatting of a space shape. By default, space shapes appear with diagonal green lines. To change the background fill of an individual shape, right-click the shape and choose Format, Fill from the shortcut menu. |
Creating Space with the Drawing Tools
Drawings created with one of the building plan templates include the added ability to convert shapes you draw into walls. You can specify whether to add dimension lines or guides to walls. If you’re creating a floor plan that will be used as part of a facilities or space plan, you can create a space shape within the walls you’ve drawn when you convert the original geometry.
To start a new building plan and define spaces by drawing, follow these steps:
-
Choose File, New, Building Plan, and then choose the template for the type of building plan you’re creating.
You can also start from an existing floor plan as long as it was created using a template from the Building Plan folder, which adds the Plan menu to Visio’s menu bar.
-
If you’re starting a new drawing, choose File, Page Setup. On the Page Size tab, verify that the drawing uses the size settings you want, and make any changes. Then click the Drawing Scale tab, and verify that the scale is the one you want, and make any changes. Click OK.
Cross-Reference For details about setting up page size and drawing scale, see “Setting Up Measurements in a Diagram,” page 421.
-
Click the Drawing Tools button on the Standard toolbar to display the drawing tools and then select a drawing tool, such as the Line tool or the Rectangle tool. Then draw overlapping boxes to form an area in the shape you want.
Tip To create areas with curved walls, use the Arc or Pencil tool.
-
To create a single shape that represents the space, select the shapes, choose Shape, Operations, and then choose one of the following commands:
-
Choose Union to combine the areas of all the shapes.
-
Choose Subtract to take the first shape you select and subtract subsequently selected shapes from that area.
-
Choose Intersect to create a new shape from the areas that overlap in your selected shapes.
-
Choose Combine to combine the shapes and omit their overlapping areas.
-
Choose Fragment to break the shapes into smaller shapes defined by their intersection.
Cross-Reference For details about combining, subtracting, and intersecting shapes, see “Merging Shapes to Create New Ones,” page 660.
-
-
To convert the shape to walls or walls plus space, select the shape, and then choose Plan, Convert To Walls.
-
In the Wall Shape box, select the type of shape you want to use for walls.
The list includes wall shapes from all the stencils you have open.
-
If you want to display dimension lines on the room’s perimeter, select the Add Dimensions check box.
-
If you want to display guides with the walls, which makes the walls easier to reposition, select the Add Guides check box.
-
If you want to fill the area within the walls with a space shape, select Convert To Space Shape, and then click OK. Visio converts the shape to walls using the options you selected.
-
To adjust the position of a wall, drag a guide to which the wall is attached. As you drag, the walls glued to the guide are resized. If you did not add guides, drag a wall or one of its endpoints to a new position. If you created a space shape, it does not change size. You can right-click it, and then select Auto Size to make it match the new area.
Customizing Space Shapes
You can change the look of a space shape, including its format, labels, and units of measure. By default, Visio space shapes display diagonal green lines with a centered label identifying the space and its square footage. Space shapes that you draw typically have white fill and no label. You can manually format individual space shapes to change their fill pattern and color. The labels and measurement units that appear on space shapes are properties that Visio stores with the page, so if you choose different options, all space shapes on the page reflect the change.
To change the fill for a shape, right-click the shape, select Format, Fill, and then specify new options in the Fill dialog box. You can use different colors and patterns in space shapes to designate different areas in a floor plan, as Figure 18-4 shows. If you later convert the space to walls, the fill pattern and color are discarded.

Figure 18-4: You can change a space shape’s fill to indicate how the space will be used. In this drawing, different fills are used for offices, conference rooms, and public areas.
Follow these steps to change labels and units for all space shapes on a page:
-
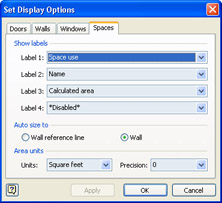
Open a floor plan drawing, choose Plan, Set Display Options, and then click the Spaces tab.
The Spaces tab displays options for changing labels and measurement units.
-
Under Show Labels, select from among the available options to display a field on the space shape.
New Feature In Visio 2003 you can display up to four labels for each space. In each label window shown in the Set Display Options window, on the Space tab, you can choose to display one of the following in each subwindow: Space Use, Calculated Area, Name, Space ID, Shape Class, Subshape Type, Shape Type, Department, Phone Number, Occupancy, Capacity, Space Height, Base Elevation, or Zones.
The values for most of these areas are entered in the space’s custom properties. To view the custom properties, right-click the space shape and select Properties. Some values, such as Calculated Area, are automatically calculated, whereas others, such as Shape Class, Subshape Type, and Shape Type are displayed on demand.
-
In the Units list, select the measurement units in which you want to display the area.
Tip The units for the shapes don’t need to match the measurement units used by the drawing page.
To display the space shape based on the endpoints of the wall shapes rather than the interior of walls, select the Wall Reference Line option.
-
Click OK to update all the space shapes on the page with the new settings.
-
If your drawing has multiple pages and you want to use the same settings throughout the drawing, click a page tab to display a page, and then repeat steps 1 through 4.
Converting Space Shapes into Walls
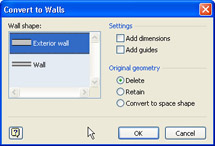
When you’re ready to commit to the design of your space plan, you can convert space shapes to rooms, as Figure 18-5 shows. To do this, you use the Convert To Walls command, which is available on the Plan menu or when you right-click shapes.
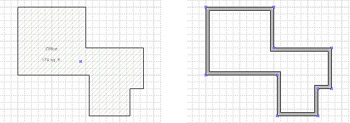
Figure 18-5: The Convert To Walls command creates walls around the perimeter of a space shape or shapes you draw. You can specify to add dimension lines and guides automatically as well.
| Note | The Convert To Walls command is available when you right-click a space shape. The command is also available on the Plan menu. |
When you use the Convert To Walls command, you can specify which wall shape to use as well as display options, such as whether to display dimension lines or add guides to the wall shapes. After you convert a space shape to walls, the original space shape is deleted unless you specify otherwise. If you plan to track space in a drawing apart from other structures or want to display square footage in rooms, you can retain the space shape after conversion. The space shape sizes separately from the room or building it’s in.
| Tip | If you are going to use your building plan with the Space Plan template, keep the original space shape when you use the Convert To Walls command. |
To convert the space shapes into walls, follow these steps:
-
Right-click a space shape, and then choose Convert To Walls.

-
In the Wall Shape box, select the type of shape you want to use for walls.
The list includes wall shapes from all the stencils you have open.
-
If you want to display dimension lines on the room’s perimeter, select the Add Dimensions check box.
-
If you want to display guides with the walls, which makes it easier to reposition walls, select the Add Guides check box.
-
If you want to keep the original space shape after conversion, select the Retain option.
When you start with a space shape, the Retain and Convert To Space Shape options have the same effect.
-
Click OK to convert the space using the options you selected.
-
To adjust the position of a wall, drag a guide to which the wall is attached.
As you drag, the walls glued to the guide are resized. If you retained the space shape, it doesn’t change size. To update the space shape to match the new area, right-click the shape, and then choose Auto Size.
Tip You can also create rectangles, squares, and trapezoids drawn with the Line tool into walls.
|
EAN: 2147483647
Pages: 209