Lesson 2: Mailbox and Resource Management
You can manage mailbox resources at different levels in Active Directory Users and Computers and Exchange System Manager. The former gives you the finest granularity. You can use this tool to configure individual mailbox properties. The latter enables you to define default settings for mailbox stores as well as recipient and system policies. Further utilities are available, such as the LDIFDE and CSVDE utilities, which allow you to deal with numerous recipient objects in bulk.
This lesson covers several important aspects that you will come across when managing mailbox resources, including the assignment of permissions to additional user accounts, the definition of storage limits, and the management of default e-mail addresses. The import and export of recipient information are also addressed.
At the end of this lesson, you will be able to:
- Grant user accounts specific permissions on mailbox resources.
- Manage mailbox resources through mailbox store settings and policies.
- Configure the Recipient Update Service.
- Import and export recipient information from Active Directory.
Estimated time to complete this lesson: 75 minutes
Assigning Mailbox Rights
It is advantageous to have the ability to add mailbox information to user accounts upon their creation and remove mailboxes again when their associated accounts are deleted. Yet, the direct mapping of user accounts to Exchange mailboxes has side effects. The overwhelming number of user account property pages, for instance, is not easily comprehensible. Another issue is that it is not trivial to assign a particular account two or more mailboxes.
Configuring a Postmaster Mailbox
It is a good idea to mailbox-enable the general Administrator account and assign it the SMTP service's postmaster address (for example, Postmaster@Bluesky-inc-10.com). As a matter of fact, this is accomplished by default when installing Exchange 2000 Server as Administrator. However, if you have installed your first Exchange 2000 server in the forest using a different account, then this account is currently the postmaster. The postmaster address is used, for instance, in nondelivery reports to indicate delivery problems to the message originator. The originator may then reply to the postmaster address to seek assistance.
It would be inconvenient to use the Administrator mailbox as a personal e-mail account. When working with your own account, though, it is likewise not optimal to have it receiving messages sent to the postmaster. These system messages are not personal. You may even want to share them with other administrators. Therefore, remove the postmaster address from your personal account if you own it currently, and assign it to the Administrator via the E-Mail Addresses tab. After that, grant your account and those of other relevant administrators Full Mailbox Access permissions to the Administrator mailbox, and include it as an additional mailbox into your MAPI profile, as illustrated in Exercise 5 of Chapter 8, "Microsoft Outlook 2000 Deployment."
To successfully open the Administrator mailbox, launch Active Directory Users and Computers, activate Advanced Features, and display the properties of the Administrator. Click on the Exchange Advanced tab, click Mailbox Rights, add your personal account to the list of accounts with Mailbox Rights, and grant yourself the specific Full Mailbox Access right. If you are a Windows 2000 enterprise or domain administrator, you also need to grant your account Send As and Read As permissions on the Security property sheet.
Creating Dedicated, Disabled Mailbox Accounts
You may create disabled user accounts for specific purposes and mailbox-enable them. Then assign your own account the Full Mailbox Access and Read As rights. Although you will not be able to log on using a disabled account, you will be able to open its mailbox and read messages. If you want to send messages on behalf of the disabled account, configure its Delivery Options in the Exchange General tab to grant yourself Send On Behalf permissions (see Chapter 8, "Microsoft Outlook 2000 Deployment").
Management of Server-Based Mailbox Resources
The number of mailboxes that you can put on a single Exchange 2000 Server greatly depends on the available hard disk space. Nevertheless, it is difficult to find out how much hard disk space your users' mailboxes will eventually consume.
TIP
The Mailbox Statistics Tool from the BackOffice Resource Kit, which is also included on the companion CD to this book, enables you to gather information about mail-use patterns from your users. This information can help you to size your hardware more precisely.
Single Instance Storage Feature
If you send a particular message to multiple users on the same server, only one copy of the message is initially stored in the database and all local addressees receive a pointer to this particular object. This feature, known as single instance storage, can greatly help improve delivery performance. Instead of delivering a message addressed to 1000 recipients into 1000 mailboxes, the message is delivered once, saving 999 instances of delivery time. Users can access this single message instance and read it just as if it belonged exclusively to them. When they delete the message, only their reference is removed from the single message instance.
However, when calculating the required disk space for your users' mailboxes, ignore the single instance storage feature, and assume that every user receives individual copies of messages. This simplifies the calculation, and actually, the single instance storage feature does not really reduce the requirements for disk space. This may sound astonishing at first, but practice shows that over time the single instance storage ratio is reduced to two or just one recipient per message. Most messages are sent just to one recipient, but consider the following scenario. You send a message to 2000 recipients on a particular Exchange 2000 server informing them that the server will be unavailable due to maintenance next Friday. It is very likely that almost all recipients will delete this message right away, with the exception of those users that never delete a message at all (you will take care of them a little later with storage quotas). After a month, maybe one or at most a few recipients still hold this outdated message in their mailbox. Hence, your single instance storage ratio dropped from 2000 recipients to one or, at most, a few recipients per message. You should not consider the initial ratio of 2000:1 a serious disk space savings.
TIP
The MSExchangeIS Mailbox performance object provides a counter named Single Instance Ratio, which you can use to monitor the single instance storage ratio of your server with the Performance tool that was discussed in Chapter 12, "Management Tools for Microsoft Exchange 2000 Server."
Storage Limits
If your server's disk space is limited, consider applying storage limits. Storage limits allow you to warn your users if their mailbox size exceeds a certain maximum (Issue Warning At [KB]), to prevent them from sending messages (Prohibit Send At [KB]), and to prevent message reception (Prohibit Send And Receive At [KB]). To set these values, display the properties of the desired mailbox store in the Exchange System Manager, and click on the Limits tab. Alternatively, you can define default settings for your servers through system policies (see Chapter 12, "Management Tools for Microsoft Exchange 2000 Server").
NOTE
You can overrule storage limits assigned to the mailbox store per user account (using the Exchange General tab, Storage Limits button). Users that exceed the limits need to delete messages from the server and may download them into a personal folder store. The configuration of the personal folder store was covered in Chapter 9, "MAPI-Based Clients."

Exercise 3: Configuring Mailbox Storage Limits and Deletion Settings
In this exercise you will define default storage limits for a mailbox store and set deletion settings for items and mailboxes. To test the parameters you will delete items and mailboxes and recover them.

To view a multimedia demonstration that displays how to perform this procedure, run the EX3CH13*.AVI files from the \Exercise_Information\Chapter13 folder on the Supplemental Course Materials CD.
Prerequisites
- Complete Exercise 1, earlier in this chapter.
- Log on as Administrator to BLUESKY-SRV1 and BLUESKY-WKSTA.
To configure mailbox storage limits and deletion settings
- On BLUESKY-SRV1, launch the Exchange System Manager.
- In the console tree, expand the node for BLUESKY-SRV1 (under Servers in the First Administrative Group), expand First Storage Group, and then right-click Mailbox Store (BLUESKY-SRV1).
- From the shortcut menu, select Properties, and click on the Limits tab.
- Select the Issue Warning At (KB) check box and type 10240.
- Select the Prohibit Send At (KB) check box and type 20480.
- Select the Prohibit Send And Receive At (KB) check box and type 40960.
- Notice that the Warning Message Interval will cause the generation of a warning message for users exceeding the mailbox quota at midnight.
- Under Deletion Settings, in the Keep Deleted Items For (Days) text box, type 7.
- In the Keep Deleted Mailboxes for (Days) text box, type 30.
- Select the Do Not Permanently Delete Mailboxes And Items Until The Store Has Been Backed Up check box, and then click OK (see Figure 13.9).
- On BLUESKY-WKSTA, launch Outlook 2000, connect to the Administrator mailbox, and make sure that there is at least one message in the Inbox.
- Delete the message, open the Deleted Items folder, and notice that the message has not been deleted yet (the user can easily move the message into another Outlook folder).

Figure 13.9 Defining storage limits and deletion settings for a mailbox store
- Right-click Deleted Items, and select Empty "Deleted Items" Folder. In the Microsoft Outlook dialog box asking whether you are sure, click Yes.
- Notice that the messages are purged from your mailbox.
- Open the Tools menu, and select the Recover Deleted Items command.
- In the Recover Deleted Items From - Deleted Items dialog box, notice that the messages deleted in Step 13 are listed.
- Select the first item, and click the Recover Selected Items button. Notice that the message is placed back in the Deleted Items folder (see Figure 13.10).
- Close Outlook 2000.
- On BLUESKY-SRV1, launch the Active Directory Users and Computers snap-in, open the Users container, and right-click the Administrator account.
- From the shortcut menu, select Exchange Tasks. Click Next on the welcome screen (if it appears), select Delete Mailbox on the Available Tasks screen, and then click Next. Click Next on the Delete Mailbox screen, and click Finish.
- On BLUESKY-WKSTA, try to start Outlook 2000, and notice that you are unable to open the default e-mail folders, which is an indicator that the mailbox could not be accessed (because it was deleted). In the corresponding Microsoft Outlook dialog box, click OK. When asked whether to open the default file system folder, click No.
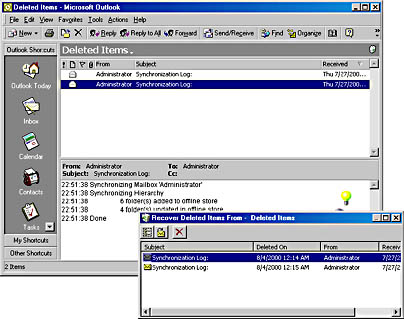
Figure 13.10 Recovering deleted message items in Outlook 2000
- On BLUESKY-SRV1, switch to the Exchange System Manager, open the Mailbox Store (BLUESKY-SRV1) node in the console tree, and then select Mailboxes. Notice that the Administrator mailbox is still listed as a full mailbox resource.
- Right-click Mailboxes, and select Run Cleanup Agent. Notice that the Administrator mailbox is now marked as deleted (see Figure 13.11).
- Right-click the Administrator mailbox, and select Reconnect. (If you select Purge, the mailbox is deleted permanently.)
- In the Select A New User For This Mailbox dialog box, double-click Administrator. In the Reconnect dialog box informing you that the operation completed successfully, click OK.
- If an Exchange System Manager dialog box appears informing you that the object has not been replicated to the destination server yet, click OK.
- Give the Recipient Update Service a few minutes to assign the Administrator account new e-mail addresses, then right-click Mailboxes again, and select Run Cleanup Agent. Verify that the mailbox is now marked as available.

Figure 13.11 Recovering deleted mailboxes
Exercise Summary
The Limits tab of the mailbox store allows you to define default quotas for all mailboxes located in the mailbox store. In addition, you can configure item and mailbox retention times. Within the specified intervals, users can easily undelete purged message items in Outlook 2000 without administrative intervention. Administrators, in turn, can recover deleted mailboxes quickly from within the Exchange System Manager. Once retention time is exceeded, however, accidentally deleted items and mailboxes must be restored from backups.
Management of Recipient Policies
Policies offer many benefits. A default policy in Exchange 2000 Server, for instance, determines the format of e-mail addresses that recipient objects receive when they are mailbox- or mail-enabled. The SMTP address, for instance, defaults to <User Logon Name>@<Domain Name>. Let's say you want your users to have an e-mail address in the form of <First Name>.<LastName@ <Domain Name>, for example, Roger.Robin@Bluesky-inc-10.com. You may adjust the e-mail addresses manually in Active Directory Users and Computers, but this could become a puzzling task in a large organization. The system can take care of this job when you adjust the default policy or create a new one with higher priority.
Adjusting Default Policy Settings
You can configure default policy settings in the Exchange System Manager by expanding the Recipients container and then selecting Recipients Policies. In the contents pane, the Default Policy object is listed. When you double-click it to display its properties, notice that this policy applies to all recipients (mailnickname=* in the General tab). Click on the E-Mail Addresses tab, select the SMTP entry, click Edit, and, under Address, add %g.%s to the beginning of the address definition, for example, %g.%s@Bluesky-inc-10.com. (Table 13.1 lists the available placeholders.) Click OK, verify that the new rule is displayed in the Generation Rules list, and then click OK again. An Exchange System Manager dialog box will appear asking you whether you want to update all existing recipients. Click Yes if you think this is a good idea. Existing SMTP addresses are preserved, and new addresses are added to the recipient objects.
NOTE
The update process may take a few minutes; give the process sufficient time. You will be able to verify the results in Active Directory Users and Computers when displaying the E-Mail Addresses tab of a mailbox- or mail-enabled object.
Table 13.1 Placeholders in Address Generation Rules
| Placeholder | Description |
|---|---|
| %d | Display name |
| %g | First name |
| %i | Initials |
| %m | Alias |
| %s | Last name |
NOTE
In addition, you may specify how many characters to use (for instance, %1g.%s@Bluesky-inc-10.com would result in R.Robin@Bluesky-inc-10.com).
Adding Recipient Policies
Blue Sky Airlines is an international enterprise with offices around the world. Employees in London, for example, are supposed to have an SMTP address of %g.%1s@Bluesky-inc-10.co.uk. In this scenario, it is advantageous to configure an additional policy and apply it to those recipients who work in London, while the default policy may still apply to users in other locations.
In the Exchange System Manager, right-click Recipient Policies, point to New, and select Recipient Policy. Under Name, type Users in London, and then click Modify. In the Find Exchange Recipients dialog box, click on the Advanced tab, click Field, point to User, and, from the list of attributes, select City. From the Condition list box, select Is (Exactly). Under Value, type London, and then click Add. It is a good idea to verify the results of your filter by clicking the Find Now button. If everything is fine, click OK, and then, in the Exchange System Manager dialog box informing you that existing recipient addresses don't change when a filter changes, click OK. Now click on the E-Mail Addresses tab, and adjust the SMTP address (that is, %g.%1s@Bluesky-inc-10.co.uk). Click OK, and update the existing addresses by clicking Yes in the subsequent Exchange System Manager dialog box.
As you will see, the Users In London policy is added to the list of policies with a higher priority than the Default Policy object. If you create further policies, those can be arranged in the contents pane by right-clicking them and selecting the Move Up or Move Down commands. The order in the list determines the policy's priority.
Recipient Update Service
When creating new mailbox- or mail-enabled recipient objects or when updating existing e-mail addresses, there may be a delay before the addresses are displayed correctly. The Recipient Update Service, an internal process of the System Attendant, handles the process of updating in the background. The Recipient Update Service is also responsible for updating address lists in Active Directory.
In the Exchange System Manager, open the Recipients container, and then select Recipient Update Services. At least two update service objects exist. One is for updating information in the naming context (NC) of the domain and the other for the configuration NC of Active Directory. For global administration, Exchange 2000 Server stores the majority of its information in the configuration NC, but recipient objects are maintained in the domain. You can adjust the settings of a particular update service object when right-clicking it and selecting Properties. The domain cannot be changed, but different Exchange Server and Windows 2000 Domain Controller settings may be applied. In addition, you can customize the update interval. For fastest updates, ensure that Always Run is selected.
NOTE
To immediately update recipient addresses or rebuild the address list memberships and e-mail addresses after a recipient policy is changed, right-click the corresponding update service object, and, from the shortcut menu, select either Update Now or the Rebuild command.
Recipient Updates in Multiple Domain Environments
Because a particular Recipient Update Service keeps only a particular domain posted, you need to configure an individual update service object for each domain in your organization that holds recipient objects. If you install at least one Exchange 2000 server in all of your domains, the required objects are created automatically. If domains without an Exchange 2000 server exist, you need to perform this task manually.
NOTE
If mailbox- or mail-enabled recipient objects exist in a domain where the Recipient Update Service is not configured, corresponding e-mail addresses will not be generated. Recipient objects without e-mail addresses are not displayed in the address book.
To manually create a Recipient Update Service reference, run the Exchange 2000 Setup program in the target domain with the DomainPrep option (see Chapter 4, "Planning the Microsoft Exchange 2000 Server Installation"). After that, in Exchange System Manager, right-click Recipient Update Services, point to New, and select the Recipient Update Service command. In the New Object - Recipient Update Service dialog box, click Browse to conveniently select the desired domain, then click OK, and then click Next to continue. In the second dialog box, click Browse to select an appropriate Exchange 2000 server. This will be the server that runs the Recipient Update Service. The domain controller that will update the recipients in the domain is chosen automatically in the next dialog box. Click Finish.
TIP
If you want to update a particular domain through a customized recipient policy, create a filter that checks the ending of the user's logon name. To give an example, if the domain you want to update is Bluesky-inc-10.co.uk, create a filter that checks a condition that ends with co.uk. The configuration of recipient policies was explained earlier in this lesson.
Export and Import Features
Beyond the simple feature of exporting the currently displayed contents pane, the Active Directory Users and Computers snap-in does not provide the functionality of exporting or importing recipient information.
Directory Export and Import Using LDIFDE
Windows 2000 Server provides you with a very powerful console application (LDIFDE.EXE) that supports batch operations based on LDAP Directory Interface Format (LDIF) files. LDIF is a file-format standard for batch operations against LDAP-conforming directories. Exchange 2000 Server, for instance, comes with a large number of LDIF files that are imported into Active Directory during the first server installation.
Although LDIFDE.EXE is not included in Windows 2000 Professional, you can copy it from the server (\Winnt\System32 directory) to your workstation and use it remotely to export or import data in Active Directory. To view the general parameters of LDIFDE.EXE, open the command prompt, type ldifde, and press Enter. The output on the screen explains available options and gives sample command lines. To export directory information from a domain controller, use the command ldifde -f c:\Export.ldf -s <Domain Controller> (such as in, ldifde -f export.ldf -s bluesky-srv1 -d "CN=Carl Titmouse,CN=Users,DC=BlueSky-inc-10,DC=com").
After exporting a reference object, it is possible to adjust the settings carefully and use the resulting document as an import file. The following example creates an active and mailbox-enabled user account named Fred Pheasant that owns two different SMTP addresses and one X.400 proxy address. The import command is ldifde -i -f import.ldf -s bluesky-srv1.
dn: CN=Fred Pheasant,CN=Users,DC=BlueSky-inc-10,DC=com changetype: add displayName: Fred Pheasant objectClass: user sAMAccountName: FredP userPrincipalName: FredP@BlueSky-inc-10.com msExchHomeServerName:/o=Blue Sky Airlines/ou=First Administrative Group/cn=Configuration/cn=Servers/cn=BLUESKY-SRV1 mailNickname: FredP proxyAddresses: SMTP:Fred.Pheasant@BlueSky-inc-10.com proxyAddresses: smtp:FredP@BlueSky-inc-10.com proxyAddresses: X400:c=us;a= ;p=Blue Sky Airline;o=Exchange;s=Pheasant;g=Fred; userAccountControl: 512
Directory Export and Import Using CSVDE
If you are an Exchange Server 5.5 administrator, you are probably familiar with the comma separated values (CSV)-based export/import files as used in the Exchange Administrator program. As a matter of fact, many large networks that operate a heterogeneous messaging environment exchange address book files in .csv format to import the address information into Exchange directories conveniently. With Exchange 2000 Server, you can continue to use .csv files for this purpose.
As its name implies, you can use the CSVDE tool of Windows 2000 Server to export and import CSV-structured Active Directory information. The command syntax is the same as for the LDIFDE utility. Both tools have many features in common, only the resulting files are different. Column-oriented files are better suited for semiautomated processing in Microsoft Excel 2000.
To export Carl Titmouse, for example, type the following command: csvde -f export.csv -s bluesky-srv1 -d "CN=Carl Titmouse,CN=Users,DC=BlueSky-inc-10,DC=com. You can use the resulting file as a basis for a bulk import of address information. Edit the file in Excel 2000, eliminate those columns that you don't want to use, populate the table with the desired information, and then use the command csvde -i -f import.csv -s bluesky-srv1 to create mailbox- enabled user accounts in bulk. The following is a sample header that allows you to create mailbox-enabled recipient objects: DN, cn, displayName, mail, givenName, objectClass, proxyAddresses, name, sAMAccountName, userAccountControl, userPrincipalName, msExchHomeServerName, mailNickname.
TIP
Using LDIFDE and CSVDE, you can create mailbox-enabled as well as mail-enabled recipient objects. It is advantageous to use the CSVDE utility if you are familiar with the processing of table data through Excel macros (see Figure 13.12). You can read more about these utilities in the Windows 2000 Server Distributed Systems Guide of the Windows 2000 Server Resource Kit.
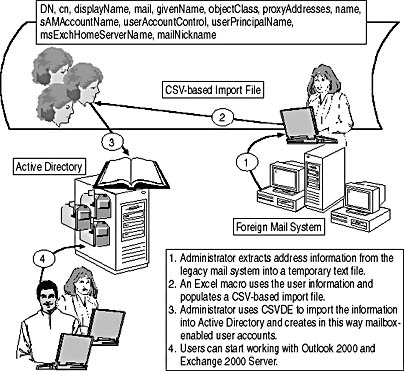
Figure 13.12 A high-speed migration scenario based on directory import features
EAN: N/A
Pages: 186