Surface Types
When modeling, you can use many different surfaces to create a character, including polygons, subdivision surfaces, and NURBS-based surfaces. (I'll explain what these are later.) The type of surface you choose depends on a number of factors. One of these factors is the software package you're using. If your software supports only polygonal surfaces, your decision is already madethe character must be built out of polygons. Some packages are more adept at one type of modeling than others: a package with more tools for manipulating NURBS surfaces might make NURBS the best choice for your character. The type of project may also play a role in your choice of surfaces. A character in a gaming environment, for example, may need to be built from polygons simply because most game engines support polygons.
Polygonal Surfaces
Polygonal modeling was the first form of 3D modeling developed for computer graphics. Although more sophisticated modeling techniques have since been developed, basic polygonal modeling remains the most effective technique to use in many situations. Polygonal models are simple to construct, and they can be used in almost any situation, from feature films to games. Polygons are simply triangles or rectangles, each representing a plane and defining an area of the character's surface. All other forms of modeling resolve to polygons at some point, usually before rendering.
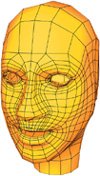
A human face is another fairly complex surface because it has holes for the eyes, mouth, and nostrils. Again, polygons handle these complex surfaces easily.
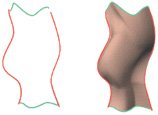
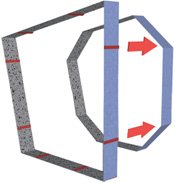
One big benefit of polygonal modeling is the freedom you have when constructing a character. Patch modeling, the other popular form of modeling, can limit you to surfaces that are topologically simple, such as a plane, cylinder, or sphere. In order to create an object that's more complex, such as a body, you'll need to attach multiple surfaces together. Polygons don't suffer from this topological constraint, and with a polygonal modeler, you're free to make your surface as complex as you desire. Another advantage of polygonal modeling is simplicity: a polygonal model often consists of a single object, but NURBS models, the most common form of patch models, are frequently composed of dozens of patch objects, therefore adding complexity to the whole project.
The downfall of polygonal modeling is that a polygon is by definition a plane, so you'll need many small polygons to create a smoothly curved surface.
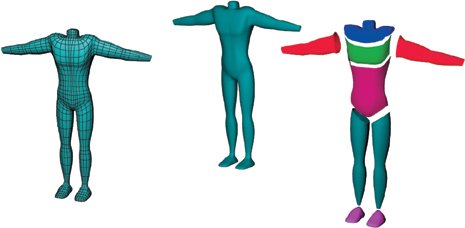
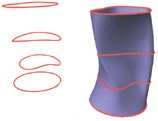
The arms and legs in a human body make it a fairly complex surface. Polygons can handle this complexity very easily. To make the same body out of patches, you'd need to stitch together several surfaces.
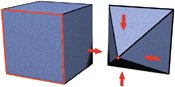
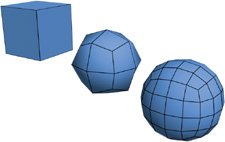
The polygonal sphere on the left is not nearly as smooth as the NURBS sphere on the right.
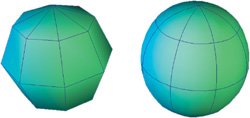
For the polygonal sphere to be smooth, it needs a lot more detail, in the form of more polygons. This added detail slows down the animation process, however.
Working with Polygons
Since polygons are the fundamental building blocks of all 3D animation, most 3D modeling packages use some form of polygonal modeling. The underlying concepts of polygonal modeling are the same in all packages, though they do differ in interface and workflow.
Elements of a Polygonal Model
Polygonal models are built of vertices (points) that define edges (lines), which in turn define polygons or faces (planes). You can create and manipulate these geometric building blocks using a variety of relatively standardized tools.
Basic Polygonal Operations
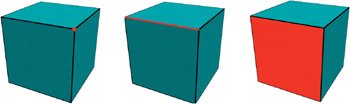
An extrusion takes a vertex, edge, or polygon and extrudes the component, adding additional detail and pushing or pulling it into or away from the surface. A bevel adds one or more polygons that are at an angle to the original geometry. Most packages allow you to define the angle of the bevel and the height of the new detail above or below the original surface. A collapse reduces a face or edge to a single vertex. A cut slices a face into two parts, adding an edge and splitting the polygon in two. The cut may or may not be symmetrical.
A vertex is a single point. An edge is a two-dimensional line connecting two vertices. A polygon, or face, is a three-dimensional plane defined by three or more edges or vertices.
An extruded vertex
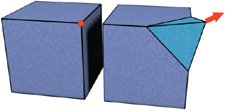
An extruded edge
An extruded face
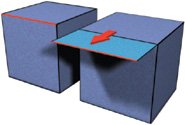
A beveled vertex
A beveled edge
A beveled face
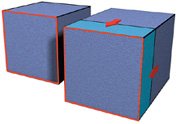
A collapsed edge
A collapsed face
A cut face
Patches and NURBS Surfaces
Patch surfaces are more complex than polygonal surfaces; while a polygon has straight lines for edges, a patch has curves for edges. These curves, in turn, define a curved surface. Since these surfaces are defined mathematically, they're also perfectly smooth. Think of a patch as a flexible sheet of rubber that can be bent and twisted into any shape. This makes patches a great choice for applications like car bodies or a character's skin, for which you need very smooth surfaces. Patch models can be created using individual patches or collections of patches that are stitched together into a seamless whole. Patches come in a number of different varieties, including Bèzier patches and B-splines, but NURBS surfaces are by far the most common type of patches.
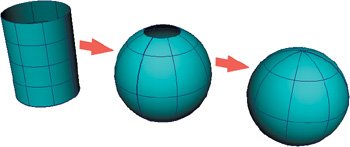
A patch surface is four-sided and defined by curves. Think of it as a rectangular sheet of rubber.
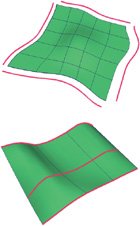
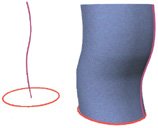
This sheet can be wrapped around to create a cylinder.
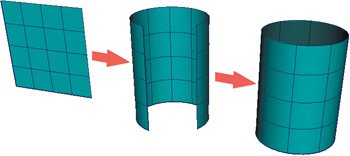
The ends of the cylinder can be brought together to create a sphere.
NURBS stands for non-uniform rational B-splines. NURBS patches allow for curved surfaces and also support such advanced features as vertex weighting, which allows you to define the curvature very precisely. These are by far the most popular types of patches and are supported by packages like Maya and Softimage.
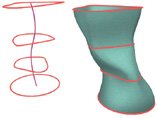
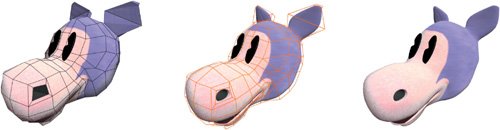
A more complex NURBS head must be created as a collection of individual patches, which are stitched together.
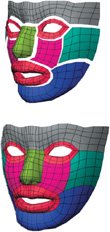
The big limitation of patch-based modeling is that patches are always four-sided objects. Thus, to create a complex shape like a face or a body, you need to stitch several patches together. While many packages offer tools to automate this process, a stitched-together model can still be difficult to manage.
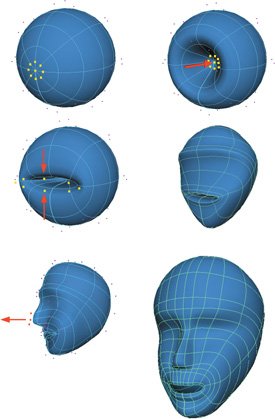
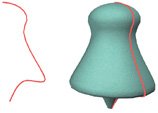
This head was created by deforming a simple NURBS sphere.
Working with Patches
Not all 3D modeling packages support patches, but those that do offer similar sets of tools to create and manipulate patch-based models. The type of patch used varies from package to package, and although NURBS has become the most popular patch type, some packages define their own types of patches. The best type of modeling to learn is probably NURBS modeling, but other surface types have their own advantages. Once you learn one type of patch modeling, learning the others will come more naturally.
Patch and Curve Types
Curves can come in many different forms, but they are all created from control points, which define the basic shape of the curve. The type of curve determines how these points are used. In modeling, you'll use curves to define patch surfaces, and the type of curves you use will determine what kind of patches you end up with.
Basic Patch Operations
You can create patches using a number of methods, all of which use the shape of one or more curves to define a more complex 3D surface. Some of these operations are used in very similar ways, but their subtle differences allow for more flexibility when modeling.
LinearA first-degree curve, this looks like a series of lines connecting the control points. The resulting patch also has straight edges and is very similar to a polygonal surface.
CardinalA second-degree curve, this curve passes through the control points. The resulting patch will actually have control points beyond the edge of the surface.
B-splineA third-degree curve, this type of curve rarely passes through its control points. The resulting patch also has control points beyond the edges.
BèzierThis curve passes through the control points, and each point has two tangents that are used to adjust the weight on either side of the point. A patch made out of Bèzier curves will have a curved surface and also extend to the outer control points.
NURBSThis curve is like the B-spline, but with weighting that can pull the curve closer to the control point. The patch is very similar to a Bèzier patch, but also has weighted control points.
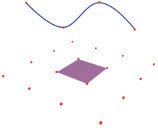
ExtrudeSweeps a profile curve along a line or a path to create a surface.
Revolve/LatheTakes an outline curve and sweeps it around an axis to create a surface.
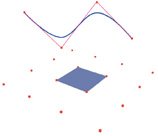
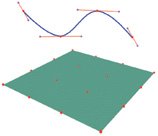
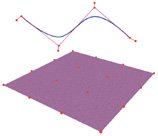
Skintakes a series of sequential profile curves and uses them to progressively define the surface.
LoftUses a path curve and multiple profile curves to create a more complex surface than is possible with extruding or skinning.
RuleUses two curves to define opposite edges of the surface. This is often used to bridge the edges of adjacent surfaces.

BiRailConstructs a surface by sweeping profile curves along two rail curves.

BoundaryUses three or four curves to define the edges of a patch.
Subdivision Surfaces
Subdivision surfaces offer the best of both worlds. You can model them with polygonal modeling tools, so they can have any topology, but they resolve to very smooth surfaces at render time, just as patches do. Because of this ability, subdivision surfaces are fast becoming the standard method for modeling characters. All of the characters modeled in this book are modeled using polygonal tools so they can be animated quickly, but can also take advantage of subdivision surfaces for smooth final renders.
Subdivision surfaces are polygonal objects which can be dynamically and nondestructively smoothed into a high-resolution object for rendering. In most packages, this subdivision happens after the object is animated and before rendering. This means that your character rig will deform the low-res model, making animation fast and easy, while the renderer will see the high-res subdivided version of the same model.
Subdividing a surface progressively smooths it by adding detail.
A low-resolution polygonal model of a head. When the model is turned into a subdivision surface, many software packages will display a "cage" that surrounds the surface and shows the original low-resolution model. This can make modeling much easier. When the model is rendered, the result is a smooth, subdivided surface without the cage.
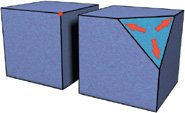
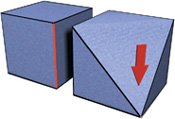
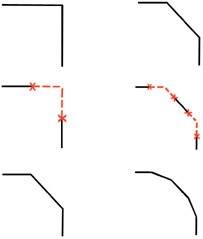
When you subdivide a polygonal surface, the software needs to figure out where to place all of the added detail. These extra polygons are placed according to any number of formulas, but the simplest way of calculating this extra detail is by cutting some cornersliterally. A woodcarver sculpting a block of wood would start by whittling off the corners of the block. If you mathematically whittle the corners off of your virtual character, you will also get a smoother surface. This technique is called "corner clipping."
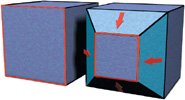
Corner clipping connects the midpoints of your object's polygons with intermediate polygonsturning one polygon into four, four into sixteen, and so on. With each iteration, the corners are whittled away and the object gets smoother.
If you repeat the clipping process an infinite number of times, the resulting surface is exactly the same as a B-spline patch. Many implementations of subdivision surfaces also allow you to weight vertices to get corners that are sharper or more rounded. This weighting is very similar to NURBS. As you've seen, subdivision surfaces really do offer the best features of both worlds.
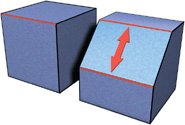
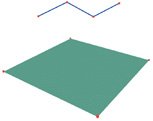
Take two simple lines, find the midpoints, and then cut the corners. Repeat as needed until the line approaches a curve.
In 3D, the theory is the same, but the faces are subdivided.
Creating Characters |
Chapter One. Basics of Character Design
- Chapter One. Basics of Character Design
- Approaching Design as an Artist
- Design Styles
- Designing a Character
- Finalizing Your Design
Chapter Two. Modeling Characters
Chapter Three. Rigging Characters
- Chapter Three. Rigging Characters
- Hierarchies and Character Animation
- Facial Rigging
- Mesh Deformation
- Refining Rigs
- Conclusion
Chapter Four. Basics of Animation
- Chapter Four. Basics of Animation
- Understanding Motion
- Animation Interfaces
- The Language of Movement
- Secondary Action
- Conclusion
Chapter Five. Creating Strong Poses
- Chapter Five. Creating Strong Poses
- Posing the Body Naturally
- Creating Appealing Poses
- Animating with Poses
- Conclusion
Chapter Six. Walking and Locomotion
- Chapter Six. Walking and Locomotion
- The Mechanics of Walking
- Animating Walks
- Beyond Walking
- Adding Personality to a Walk
- Transitions
- Conclusion
Chapter Seven. Facial and Dialogue Animation
Chapter Eight. Animal Motion
Chapter Nine. Acting
- Chapter Nine. Acting
- Acting Vs. Animating
- Acting and Story
- Acting Technique
- Acting and the Body
- Other Techniques
- Conclusion
Chapter Ten. Directing and Filmmaking
EAN: 2147483647
Pages: 84
