Lesson 1: Configuring Recipient Objects
Sometimes, professionals use slightly incorrect statements to avoid painfully precise and lengthy explanations. For example, when working with Active Directory Users and Computers, you will come across an option to create a mailbox for each selected user. You may believe that you are creating mailboxes; in reality, it's all a little different. Otherwise, how can you create a mailbox when the specified home server is shut down? (See Exercise 1 of this chapter.)
This lesson focuses on the management of recipient objects in Active Directory. You can read about how to add mailbox information and e-mail addresses to user accounts, contacts, and groups.
At the end of this lesson, you will be able to:
- Configure mailbox-enabled user accounts.
- Configure mail-enabled user accounts, contacts, and groups.
Estimated time to complete this lesson: 60 minutes
Overview of Recipient Objects
Potential recipient objects in Active Directory are user accounts, contacts, and groups. They become recipient objects when you add e-mail address information to them. A fourth type of recipient object exists when Exchange 2000 Server is installed, the public folder. Typically, public folders reside in a hidden organizational unit (OU) called Microsoft Exchange System Objects. Public folders do not necessarily own an e-mail address, but if they do, they are hidden from the address lists by default. They are usually not managed in Active Directory Users and Computers. You can read about public folder management in Chapter 17, "Public Folder Management."
Mailbox-Enabled Recipient Objects
Generally, mailbox-enabled objects are user-account objects with associated mailbox information. It is not possible to assign Exchange mailbox resources to any other object type. Mailbox-enabled accounts possess corresponding e-mail addresses and can be used to send and receive messages in an Exchange organization.
Mail-Enabled Recipient Objects
A mail-enabled object is in possession of an e-mail address but isn't associated with an Exchange mailbox. You can assign e-mail addresses to user account objects, contacts, and groups. When connecting to a third-party messaging system, such as Lotus Notes, installed in your Windows 2000 environment, you typically assign e-mail addresses to the Windows 2000 accounts of those users that work with mailboxes in the foreign system (see Figure 13.1). Exchange users can then pick the corresponding recipient information from the Global Address List (GAL) to send them messages. Directory synchronization can help facilitate the task of adding e-mail addresses to Active Directory accounts, explained in Chapters 26 through 29.
Unlike mail-enabled user accounts, mail-enabled contacts are not referring to users working in your Windows 2000 environment. They are usually a representation for recipients that exist outside the organization's own messaging network, such as partners, customers, and other users (on the Internet, for example). In fact, it is impossible to create a mail-enabled contact that references a mailbox- or mail-enabled user account within the same organization because a single e-mail address cannot be associated with multiple recipient objects.
Mail-enabled Windows 2000 groups, on the other hand, provide a convenient way to address multiple recipients at one time. Active Directory supports security and distribution groups with a domain-local, global, or universal scope. You can add e-mail address information to all types of groups. The difference is that security groups can be used to delegate access permissions to members, while distribution groups do not represent security principals and don't support permission assignments. Groups provide a way to reflect, to some degree, the structure of a company in terms of its departments and project teams.
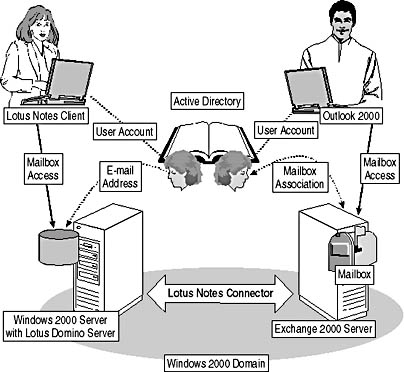
Figure 13.1 Differences between mailbox-enabled and mail-enabled user accounts
Creating Mailbox- and Mail-Enabled Recipient Objects.
The creation of mailbox- and mail-enabled recipient objects is parallel to the creation of user accounts, contacts, and groups. However, especially for mail-enabled recipients, some thought needs to be given to the type of directory object to create.
Creating Mailbox-Enabled Recipients
For mailbox-enabled objects, the only answer is user accounts. Launch Active Directory Users and Computers, expand the console tree, right-click the desired container, such as Users, point to New, and select the User command. In the first and second dialog boxes, enter the Windows 2000 account information as usual. After that, if you have installed the Microsoft Exchange System Management Tools on the computer, a third dialog box will appear, asking you whether and where to create a mailbox for the new user. Ensure that the Create An Exchange Mailbox check box is selected and that the displayed information is correct, and then click Next, and click Finish. The new Windows 2000 user can participate in your Exchange organization immediately.
To add mailbox information to an existing user account, on the other hand, right-click the corresponding directory object and, from the shortcut menu, select Exchange Tasks. This will launch the Exchange Task Wizard. Click Next on the welcome screen (if it appears), and, on the Available Tasks wizard screen, select the Create Mailbox option, and click Next. Make sure the settings are correct, and then click Next, and click Finish.
Mailbox-Enabled Recipients and Mailbox Resources
As mentioned earlier, when adding mailbox information to a user account, you are not really creating the actual mailbox resource. Recipient objects reside in Active Directory, whereas mailboxes are repositories in the Information Store. However, by mailbox-enabling a user account, you identify, among other things, the particular mailbox store to hold the mailbox. When the user launches his or her client program, such as Outlook 2000, and logs on, the client retrieves the mailbox information from Active Directory, then contacts the correct Information Store and requests the generation of the actual mailbox. The client will initialize the mailbox folders according to the client language (Inbox, Outbox, Contacts, and so on, for an English client).
NOTE
The first client that accesses a mailbox creates and names the system folders according to its language. They will retain their names until you rename them manually. For instance, if you initialized your mailbox using a French client, your system folders will show French names, even if you work with an English client subsequently. Microsoft Exchange Client 5.0 allows you to rename the system folders (Outlook 2000 doesn't).
Creating Mail-Enabled Recipients
To create a mail-enabled user account, make sure you deselect the Create An Exchange Mailbox check box during account creation. This results in a new account object without associated mailbox information. Right-click the object, select Exchange Tasks, and confirm the welcome screen (if it appears) by clicking Next. On the Available Tasks wizard screen, double-click Establish E-Mail Addresses. On the Establish E-Mail Addresses wizard screen, click Modify, and, in the New E-Mail Address dialog box, double-click the correct type entry (such as Lotus Notes Address), and specify the correct address (such as a user name and Lotus Notes domain). Click OK, then click Next, and then click Finish. The creation of a mail-enabled user account requires slightly more attention than the configuration of a mailbox-enabled account because you need to enter the address information manually. It may be better to migrate the users to Exchange 2000 Server first and then create mailbox-enabled accounts.
The procedure to assign e-mail addresses to security or distribution groups differs from the course of action for mail-enabled user accounts. Right-click the desired group, select Exchange Tasks, and confirm the welcome screen (select the Do Not Show This Welcome Page Again check box if you like). Double-click Establish An E-Mail Address, and, on the Establish An E-Mail Address wizard screen, specify the desired alias. If you are mail-enabling a global or local group (such as Domain Users or Users), read the following note on the Establish An E-Mail Address wizard screen carefully: Usage Of Mail-Enabled Universal Groups Is Strongly Recommended To Ensure Correct Mail Delivery. Later in this lesson, under "Working with Distribution Lists," you can find a discussion about the advantages and disadvantages of mail-enabled universal, global, and local groups.
Managing and Maintaining Mailbox-Enabled Recipients
When you display the properties of a mailbox-enabled user account, you can find three Exchange-related tabs: Exchange General, E-Mail Addresses, and Exchange Features. A fourth tab exists, but it is hidden by default—Exchange Advanced. To display all Exchange tabs, select Advanced Features, available under the Microsoft Management Console (MMC) View button, before displaying the account properties.
For mailbox-enabled user accounts, the following tabs are provided:
- E-Mail Addresses. To view, add, and manage e-mail addresses for the account object, such as Simple Mail Transfer Protocol (SMTP) and X.400 addresses.
- Exchange Advanced. To specify a simple display name, hide the account from Exchange address lists, downgrade high priority mail bound for X.400, and to define custom attributes, protocol settings, Internet Locator Service (ILS) settings, and mailbox rights.
- Exchange Features. To enable or disable specific advanced features, such as Instant Messaging (see Chapter 25, "Real-Time Collaboration").
- Exchange General. To change the mailbox alias and to set delivery restrictions, delivery options, and storage limits.

Exercise 1: Managing and Maintaining Mailboxes
In this exercise you will use the Active Directory Users and Computers snap-in to add mailbox information to a new user account. You will create a mailbox on a server that is currently unavailable.

To view a multimedia demonstration that displays how to perform this procedure, run the EX1CH13.AVI files from the \Exercise_Information\Chapter13 folder on the Supplemental Course Materials CD.
Prerequisites
- Exchange 2000 Server is installed and operational on BLUESKY-SRV1 and BLUESKY-SRV2.
- Log on as Administrator to BLUESKY-SRV1.
- Make sure BLUESKY-SRV2 is NOT running.
To create and manage mailbox resources
- Launch the Active Directory Users and Computers snap-in from the Microsoft Exchange program group.
- In the console tree, expand BlueSky-inc-10.com, and then select Users.
- Right-click the Users container, point to New, and then select User.
- In the New Object - User dialog box, enter the following information:
First Name Olivia Last Name Owl Full Name Olivia Owl User Logon Name OliviaO - Click Next.
- On the next wizard screen, under Password and Confirm Password, type password, and then click Next.
- On the next wizard screen, make sure that Create An Exchange Mailbox is selected. From the Server list box, select Blue Sky Airlines/First Administrative Group/BLUESKY-SRV2. Notice that the Mailbox Store information is updated automatically, and then click Next.
- On the last wizard screen, click Finish.
At this point, you have created a new Windows 2000 user account for Olivia Owl and associated this account with a mailbox in the Information Store on server BLUESKY-SRV2, although BLUESKY-SRV2 is not running at this point (see Figure 13.2).
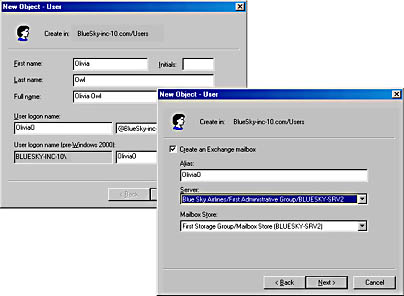
Figure 13.2 Creating user accounts and associated mailboxes
- Start the computer BLUESKY-SRV2 and wait until it is operational.
- In the Active Directory Users and Computers utility, make sure the contents of the Users container are displayed in the contents pane, right-click Olivia Owl, and then select Exchange Tasks.
- On the welcome screen, click Next.
- On the Available Tasks wizard screen, make sure that Move Mailbox is selected, and then click Next.
- On the Move Mailbox wizard screen, accept the suggestions to move the mailbox to BLUESKY-SRV1, and then click Next (see Figure 13.3).
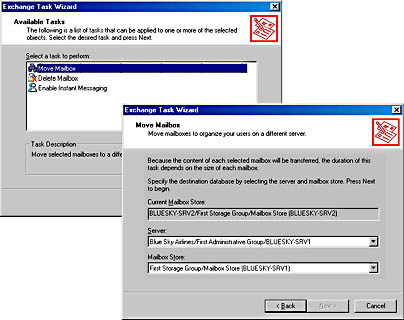
Figure 13.3 Using the Exchange Task Wizard to move mailboxes
- When The Task In Progress wizard screen appears, follow the progress of the mailbox transfer, and then, on the Completing The Exchange Task wizard screen, click Finish.
- In the Active Directory Users and Computers snap-in, click View, and select Advanced Features.
- Open the Users container again and double-click the Olivia Owl user account.
- Notice the four Exchange tabs called Exchange General, E-Mail Addresses, Exchange Features, and Exchange Advanced.
- Click on the Exchange Advanced tab, and then click Protocol Settings.
- In the Protocols dialog box, select the HTTP protocol entry (see Figure 13.4), and then click Settings.
- In the HTTP Protocol Details dialog box, deselect the Enable For Mailbox check box, and then click OK. Repeat this step for the IMAP4 and POP3 protocol entries as well.
- Click OK twice. From this point forward, the user Olivia Owl will only be able to access her mailbox using Outlook 2000 or any other Messaging Application Programming Interface (MAPI)-based client.
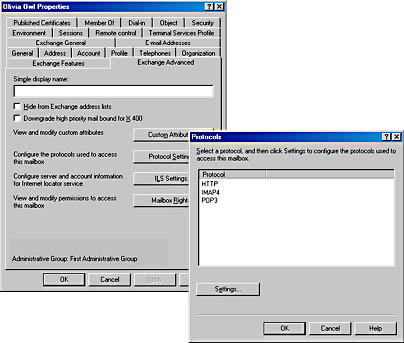
Figure 13.4 Configuring Internet Protocol settings for mailboxes
Exercise Summary
You can create mailbox resources at the same time you create user accounts. The Exchange 2000 server does not even have to be available to associate a user account with a mailbox. The Exchange Task Wizard greatly facilitates mailbox maintenance tasks. You can move one or many mailboxes between servers quickly and conveniently. To adjust mailbox settings, use the Exchange-specific tabs of the mailbox-enabled user account object.
Managing and Maintaining Mail-Enabled Recipients
With minimal differences, the management of mail-enabled recipient objects is performed similar to the administration of mailbox-enabled user accounts.
Managing Mail-Enabled User Accounts and Contacts
Mail-enabled user accounts are very similar to mailbox-enabled objects; they just don't have an Exchange mailbox—yet. However, they can participate in Instant Messaging because this feature is not bound to a particular Exchange mailbox. You can activate this function in the Exchange Features tab if Instant Messaging is installed.
For mail-enabled user accounts, you can configure the following settings:
- E-Mail Addresses. To view, add, and manage e-mail addresses for the account object (such as SMTP and X.400 addresses).
- Exchange Advanced. To specify a simple display name, hide the account from Exchange address lists, specify whether the user's client program is able to use MAPI rich text format, and to define custom attributes and ILS settings.
- Exchange Features. To enable or disable specific features such as Instant Messaging.
- Exchange General. To change the alias, to set incoming message size restrictions, and to specify from whom to accept messages.
NOTE
With the exception of the Exchange Features tab, which doesn't apply to users outside the organization, mail-enabled contact objects provide access to the same configuration settings as mail-enabled user accounts.
Managing Mail-Enabled Groups
Mail-enabled groups don't provide access to the Exchange Features tab because Instant Messaging applies to users, not to groups. The Exchange Advanced tab also shows a slightly different layout. The Exchange General and E-Mail Addresses tabs, however, are identical with the property sheets of the other mail-enabled object types.
The Exchange Advanced tab of a mail-enabled group allows you to configure the following settings:
- Simple Display Name. To specify a simple display name for systems that cannot understand special characters set in the regular display name.
- Expansion Server. To designate a computer in the organization running Exchange 2000 Server as responsible for distribution list expansion.
- Hide Group From Exchange Address Lists. To prevent the members of the group from being displayed in the server-based address lists. It is also advisable to activate the Do Not Send Delivery Reports option.
- Send Out-Of-Office Messages To Originator. To send out-of-office notifications to the originator of a message even if the recipient, who is currently out of the office, received the message only because he or she is a member of a distribution list.
- Send Delivery Reports To Group Owner. To allow the owner of a mail-enabled group to receive detailed delivery reports and nondelivery reports.
- Send Delivery Reports To Message Originator. To allow the originator of a message to receive delivery reports and nondelivery reports directly from the members of the distribution list rather than from the distribution list itself.
- Do Not Send Delivery Reports. To suppress requested delivery reports and nondelivery reports. This setting is especially important if you want to hide distribution list membership and don't want to disclose the information through delivery reports either.
- Custom Attributes. To add more information to the group than provided through default attributes.
Working with Mail-Enabled Groups
Microsoft recommends mail-enabling universal groups. The most obvious disadvantage of global groups in a multidomain environment is that this type of group cannot contain any recipients from other domains. Groups with a local scope, on the other hand, may contain accounts from other domains but cannot be used in other domains to grant permissions on public folders and other resources. Furthermore, the membership lists of local and global groups are not replicated to the Global Catalog, which restricts their functionality. Outlook users in other domains are unable to retrieve full membership information.
NOTE
In a single domain environment, no restrictions apply because all Global Catalog servers are domain controllers that contain a full replica of the local domain information.
Membership Information and Group Expansion
Universal security and distribution groups can replicate information about group members to the Global Catalog. This information is then available across the entire forest. The SMTP service can expand these mail-enabled groups to determine the delivery path for each individual recipient. If your users are sending messages to mail-enabled local or global groups, on the other hand, the SMTP service may not be able to retrieve the required information.
If a mail-enabled local or global group from another domain needs to be expanded, the SMTP service must establish a direct connection to a domain controller in that domain. Elsewhere, the required information is not available. The communication takes place via LDAP. Hence, direct IP connectivity is required. Because network communication is involved, group expansion is not performed as fast as if the membership data were available locally. Especially if the group contains numerous members, message delivery may be delayed.
To circumvent the disadvantages of remote expansion over the network, specify an expansion server in the Exchange Advanced tab for local and global groups. Make sure the expansion server exists in the group's home domain. All other SMTP services in the organization will then forward messages addressed to this mail-enabled group to its expansion server first, which can communicate with a local-domain controller and populate the message header with group membership information. It also makes sense to move the expansion of the larger groups—those with thousands of members—from less powerful to more powerful servers.
NOTE
The Expansion Server Any Server In The Organization setting implies that the home server of the sender performs the expansion.
Considerations About Universal Groups
The advantage of universal groups is that their membership information is replicated to the Global Catalog. This is also a disadvantage, especially if the group is large. For large groups, membership changes can result in excessive replication traffic. The membership information for a group is held in a multivalued property of the group object in Active Directory (see Figure 13.5). When members are added or removed, this attribute changes and the property-level Active Directory replication must transfer the entire list to the Global Catalog again. Consequently, it is not advisable to create gigantic mail-enabled universal groups.
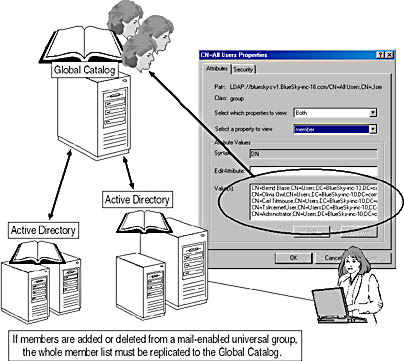
Figure 13.5 Property-level replication of group membership information
TIP
Microsoft recommends restricting the number of members in mail-enabled groups to less than 5000 to mitigate the risk of excessive network traffic. If more than 5000 members must be included, consider using nested groups.
Nested groups allow you to partition the replication traffic to the Global Catalog. Instead of a single group with 10,000 members, create 10 groups with 1000 members, and then include all of these in an overlay group. When new users are added to one of these groups, only a subset of the membership needs to be replicated while Outlook users can still examine the full membership. Implement global mail-enabled groups instead of universal groups if you need to eliminate the replication traffic. If you change your mind later, you can convert global into universal groups, provided that your domain operates in native mode and that the groups are not members of any other global group.
Security Versus Distribution Groups
Whenever possible, give security groups preference over distribution groups. This allows you to keep the number of groups in your environment at a reasonable level because mail-enabled security groups can serve the purpose of permission assignment as well as message addressing. If you use mail-enabled distribution groups to build your address lists, however, you will have to create separate security groups to manage permissions on resources and public folders. Universal security groups can only be created in native-mode domains.
Exercise 2: Managing and Maintaining Contacts and Groups
In this exercise, you will create contact objects and universal distribution groups and adjust their settings afterward. This exercise suggests the creation of a distribution group to accommodate mixed-mode and native-mode domains.
To view a multimedia demonstration that displays how to perform this procedure, run the EX2CH13*.AVI files from the \Exercise_Information\Chapter13 folder on the Supplemental Course Materials CD.
Prerequisites
- Make sure Exchange 2000 Server is running on BLUESKY-SRV1.
- Log on as Administrator to BLUESKY-SRV1 and BLUESKY-WKSTA.
To mail-enable contact objects and work with universal distribution groups
- On BLUESKY-SRV1, launch the Active Directory Users and Computers snap-in from the Microsoft Exchange program group.
- Click View and select Advanced Features.
- Expand the console tree, right-click the Users container, point to New, and select Contact.
- In the New Object - Contact dialog box, enter the following information:
First Name Josephine Last Name Hummingbird Full Name Josephine Hummingbird Display Name JosiH - Click Next, and, in the next dialog box, verify that the Create An Exchange E-Mail Address check box is selected.
- Click Modify. In the New E-Mail Address dialog box, double-click SMTP Address. In the E-Mail Address box, type JosiH@External-inc-20.edu, and then click OK, click Next, and click Finish.
At this point, you have created a mail-enabled contact object in your Users container (see Figure 13.6). When users address messages to Josephine, these will be delivered to JosiH@External-inc-20.edu outside the local organization.
- Right-click the Users container again, point to New, and select Group.
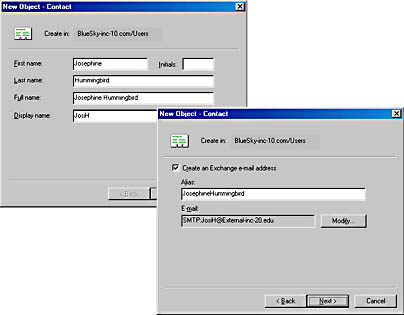
Figure 13.6 Creating a mail-enabled contact
- In the New Object - Group dialog box, enter the following information:
Group Name All Users Group Name (pre-Windows 2000) All Users Group Scope Universal Group Type Distribution - Click Next, and, in the next dialog box, verify that the Create An Exchange E-Mail Address check box is selected, accept the default Alias, click Next, and then click Finish.
At this point, you have created a mail-enabled universal group (see Figure 13.7). However, this group has no members yet.
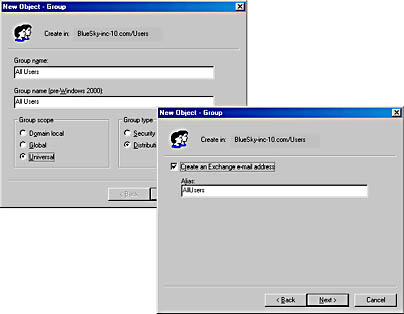
Figure 13.7 Creating a mail-enabled distribution group
- In the contents pane of the Users container, double-click All Users, and then click on the Managed By tab.
- Click Change, and select the Administrator account from the domain BlueSky-inc-10.com.
- Click on the Exchange Advanced tab, and select the Send Out-Of-Office Messages To Originator check box. Click OK.
- On BLUESKY-WKSTA, launch Outlook 2000, and connect to the Administrator mailbox. If a message box appears asking you whether you would like to use Outlook for Newsgroups, click Yes.
- From the Tools menu, select Address Book.
- Double-click All Users to display the All Users Properties dialog box. Notice that the Members list is still empty.
- Click Modify Members, and, in the Distribution List Membership dialog box, click Add to add the Administrator and JosiH as members to the distribution group.
- Click OK three times, and close the address book.
At this point, you are able to add members to the group because you are designated as the group owner (see Figure 13.8).
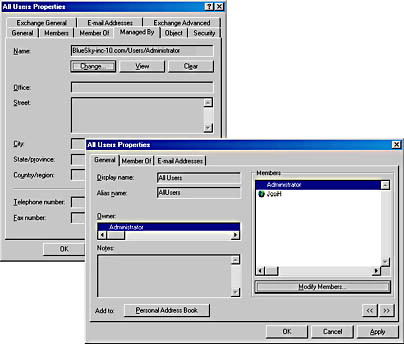
Figure 13.8 Configuring group membership in Outlook 2000
Exercise Summary
The creation of mail-enabled contacts and groups is as easy as the creation of mailbox-enabled user accounts. For groups, don't forget to specify a group owner. This is a useful feature that enables you to delegate the responsibilities of group management to team or department heads. Your valuable time doesn't have to be consumed by the task of keeping track of individual group members. After all, the individual team managers know best who belongs to their group.
EAN: N/A
Pages: 186