| A button is a movie clip that has just four frames in its Timeline. Flash labels these frames Up, Over, Down, and Hit. In the Up state, you create a graphic that looks like a static, unused button. This graphic appears whenever the pointer lies outside the active area of the button. In the Over state, create the graphic as it should look when the pointer rolls over the button. Usually, you want some kind of visual change to alert your viewer that the pointer is now on a live button. In the Down state, create the graphic as it should look when someone clicks the button. In the fourth frame, which is called the Hit frame, create a graphic that defines the boundary of the button. Any filled shape in this frame becomes a place where mouse movements trigger the button in the final movie. To create the most basic button, choose a simple geometric shape and use it throughout the button states; just change its color or add or modify internal elements for the button. To create a button symbol: -
Open a new Flash document, or open an existing Flash document to which you want to add buttons . -
From the Insert menu, choose New Symbol, or press  -F8 (Mac) or Ctrl-F8 (Windows) (Figure 13.3). -F8 (Mac) or Ctrl-F8 (Windows) (Figure 13.3). Figure 13.3. Choose Insert >New Symbol as the first step in creating a button. 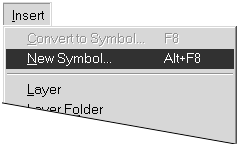 The Create New Symbol dialog box appears. -
Type a name in the Name field, choose Button in the Behavior section, and click OK (Figure 13.4). Figure 13.4. To make a button, you must create a new symbol and assign it button behavior in the Create New Symbol dialog box. You can also name the button. 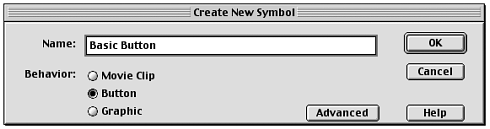 Flash creates a new symbol in the Library window and returns you to the Timeline and Stage in symbol-editing mode. The Timeline for a button symbol contains the four frames that you need to define the button: Up, Over, Down, and Hit. By default, the Up frame contains a keyframe (Figure 13.5). You must add keyframes to the Over, Down, and Hit frames and place the graphics in each frame of the button. To give users feedback about the buttonso that they can tell when they're on a live button and sense the difference when they actually click ituse a different graphic in each frame. Figure 13.5. The Timeline for every button symbol contains just four frames: Up, Over, Down, and Hit. Flash automatically puts a keyframe in the Up frame of a new button symbol. 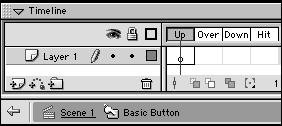 To create the Up state: -
Using the file from the preceding exercise, in the Timeline, select the Up frame. -
On the Stage, create a new graphic or place a graphic symbol (Figure 13.6). Figure 13.6. When a button is waiting for your viewer to notice and interact with it, Flash displays the contents of the Up frame. 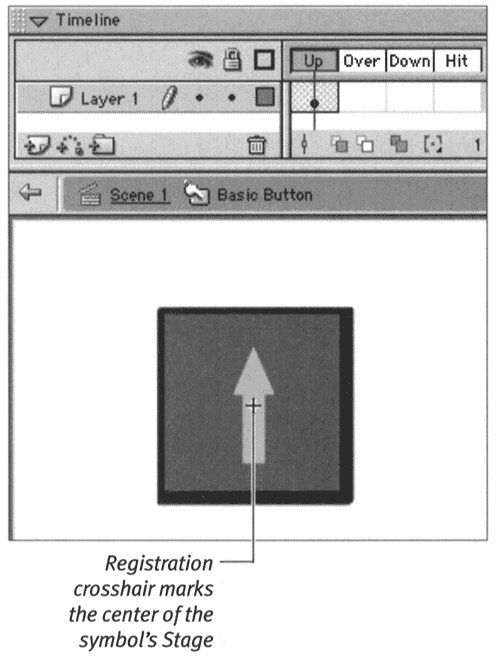 This graphic element becomes the button as it's just sitting onstage in your movie, waiting for someone to click it. In symbol-editing mode, the crosshair in the middle of the Stage serves as the central point for registering your graphic symbols. To create the Over state: -
Using the file from the preceding exercise, in the Timeline, select the Over frame. -
From the Insert menu, choose Keyframe. Flash inserts a keyframe that duplicates the contents of the Up keyframe. Now you can make minor changes in the Up graphic to convert it to an Over graphic. You might enlarge an element within the button, for example (Figure 13.7). Duplicating the preceding keyframe makes it easy to align all your button elements so that they don't appear to jump around as they change states. Figure 13.7. When the viewer's pointer rolls (or pauses) over the button, Flash displays the contents of the Over frame. 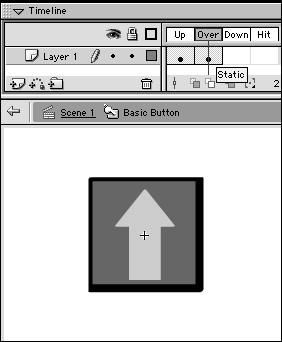 To create the Down state: -
Using the file from the preceding exercise, in the Timeline, select the Down frame. -
From the Insert menu, choose Keyframe. Flash inserts a keyframe that duplicates the contents of the Over keyframe. Now you can make minor changes to convert the Over graphic to a Down graphic. You might change the button color, for example, and reverse the shadow effect so that the button looks indented (Figure 13.8). Figure 13.8. When the viewer clicks the button, Flash displays the contents of the Down frame. 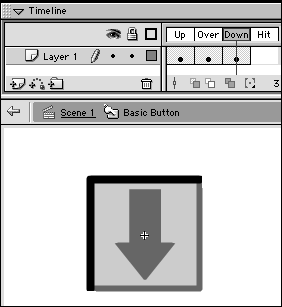 After you create graphics for the three states of your button, you need to define the active area of the button. To create the Hit state: -
Using the file from the preceding exercise, in the Timeline, select the Hit frame. -
From the Insert menu, choose Keyframe to duplicate the contents of the Down keyframe. When you use a graphic with the same shape and size for all three phases of your button, you can safely use a copy of any previous frame as the Hit-frame graphic. -
If you want, using the paint-bucket tool, fill the Hit-frame graphic with a single color (Figure 13.9). Figure 13.9. The Hit-frame graphic doesn't need to be a fully detailed image of the button in any state; it just needs to be a silhouette of the button shape. Flash uses that shape to define the active button area. This Hit frame contains a copy of the Down frame that has been filled with dark gray. 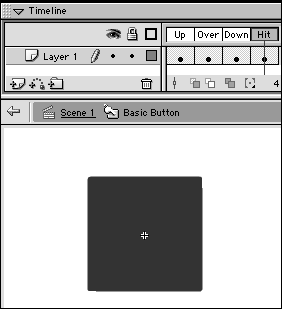 This step is not required, but it helps remind you that this graphic is not the one that viewers of your movie will actually see. The Mystery of Hit-Frame Graphics Though it never appears in a Flash movie, the Hit frame's graphic content is vital to a button's operation. The sole purpose of the Hit-frame graphic is to define the button's boundaries. This graphic doesn't need to be detailed; it's just a silhouette that defines the button shape. Any painted area in the Hit frame becomes an active part of the button. In the final movie, when the viewer moves the pointer into that area, the Over frame of the button appears; when the user clicks that area, the Down frame appears. For the clearest, most user-friendly buttons, make sure that your Hit-frame graphic is large enough to cover all the graphics in the first three frames of the button. To be safe, make your Hit-frame graphic a little larger than the other graphics. If your button is something delicate, such as a piece of type or a line drawing, make your Hit-frame graphic a geometric shape say, a filled rectangle or ovalthat completely covers the Up, Over, and Down graphics. That way, your viewers will have no trouble finding and clicking the button. | When you've completed all four frames, your button is ready to use. Return to movie-editing mode, and drag a copy of the button symbol from the Library window to the Stage. To place the newly created button in your movie: -
Continuing with the file from the preceding exercise, from the Edit menu, choose Edit Document, or click the Back button in the info bar at the top of the Stage. Flash returns you to the main Timeline. Now you can use the button symbol in your movie just as you would use any other symbol. -
Drag an instance of the button from the Library window to the Stage. You can modify the instance to change its size, rotation, and color. (For more information on modifying symbol instances, see Chapter 6.)  Tips Tips -
To create a consistent look on a Web site, you might want to use a set of buttons over and over. You can even reuse buttons in several projects with only slight changes. To save time, try devoting one whole document to buttons and always create your button symbols there. Then you can copy a button from this master button file to your current Flash movie file and tweak the button in that file. You can also create a shared library of buttons (see Chapter 6). -
Always fill your Hit-frame silhouette with the same colorsay, light gray or neon blue. That way, the silhouette becomes another visual cue that you are in the Hit frame of a button, in symbol-editing mode.
The Mystery of Buttons In Flash, you create a button by creating a symbol and then assigning it button behavior. Buttons are actually shortfour frames, to be preciseinteractive movies. When you select button behavior for a symbol, Flash sets up a Timeline with four keyframes. The first three keyframes display the three ways a button can look; the fourth keyframe (never shown to the viewer) defines the active area of the button. Any changes you make in the appearance of the graphic elements in the keyframes create the illusion of movement. In other Flash animation sequences, changes occur over time as the playhead moves through the frames. In Flash buttons, however, changes occur when the user moves the pointer over a specific area of the screen. You can include movie clips within each frame of a button to create buttons that are fully animated, and you can at ach actions to buttons to give your viewers more control of the movie. |  |