Manipulating Frames in One Layer You cannot copy or paste frames by using the standard Copy and Paste commands that you use for graphic elements. Flash's Edit menu provides special commands for copying and pasting frames. Flash also lets you drag selected frames to new locations in the Timeline. For the following exercises, open a new Flash document. Create a 10-frame movie with keyframes at frames 1, 3, 5, and 9. Using the text tool, place a text box in each keyframe, and enter the number of the frame in the text box; this technique makes it easy to tell what frame winds up where as you practice. Your document should look like Figure 8.13. Figure 8.13. To practice moving frames around, create a document with keyframes at frames 3, 5, and 9. Each keyframe contains a text box with the number of the frame. 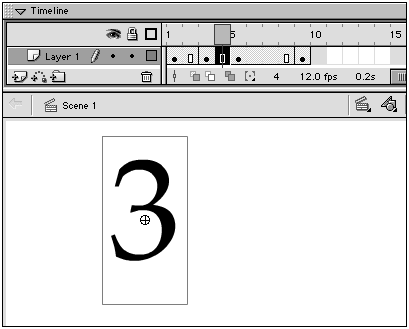 To copy and paste a single frame: -
In the Timeline, select Frame 3. -
From the Edit menu, choose Copy Frames, or press Option-  -C (Mac) or Ctrl-Alt-C (Windows) (Figure 8.14). -C (Mac) or Ctrl-Alt-C (Windows) (Figure 8.14). Figure 8.14. Flash's Edit menu provides special commands for copying and pasting frames in the Timeline. 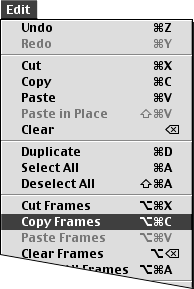 Flash copies the selected frame to the Clipboard. -
In the Timeline, click Frame 4 to select it as the location for pasting the copied frame. -
From the Edit menu, choose Paste Frames, or press Option-  -V (Mac) or Ctrl-Alt-V (Windows). -V (Mac) or Ctrl-Alt-V (Windows). Flash pastes the copied frame into Frame 4 (Figure 8.15). Figure 8.15. When you paste a frame with new content into an in-between frame, Flash converts the frame to a keyframe. 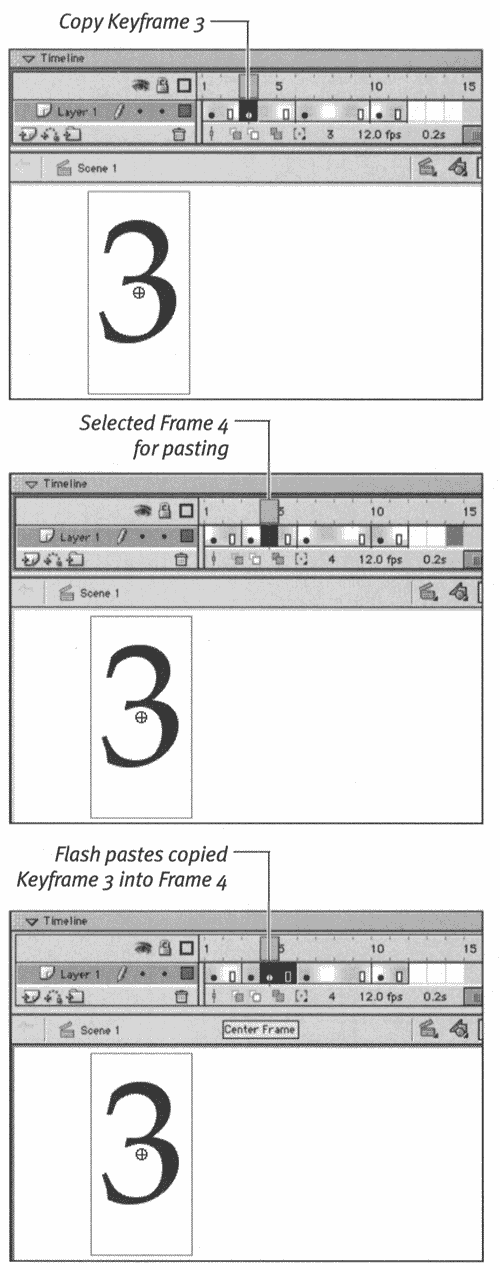 -
Paste another copy into Frame 5 (Figure 8.16). Figure 8.16. When you paste a frame with new content into a keyframe, Flash replaces the keyframe's content. 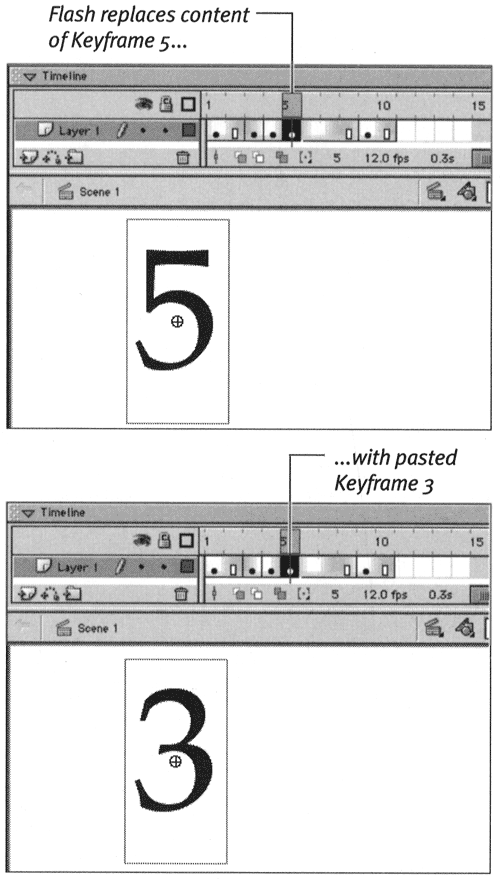 Flash replaces the contents of Keyframe 5 with the content of Keyframe 3. -
Paste another copy into Protoframe 12. Flash extends the movie to accommodate the pasted frame.  Tips Tips -
You can copy and paste multiple frames; in step 1 of the preceding exercise, select a range of frames. -
To copy and paste the content of a keyframe, copy an in-between frame that displays that content. When you paste, Flash creates a new keyframe. -
Warning: Flash always replaces the content of the selected frame with the pasted frame (or, for multiple-frame pastes, with the first pasted frame). If you're not careful, you might eat up the content of keyframes you intended to keep. To be safe, always paste frames into in-between frames or blank keyframes. You can always delete an unwanted keyframe separately. -
You cannot paste frames between back-to-back keyframes in a single step. You must first create an in-between frame (press F5) between the two, select the new frame, and paste the copied frames into the new frame.
To move frames using drag and drop: -
In the Timeline of your practice document, select the keyframe span that starts with Frame 5 and ends with Frame 8. -
Position the pointer over the selected frames. The pointer changes to an arrow with a square. -
Click and drag the selected frames. Flash further highlights the selection with a rectangle of hatched lines. Flash uses this rectangle to preview the new location for the selected frames as you drag in the Timeline. -
To move the selected frames to the end of your movie, drag the rectangle past the last defined frame and into the area of protoframes, and release the mouse button. Flash adds frames to the end of the movie; these frames display the content from Frame 5. In frame-based selection style, Flash completely removes the content from frames 5 through 8 and adds those frames to the preceding span. In span-based selection style, Flash removes the content but keeps a keyframe at Frame 5 (Figure 8.17). Figure 8.17. The process of dragging and dropping frames in the Timeline to relocate them is the same in Flash's two frame-selection styles (top). The results, however, are quite different (bottom). The frame-based selection style removes selected keyframes from their original location, leaving only in-between frames. The span-based style retains the original keyframes but removes their content. 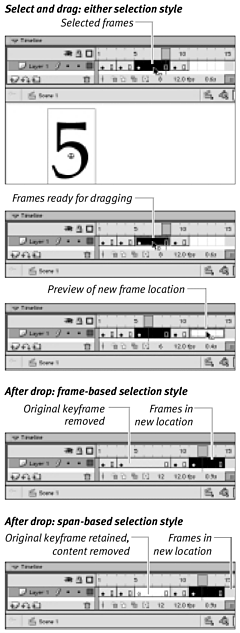 -
To move the selected frames to the beginning of your movie, drag the selected frames to Frame 1 and release the mouse button. The dragged frames replace the content of frames 1 through 4.  Tips Tips -
To drag a copy of selected frames in the Timeline, hold down Option (Mac) or Alt (Windows) as you drag. -
In span-based selection mode, if you select a span that consists of a keyframe and one in-between frame, you never get the arrow-with-square pointer; you only get the double-headed arrow. That means you can't drag the span to move it. To move such spans , switch to frame-based selection, or Option-drag (Mac) or Alt-drag (Windows) a copy of the span; then remove the original. -
No matter which frame-selection style you use, pressing the  key (Mac) or Ctrl key (Windows) lets you access some of the functionality of the other style temporarily. In frame-based selection, the modifier lets you access the double-headed arrow pointer for extending keyframe spans. In span-based mode, the modifier gives you the arrow pointer for selecting individual frames. key (Mac) or Ctrl key (Windows) lets you access some of the functionality of the other style temporarily. In frame-based selection, the modifier lets you access the double-headed arrow pointer for extending keyframe spans. In span-based mode, the modifier gives you the arrow pointer for selecting individual frames.
The Trick to Extending Keyframe Spans In span-based selection style, the pointer becomes a double-headed arrow when it hovers over a keyframe or an end-of-span frame. Use this pointer to drag that frame to the right or the left to increase or decrease the length of the span. Resizing a span in the middle of other spans gets a bit tricky. Flash won't let your expanding span eat up the content of other keyframes. Your expansion can reduce the length of a neighboring span, however. In your practice document, for example, using span-based selection, position the pointer over the end of the span that runs from Frame 3 to Frame 4. With the double-headed arrow pointer, drag Frame 4 to the right. When you get to Frame 7, you can drag no further. Release the mouse button. The span that starts at Frame 3 now extends through Frame 7. The content that was originally in Keyframe 5 still exists, but Flash has pushed it into Frame 8. To increase the length of a span without affecting the length of neighboring spans, select the span or any frame within it; then choose Insert > Frame or press F5. Flash adds an in-between frame to the selected span and pushes all subsequent spans to the right in the Timeline. When you reduce the size of a span by dragging, Flash creates blank keyframe spans to cover any gaps between the end of the span you are resizing and the beginning of the neighboring span. |  |


