| Although you can define fill and stroke colors from most color controls (see the sidebar "The Mystery of Color Controls"), the Color Mixer panel gives you the widest variety of options for defining fill and stroke colors. You can choose colors visually (by clicking a graphic representation of a color spaceall the available colors in a given color-definition system) or numerically (by entering specific values for color components). You can also set a color's transparency in the Color Mixer panel. To define new gradients, you must use the Color Mixer panel. Before you define a color or gradient, you must choose whether the color or gradient applies to fills or strokes by activating the Fill Color control or the Stroke Color control. (The ability to apply gradients to strokes is new in Flash 8.) As you define new colors, Flash updates all the related color controls. If you define a new fill color, for example, that color becomes the current setting for all the tools that use fills. To assign solid-color attributes in the Color Mixer panel 1. | Access the Color Mixer panel (if it's not open, choose Window > Color Mixer).
| 2. | From the Type menu, choose Solid.
| 3. | To choose a color space, from the panel's Options menu, do one of the following:
- To define colors as mixtures of red, green, and blue, choose RGB.
- To define colors by percentage of hue, saturation, and brightness, choose HSB (Figure 2.3).
Figure 2.3. The Color Mixer panel lets you choose a color from the color-space window or enter values directly to define a color in the RGB or HSB color space. Choose the desired color space from the Options pop-up menu. 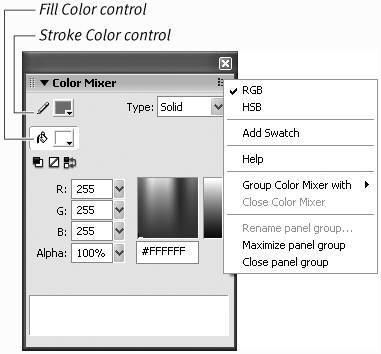
What Are Hex Colors? The term hex color is short for hexadecimal color, which is a fancy way of saying "a color defined by a number written in base 16." Hexadecimal coding is the language of bits and bytes that computers speak Hex coding is the way to specify color in HTML. In Flash, entering a single hex code for your color may be easier than entering three different values for red, green, and blue (RGB). If you remember studying bases in high-school math, you'll recall that the decimal system is base 10, represented by the numbers 0 through 9. In hex color, to get the extra six digits, you continue coding with letters A through F. |
| 4. | To determine where Flash applies the new color, do one of the following:
- To set a new stroke color, choose the Stroke Color control by clicking the pencil icon.
- To set a new fill color, choose the Fill Color control by clicking the paint-bucket icon.
|
To define a new color visually in the Color Mixer panel 1. | With the Color Mixer panel open, choose a color space.
| 2. | Position the pointer over the desired hue in the color-space window.
| 3. | Click.
The crosshair cursor appears, and Flash selects the color within the crosshairs (Figure 2.4).
Figure 2.4. The Color Mixer panel displays a color-space window (A), a preview window for the new color (B), a luminosity/ lightness slider (C), and a text field for entering the precise hex value of a color (D). Click in the color-space window to choose a new color visually. 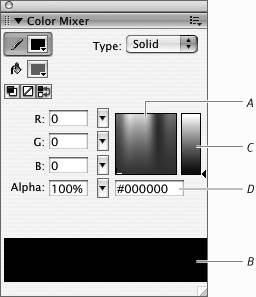
|
 Tips Tips
If you have trouble clicking exactly the right color, click and drag around within the color-space window. A preview of the new color appears alongside the old color in the preview window. When the color you want appears, release the mouse button. Flash enters the values for that color in the appropriate fields. You can move the color-control eyedropper anywhere over your desktop within Flash to pick up a color. You can use this method to match colors with artwork you've created in Flash.
The Mystery of Color Controls You'll find color controlsa color chip with an open-menu triangle in the lower right cornerthroughout Flash. To operate a color control, click the color chip; color swatches pop up, and the pointer changes to an eyedropper. To assign a new color, click a swatch with the eyedropper; with many color controls, you can also click a color on the Stage or the desktop, enter a new value in the Hex Color field, enter a transparency value in the Alpha field, choose No Color, or click the Color Picker button to access the System Color Picker(s). You can use any Stroke Color or Fill Color control to assign color attributes. The specs for the color you select appear in the Color Mixer panel, and all the other color controls update to match. |
To define a new color numerically in the Color Mixer panel 1. | With the Color Mixer panel open, choose a color space.
| 2. | To define a new color, do one of the following:
- For RGB colors, enter values from 0 to 255 for red, green, and blue in the R, G, and B fields (Figure 2.5).
Figure 2.5. Enter RGB values to specify the amount of red, green, and blue that make up the color. Enter HSB values to specify the color by hue, saturation, and brightness. The new color appears in the selected color control. 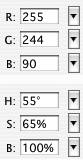
- For HSB, enter values for hue, saturation, and brightness in the H, S, and B fields.
|
To define a color's transparency 1. | With the Color Mixer panel open, define a color.
| 2. | Enter a value in the Alpha field (Figure 2.6).
Figure 2.6. Enter an Alpha value of less than 100 percent to define a transparent color. 
A value of 100 (100 percent) results in a completely solid color; a value of 0 results in a completely transparent color.
After you define a new color, you may want to add it to the Color Swatches panel so that you can use it again. (For more information about the Color Swatches panel, see "Creating Color Sets" later in this chapter.)
|
To create a linear gradient 1. | Open the Color Mixer panel.
| 2. | From the Color Mixer panel's Type menu, choose Linear (Figure 2.7).
Figure 2.7. Choose Linear from the Type menu to access the tools for defining linear gradients. 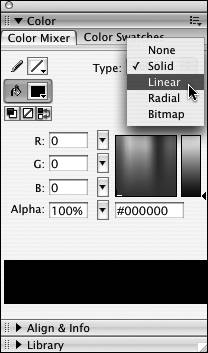
The tools and options for defining gradients appear (Figure 2.8). The default gradient starts with two pointers, black on the left and white on the right.
Figure 2.8. The Color Mixer panel displays the gradient-preview window, gradient-definition bar, and a color-space window. 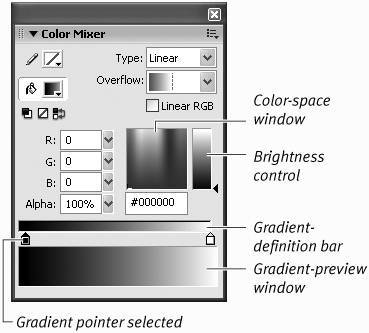
| 3. | For Overflow, leave the default setting (Extend).
Overflow determines how gradient colors fill a shape when you resize the gradient to be narrower than the shape it fills (to learn about resizing gradients, see Chapter 4).
| 4. | To add a new color to the gradient, position the mouse pointer on or below the gradient-definition bar.
Flash adds a plus sign to the pointer, indicating that you can add a new gradient pointer in this area.
| 5. | Click anywhere along the gradient-definition bar.
Flash adds a new gradient pointer.
| 6. | To change a gradient pointer's color, click it to select it, and define a new color using any of the methods described in the preceding section.
or
Double-click the gradient pointer to open a pop-up swatch set, and do one of the following:
- Click a swatch to copy the swatch color.
- Click an item on the desktop to copy its color.
- Enter a new value in the Hex field.
- Click the Color Picker button in the upper-right corner of the pop-up swatch set to access the System Color Picker for assigning new colors.
| 7. | Repeat steps 5 and 6 for any additional colors you want in your gradient.
You can add up to 13 pointers (for a total of 15 colors) to a gradient.
| 8. | Drag the pointers to position them on the gradient-definition bar (Figure 2.9).
Figure 2.9. Choose a color for each gradient pointer. The colors and positions of the pointers on the bar define a gradient's color transitions. 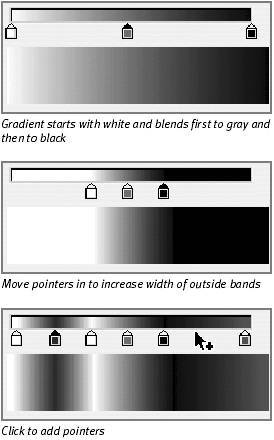
Place pointers closer together to make the transition between colors more abrupt; place them farther apart to spread the transition out over more space.
As you modify the gradient, your changes appear in the Tools panel's Fill Color control. The new gradient also appears in the Properties tab of the Property inspector for any tools that create a fillsay, the oval tool. Those tools are now loaded and ready to create shapes using that gradient.
|
About Gradients In addition to solid colors, Flash works with gradientsbands of color that blend into each other. Gradients can be linear (parallel bars of color) or radial (concentric rings of color). Gradients can create interesting visual effects and are useful for adding shadingto make a circle look like a sphere, for example. In previous versions of Flash, gradients were used only for fills. In Flash 8, you can also use gradients in strokes. Flash defines each gradient with a set of markers called gradient pointers that indicate which color goes where in the lineup of color bands. You define the color for each pointer. By positioning the pointers on the gradient-definition bar, you control how wide each band of color is. Each gradient can contain as many as 15 colors. You define new gradients in the Color Mixer panel. |
Tips To reduce the number of colors in a gradient, with the gradient selected in the Color Mixer, drag one or more gradient pointers downward, away from the gradient-definition bar. The pointer disappears as you drag. The gradient changes to blend the colors in the remaining gradient pointers. When a gradient pointer is set to black, the Color Picker's Luminosity setting gets set to 0% (for white, Luminosity gets set to 100%). That setting means the color-proxy window will show a solid black (or solid white) square even if you enter new RGB values or use the crosshair cursor to choose a new color. To change the color of a pointer that's set to black (or white), you must choose a new color from the color-proxy window's pop-up swatch set, reposition the Luminosity slider (on the right side of the Color Picker window), or enter a new Brightness value. To reverse the direction of a gradient's color transition, drag one gradient pointer over another. In a white-to-black gradient (a white pointer on the left and a black pointer on the right), drag the white pointer to the right past the black one. Your gradient goes from black to white. To create an SVG-compliant gradient, select the Linear RGB check box.
About Using the System Color Pickers In addition to creating colors in the Color Mixer panel, you can create colors in one of the System Color Pickers. These color pickers let you enter colors in a system that may be more to your liking than the RGB/HSB offered by the Color Mixer panel. The Windows System Color Picker allows you to specify colors according to Hue, Saturation, and Luminosity values. The Macintosh OS offers five different System Color Pickers, including one with CMYK sliders. To access the System Color Picker(s), Option-double-click (Mac) or Alt-double-click (Windows) the Fill Color or Stroke Color control in the Color Mixer panel, Tools panel, or Properties tab of the Property inspector. You can also access the System Color Picker(s) by clicking the color control once, to open the swatch set, then clicking the Color Picker button in the upper-right corner. Whenever you select or specify a color that will dither, the color picker splits the preview window; half the window shows the dithered color, and the other half shows the nearest Web-safe color. |
About Bitmap Fills In addition to solid fills and gradients, Flash lets you import bitmap images and use them as fills. They work similarly to gradient fills. You might use a bitmap fill to create a tiled repeating image for the background of a Web page. To learn about working with bitmaps and bitmap fills, see Chapter 14. |
To create a radial gradient 1. | Open the Color Mixer panel.
| 2. | From the Type menu, choose Radial.
The tools for defining circular gradients appear. The gradient-definition bar looks the same as it does for linear gradients, but the preview shows your gradient as a set of concentric circles (Figure 2.10). The leftmost pointer defines the inner ring; the rightmost pointer defines the outer ring.
Figure 2.10. Choose Radial from the Type menu to create a circular gradient. The preview window translates the horizontal gradient-definition bar into the appropriate circular color transitions. 
| 3. | Follow steps 38 of the previous task, "To create a linear gradient," to define the color transitions in the radial gradient.
|
Tips To modify an existing gradient, choose it in the Color Swatches panel. Flash switches the Color Mixer panel to gradient mode and displays the selected gradient. Now you can make any changes you need. Gradients can have transparency. You simply use a transparent color in one or more gradient pointers (see "To define a color's transparency" earlier in this chapter). If a gradient has transparency, a grid shows up in the gradient pointer, in the Fill Color or Stroke Color control, and in the transparent part of the gradient in the preview window (Figure 2.11). Figure 2.11. When transparent colors make up part of a gradient, grid lines appear in the gradient pointer, the Fill Color or Stroke Color control, and the gradient-preview window. 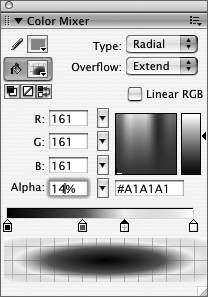 Each pointer in a gradient can have a different alpha setting. To create fade effects, try creating a gradient that blends from a fully opaque color to a transparent one.
|