| Now that you've learned your way around Mail's web-based interface, and you have all of your preferences set, it's time to start sending and receiving email. 4.4.1 Sending Mail To create and send a new email message, follow these simple steps: -
Click on the Compose icon in the toolbar; you will be taken to a new page, which you can use to write and send your email.  | To quickly move from one field to the next , use the Tab key rather than moving the mouse and clicking in each individual field. | |
-
In the To: field, type in the email address of the person you want to send the message to; likewise for the Cc: field if you want to copy someone on the message. -
Type something into the Subject field (your messages should always contain a subject, even if it's just "Hi there"). -
Type in whatever it is that you want to say in the message body area (shown in Figure 4-15). Figure 4-15. Sending a new email message. 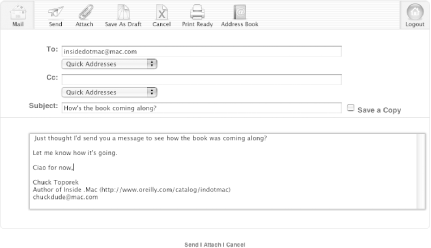
-
Click on the Send icon in the toolbar or on the Send link below the message body area. That's pretty much all it takes to send an email. However, there's a lot more to it than that. For example, what if you want to send the message to more than one person or to include an attachment? Let Safari Check Your Spelling There's nothing worse than getting an email message that's full of spelling errors. At the very least, you should read through your email to ensure that you've spelled everything correctly. Or, if you're lazy (like me), you can let Safari check your spelling as you're typing. To turn on spell-checking in Safari, do the following: That's it. Just one simple step (okay, two if you consider tabbing to the message body field as a step). Now as you're typing along, any misspelled words will have a red squiggle line beneath them. You can either go back to correct the spelling yourself, or you can Control-click on the misspelled word and select the correct spelling from the pop-up menu that appears. |
4.4.2 Sending Messages to Multiple Recipients If you want to send the same message to more than one person, you don't have to send each message individually. To send a message to more than one person, all you need to do is place a comma (followed by a space) between each email address; for example: insidedotmac@mac.com, eyeheartportland@mac.com
When the message gets sent, the mail server will see the comma, and if it finds another email address after that, the message will be sent to the next address as well. As noted earlier, you can have up to 100 recipients on each email message you send (that's the total between the To:, Cc:, and Bcc: fields). Of course, your fingers would fall off if you had to manually type in all 100 email addresses. Fortunately, you can set up a pseudogroup that contains multiple email addresses in your Address Book, and then insert the name of the pseudogroup into the To:, Cc:, or Bcc: field. Why am I calling this a "pseudogroup"? Well, because the .Mac Address Book (accessible by clicking on the Address Book icon in Mail's toolbar or from Mac.com's main page) doesn't allow you to set up email groups like the real Address Book application that ships with Mac OS X. But you can trick the .Mac Address Book into letting you set up a group by doing the following: -
Click on the Address Book icon in Mail's toolbar; the web page will change, taking you to your online Address Book. -
Click on the New icon in the Address Book's toolbar. -
In the First Name field, enter a name for the group you want to create (such as "MyFamily," "MyFriends," etc.). -
Click in the Home Email field and type in the email addresses for everyone you want to include in your group (remember, you can only have up to 100 people copied on a single message, so use that as your limit). -
When you've typed in all of the email addresses, scroll down the page and then click on the Save button. Ta-da! You've just duped the .Mac Address Book into letting you create a group without it knowing. To send an email message to the group (or to anyone else listed in your .Mac Address Book), follow these steps: -
Click on the Compose icon to start creating a new email message. -
In the message window's titlebar (see Figure 4-15), click on the Address Book icon. -
Search for the name of your group by typing its name in the Search field and clicking on the magnifying glass button. -
When the page reloads , you should see the name of your group in the results, as shown in Figure 4-16. Figure 4-16. Search for the name of your "Group," and then choose its Destination. 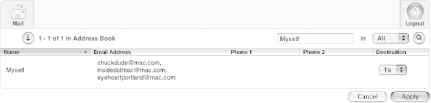
-
In the Destination column, select either To, Cc, or Bcc from the pop-up menu, and then click on the Apply button; this places the Name of the group and the email addresses in the appropriate field of the email message, as shown in Figure 4-17. Figure 4-17. The group email addresses have now been added to the To: line. 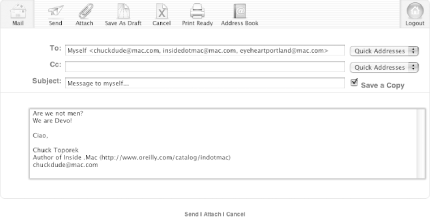
-
Now type in your email message in the message body area and click on the Send icon. -
When you click on the Send button, you'll get a fairly quick error message back, telling you that the addresses you've typed in the To: field aren't valid. If you look closely at Figure 4-18, you can see that the email messages have angle brackets on either side, plus the name you assigned to the group. Figure 4-18. Houston, we have a problem...delete the group name and the angle brackets from the To: line and your message should send. 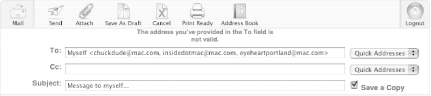
All you need to do is delete these from the To: line and you should be okay. To quickly delete these items: -
Click the mouse just to the right of first angle bracket ( < ), and then hit the Delete key until the cursor has erased the bracket and the name of the group. -
Hit the Down Arrow key on your keyboard to move the cursor to the very end of the To: line. You should see another angle bracket there ( > ); hit the Delete key to remove this bracket. -
Now click on the Send icon and the message will send without fail. Okay, now you can celebrate, knowing that you have indeed successfully tricked .Mac's Mail to let you create and use a group. 4.4.3 Attachments One of the reasons you have an email account is so you can send and receive stuff from the people you know. The most important thing to keep in mind when sending and receiving attachments is file size. Emails containing attachments can be no bigger than 3 MB, either incoming or outgoing. Keep in mind that this not only includes the file size of the attachment, but also of the text of the email message itself. So, if you've got a 3-MB image file you're trying to send, the message will most definitely bounce back with an error because the message itself will be at least a few kilobytes in size. If you're sending an attachment that's close to 3 MB in size , you should keep your message short and sweet ( kurz and gut ), just to be on the safe side. 4.4.3.1 Sending attachments To attach a file (or multiple files) to an email, simply click on the Attach icon in the toolbar; it's the one with the paper clip, as shown in Figure 4-19. Figure 4-19. After you've typed in the message, click on the Attach button to start the process of attaching files to an email. 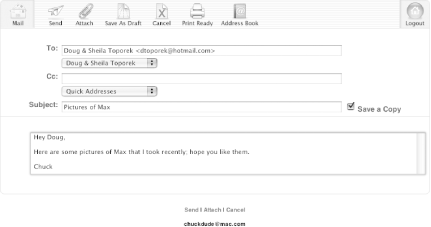
After clicking on the Attach icon, you'll be taken to another page (shown in Figure 4-20) that lets you select and attach files to your email message. It's a simple three-step process that goes as follows : Figure 4-20. Including an attachment with your email is easy; just follow the steps. 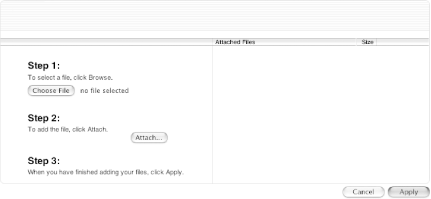
-
Select a file by clicking on the Choose File button. A sheet slides out of the browser's titlebar (as shown in Figure 4-21) with a dialog box that lets you select a file to attach. Simply move around in the column view as you would with the Finder, select the file to attach by clicking on it once, and then click on the Choose button. Figure 4-21. Selecting an attachment is pretty simple, just find the file, select it, and click on the Choose button. 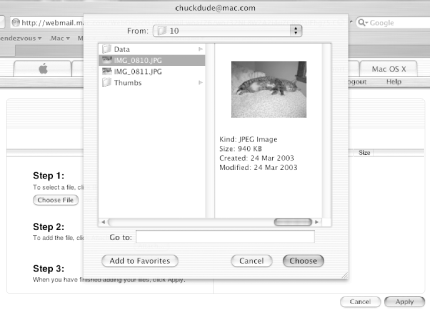
-
After clicking on the Choose button, the sheet will slide back up into the browser's titlebar, and you'll see an icon for the file, along with its filename, next to the Choose File button as shown in Figure 4-22. Figure 4-22. Click on the Attach button in Step 2 to attach the file to your email. 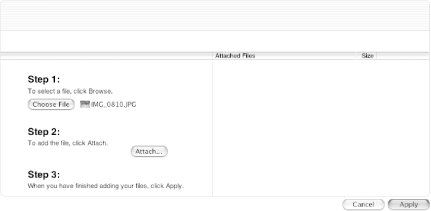
-
Now before you try attaching more files, don't click on the Choose File button just yet because the first file hasn't really been "attached." Once you've chosen a file to attach, you need to proceed to Step 2 in the window and click on the Attach button; this actually attaches the file to your message. -
After the file has attached itself, you'll see the file listed in the right side of the window, as shown in Figure 4-23. Notice that the right pane shows the filename and its file size in kilobytes, and also has a Remove button next to it, just in case you change your mind about attaching that file. Figure 4-23. Now the file is attached ( sort of). 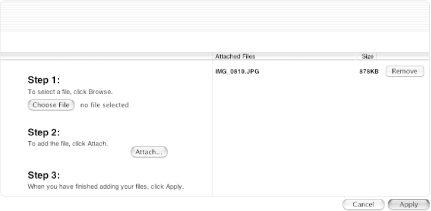
| | It's worth noting that the right pane of the page doesn't calculate the total size of the attachments you've applied to a message. If you're uncertain about how close you are to hitting the 3-MB limit, you'll need to add up the file sizes yourself. Since the file sizes are shown in kilobytes (KB), keep in mind that there are a 1000 KB to a megabyte (MB). If the total of your attachments is nearing 2900 KB, you might want to cut it short and send any additional files with a separate email message. | |
-
If you have more files to attach to your message, go back and repeat the first two steps. When you're certain that all of the files you want to attach are there, click on the Apply button at the bottom of the page. After you do this, the attachments are applied to the message, and you're returned to the Compose message view, as shown in Figure 4-24. Figure 4-24. Only after clicking the Apply button will the messages finally attach themselves to the message. 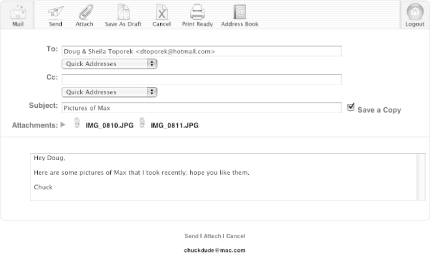
If you look below the Subject line, you'll see an additional header to the message: an Attachments line. To view additional information about the attachments, click on the black disclosure triangle (next to "Attachments:"). The triangle will point downward (Figure 4-25), and you'll see the attachments listed showing their filename, size, and MIME type, along with a Remove button so you can drop one or all of the attachments if you've changed your mind. Figure 4-25. Click on the disclosure triangle to reveal an email's attachments. 
If everything looks right (meaning the files you want to send are there), click on the Send button to send the message with the attachments. If you need to attach additional files, you can go back and click on the Attach button and repeat Steps 1-3 again. What the Heck Is a MIME Type? As you can see from Figure 4-25, the Attachments line displays the MIME type for any attachments. But what the heck is a MIME type? MIME , which stands for Multipurpose Internet Mail Extensions (and not the goofy white-faced, stripe- wearing freaks found in parks of large metropolitan areas), is a way of indicating what type the file is, what icon to apply to it, which applications can open it, and so forth. In the case of the attachments in Figure 4-25, you can see that their MIME type is listed as "image/jpeg", which lets you know that these are, well, JPEG images. MIME types are assigned by the Internet Assigned Numbers Authority (IANA; http://www.iana.org). A complete listing of MIME types is available on through their web site at http://www.iana.org/assignments/media-types. |
4.4.3.2 Receiving attachments When you receive a message that contains attachments, you'll see a little paper clip in the column that's sandwiched between the checkbox and the column that contains the blue dots that indicate an unread message, as shown in Figure 4-26. Figure 4-26. A paper clip icon in a message is an indicator that the message has an attachment. 
Before you can download the attachment from the .Mac email server to your Mac, you first need to view the message by either clicking on the sender's name in the From column or on the subject line in the Subject column. You'll notice that the word "Attachments" is highlighted in blue, and you can see the filename of the attachment next to a paper clip and a black disclosure triangle. If you click on either "Attachments" or on the disclosure triangle, the triangle will flip downward, revealing the details for the attachment as shown in Figure 4-27. Figure 4-27. Viewing the attachment (at least in the email message) is as simple as clicking on the disclosure triangle. 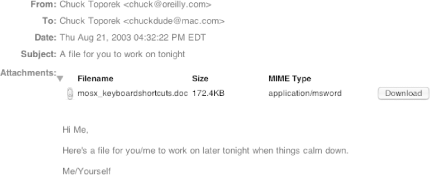
As with outgoing attachments, you can see the attachment's filename, size (in KB), and MIME type. In the case of this attachment, the MIME type ( application/msword ) tells us that the file can be opened using Microsoft Word. To download the attachment from the .Mac email server to your Mac, click on the Download button. Another browser window opens as the file downloads to your Mac, after which you can just close that window by clicking on the link provided. The attachment will download to wherever you have specified downloaded files to be saved on your Mac. For example, I have Safari set up so that any files I download from the Internet are saved in a Downloads folder on my Desktop. By default, Safari is configured to save downloaded files to your Desktop; however, if you want to create your own Downloads folder, follow these steps: -
From the menu bar, go to Safari  Preferences ( Preferences (  -,) -,) -
Click on the General icon in the preference window's toolbar -
In the pop-up menu next to "Save downloaded files to", select "Other..."; a sheet will slide out of the preference window's titlebar -
Click on Desktop in the sheet's sidebar -
Click on the New Folder button beneath the sidebar -
In the window that appears, enter "Downloads" as the name of the new folder -
Click on the Create button to create the Downloads folder on your Desktop -
Click on the Select button to select the Downloads folder and close the sheet -
Close Safari's preferences window with -W (or click on the red close window button) Now the next time you save an attachment from .Mac's web-based Mail or download something from the Internet, the file will be saved in your Downloads folder. 4.4.4 Deleting Mail and Emptying the Trash One thing that's slightly confusing is the role of the Deleted Messages and Trash folders. After selecting a message and clicking on the Delete button, that message gets moved to the Deleted Messages folder, which means that the message will still be around, taking up space. Only messages that are moved to the Trash folder will be deleted when you log out. To clear out the messages sitting in the Deleted Messages folder, follow these steps: -
Select Go To Deleted Messages from Mail's toolbar. -
Since you've already moved these messages to the Deleted Messages folder, you know you want to get rid of all of these. Click on the All column heading to place a checkmark next to all of the messages in the view, and then select Move Messages To Trash from the toolbar (as shown in Figure 4-28). Figure 4-28. Select all of the messages you want to permanently delete, and then move them to the Trash folder. 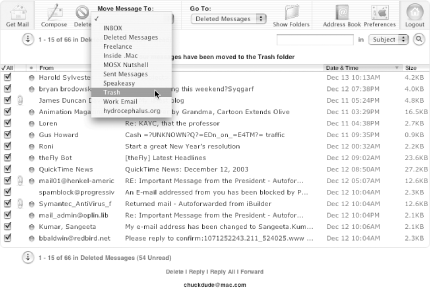
Repeat this step until all of the messages in your Deleted Messages folder have been moved to the Trash folder. -
Click on the Show Folders icon in the toolbar; this will take you to the page shown in Figure 4-29, which lists all of your email folders. Figure 4-29. After clicking on the Show Folders icon, you'll see a listing of your email folders. 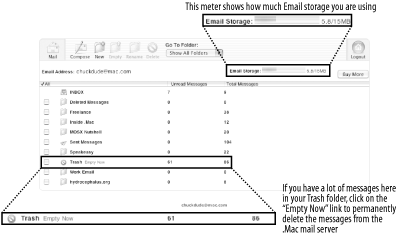
-
To permanently delete the messages in the Trash folder from the .Mac mail servers, click on the Empty Now link next to the name of the Trash folder. The page will refresh, and you should see that there are no messages sitting in your Trash folder. In addition, take a look at the Email Storage meter to see how much email space you just recovered. | | Of course, the one way around all of this is to click on the Preferences icon in the toolbar and uncheck the box next to "Move Deleted Messages To" in the Composing pane. Since you won't be moving deleted messages to any particular folder, they will be removed from the server as soon as you click on the Delete icon. | |
|