4.3 Setting Mail's Preferences Now that you know your way around the web interface a bit, let's configure your preferences for using .Mac's web-based mail. In the Mail toolbar, click on the Preferences icon (the one that looks like the System Preferences icon in the Dock). When the Mail Preferences page loads, you'll see your .Mac email address in the mailbox display area, along with a little status bar to the right that shows how much storage space you've used. By looking at the status bar, you can quickly find out how much email storage space you've used and how much you have waiting at the ready for incoming email. There's also a Buy More button, which when clicked, takes you to a page where you can purchase additional storage space. Mail's Preferences page is divided into three sections: -
Composing -
Viewing -
Account The sections that follow contain details on Mail's preference panes.  | When you make any changes to your Mail preferences, make sure you scroll down to the bottom of the web page and click on the Save button. If you don't, the changes you've applied won't take effect. | |
4.3.1 Composing This section, shown in Figure 4-6, lets you configure Mail for how it handles the email messages you send. Figure 4-6. The Composing pane of Mail's Preferences page. 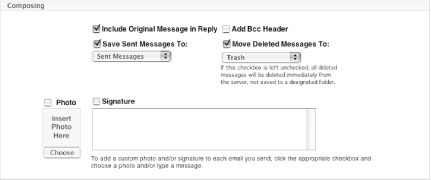
The top part of this section has a series of checkboxes that you can check or uncheck, depending on your needs. These include: -
- Include Original Message in Reply
-
With this option selected, the contents of the original email message will be displayed in the message body area (described later) when you reply to an email.  | This works only if the person who has sent you an email is sending their mail as plain text . This means that their message cannot contain any special formatting. If it does and you click on the Reply button, the original message will be sent back along with your reply as an attachment. This can be really annoying, because you have no way of seeing what you were replying to unless you go back, select, and copy all of the message text with the mouse, and then paste their message text into your reply. | |
-
- Add Bcc Header
-
The Bcc header, which stands for Blind Carbon Copy, lets you copy someone on the message, and Mail will hide that person's email address from everyone else who received the message. This feature is convenient for when you want to send an email message to a group of people, but want to hide the list of recipients from everyone else. For example, if you type in the addresses for 20 different people into the Bcc header field, each person will see the message with only their name and/or email address in the To: field; they won't see everyone else's. Bcc headers are also great for copying someone on a message when you don't want the person whose address you've typed into the To: field to know that you're copying someone else. This option is unchecked by default. -
- Save Sent Messages To
-
If this option is selected, a copy of the messages that you send from Mail will be saved to the folder you select from the pop-up menu. This option is unchecked by default. -
- Move Deleted Messages To
-
Select this checkbox if you want to keep copies of the messages you've deleted, or to have them placed in a different mail folder (such as the Deleted Messages folder). If this option is unchecked, any messages that you delete will be removed from the server immediately. This is helpful for keeping the size of your .Mac mailbox under control. If you leave this box checked, you can delete all of the messages from the .Mac server by doing the following: -
From Mail's toolbar, select Go To  Show All Folders. Show All Folders. -
-
Select Go To  Deleted Messages from Mail's toolbar. Deleted Messages from Mail's toolbar. -
Select all of the messages by clicking on the All column heading. This places a checkmark next to all of the messages in the view. -
In Mail's toolbar, select Move Message To  Trash to move the messages to the Trash folder. If there is more than one screen of messages here to trash, repeat this step until no more messages show up in the Deleted Messages folder. Trash to move the messages to the Trash folder. If there is more than one screen of messages here to trash, repeat this step until no more messages show up in the Deleted Messages folder. -
In Mail's toolbar, select Go To  Show All Folders. Show All Folders. -
-
Click on the checkbox next to the word Photo and place a checkmark in this box to enable this feature. -
Click on the Choose button below where your image will be to select an image to use. The web page will change to that shown in Figure 4-7. Figure 4-7. Adding a photo to your .Mac messages. 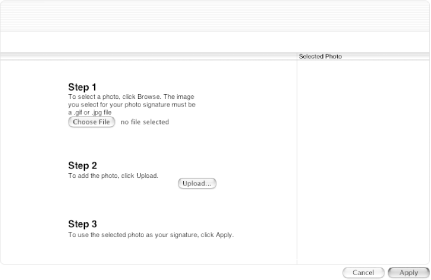
-
Click on the Choose File button under Step 1. As the message says, you can only use a GIF or JPEG image; don't worry about the size of the image, we'll get to that in a moment. A Finder sheet (shown in Figure 4-8) slides out of the browser's titlebar, from which you can locate a picture to use. If you're like me and you store your images in your Pictures folder, select that from the Sidebar of the sheet, locate the picture you want to use on the right side, and then click on the Choose button. Figure 4-8. Locate the picture you want to use, and then click on the Choose button. 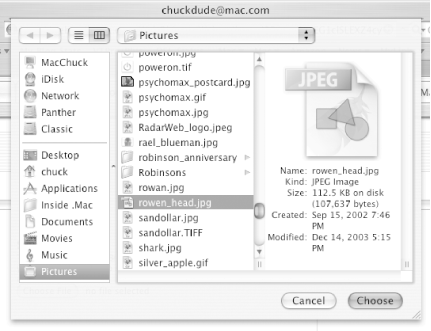
-
After you have selected the picture to use, proceed to Step 2 in the window and click on the Upload button; this uploads the picture you've selected to the .Mac server. Once the picture has uploaded to the server, you will see it displayed to the right in the Selected Photo section, as shown in Figure 4-9. Figure 4-9. Once uploaded, your picture will appear on the right. 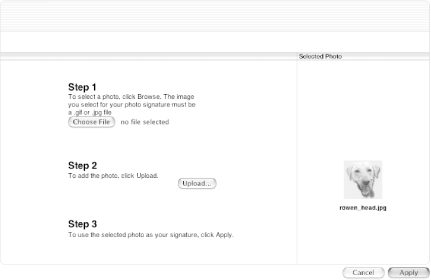
-
Click on the Apply button (shown at the bottom right of Figure 4-9). This applies the photo you've selected to your .Mac account, and takes you back to the Composing preferences page to show you the photo you've selected, as shown in Figure 4-10. Figure 4-10. Your photo has now been added to your .Mac account. 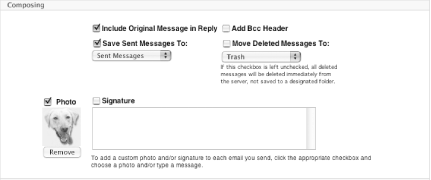
-
If you're okay with the photo you've added, click on the Save button. What About Resizing the Photo? As mentioned earlier, you don't have to worry about resizing the photo that will be used as the image attached to your .Mac email. When you upload your photo, the image file gets stored on the .Mac servers in all its full- sized glory . But when you send a message, a little script runs on the .Mac server to resize and attach your image to your emails. If you look at the raw source for a .Mac email message, you'll see a line that looks similar to the following: X-Image-Url: http://homepage.mac.com/chuckdude/.cv/thumbs/me.thumbnail
This line is a link to the .Mac server, which is used to convert your image down to a size that's small enough to attach to your email message. In looking at this line a bit further, you can see the script ( .cv ) that's used to convert (or resize) your image file. Pretty cool, huh? However, if you want to resize the image yourself, the actual image size should be 64 64 pixels. |
4.3.1.2 Adding a signature to your emails If you want to include a signature a the bottom of your email messages, click on the checkbox next to Signature, and then type something in the text field below. Your email signature can be anything, such as your name and email address: - Chuck Toporek
- Editor, Author, Speaker
- chuckdude@mac.com
or something that includes a URL: - Chuck Toporek
- Author of "Inside .Mac" (http://www.oreilly.com/catalog/indotmac)
- chuckdude@mac.com
In the case of the last example, I've placed a URL in parenthesis, which points to O'Reilly's web site for this book. When an email message is delivered with my signature attached, the URL turns into a link; when clicked, the recipient is taken to this page.  | The URL actually gets processed as a redirect. When you place your mouse over a link in someone's email message or signature, you can see a URL similar to the following show up in Safari's status bar (if you have it enabled): http://www.mac.com/webmail/redirect/http://www.oreilly.com/ catalog/indotmac
To enable Safari's status bar, select View  Status Bar, or use its keyboard shortcut ( Status Bar, or use its keyboard shortcut (  -/). -/). | |
What you put in your signature is really up to you, but word to the wise: don't include your phone number or any other personal information in your signature. If you really need to give someone your phone number, it's best to do that on a case-by-case basis, rather than to include it as part of your email's signature. 4.3.2 Viewing This section of Mail's Preferences, shown in Figure 4-11, has the following three options for controlling how Mail displays the messages in your inbox: -
- Time Zone
-
This is the time zone in which you live or from where you are sending email messages. When you send an email, the current date and time are attached to your messages based on what you've selected from the pop-up menu. -
- Messages Per Page
-
By clicking on the pop-up menu, you can opt to have 10 (the default), 15, 20, 25, 30, or 50 messages display in the message list when you're viewing the messages in a mail folder. The option you select here applies to all of your message folders. -
- Show "All Headers" Option
-
This option is unchecked by default; however, if you want the ability to view all of the headers on an email message (which is mostly gibberish that one mail server uses to send email to another mail server), click on this checkbox. With this option enabled, a Show All Headers button will appear at the top of each email message you view online. For the most part, you should never have to look at a message's headers; however, there are times when they do come in handy. For an example, see the sidebar titled, Dealing with Spam, located in the next section. Figure 4-11. The Viewing pane lets you specify how the messages appear in the display. 
4.3.3 Account If you thought having an image on your .Mac email or being able to view message headers was fun, just wait until you hit the Accounts section of the preferences page, shown in Figure 4-12. Figure 4-12. The Account preferences pane. 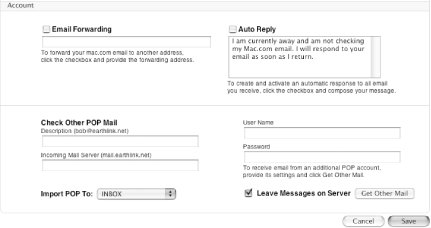
From this part of the Mail preferences page, you can: -
Specify an address to forward your Mac.com email to -
Set up an auto-reply message -
Check the email for a POP email account using your .Mac account Dealing with Spam No, I'm not talking about the gelled lunch meat that comes in a can, but the dreadful email messages you might receive for no reason. If you find that you're getting a lot of spam to your Mac.com email address, there are some things you can do to head them off at the pass: -
If you're reading your Mac.com email with Mac OS X's Mail application, you can set up the Junk Mail filtering to look for suspected spam and automatically delete it. To do this, go to Mail  Junk Mail and (at first) enable Training mode. Once you're sure that the messages Mail is flagging as Junk are actually junk, you can flip the switch and put Junk Mail into Automatic mode so you don't have to do anything. Junk Mail and (at first) enable Training mode. Once you're sure that the messages Mail is flagging as Junk are actually junk, you can flip the switch and put Junk Mail into Automatic mode so you don't have to do anything. -
Forward the offending spam message, including its message headers, to spam@mac.com. To reveal the message headers, go to http://www.mac.com/webmail and log in using your .Mac member name and password. Click on the Account button in the Sidebar (or your named button in the navigation bar), and then enable the checkbox next to the Show All Headers option. Go back to the spam message and click on the Show All Headers button, and then forward the message to spam@mac.com. It's worth noting that Apple does a fair amount of spam filtering on the server side that .Mac users never see. However, on those occasions when one does slip through, it's nice to know there's something you can do to help solve the problem. |
The first two of these are fairly self-explanatory, but there's a bit more to setting up the third option. The three options you'll find in the Account section include: -
- Email Forwarding
-
If you want to have your .Mac email forwarded to another email address, click on the checkbox to place a checkmark there, and then type in the email address to where you want your .Mac mail forwarded. After clicking on the Save button at the bottom of the page, your .Mac mail will be sent on to the email address you've specified. -
- Auto-Reply
-
If you are going to be away on business or vacation, but want to let people know that their message has been received, click on the checkbox next to Auto-Reply. You can opt to use the default message (shown in Figure 4-12), or you can delete that and type in something different.  | If you enable Email Forwarding or Auto Reply, just remember to come back here and disable these options when you no longer need them. | |
-
- Check Other POP Mail
-
If you have a POP email account (say through your ISP or from work), you can configure .Mac's Mail to pick up this mail, making it viewable on the Web. This is particularly handy for when you go on vacation, but don't want to drag your expensive PowerBook or iBook along. If you find yourself someplace that offers Internet access, you can go on the Web and read all of your email online. To set this up, however, involves a little bit more work, but if you follow along closely, you shouldn't have any problems: -
Exit out of Mail's preferences by clicking on the Save button at the bottom of the web page. This should take you back to the main Mail page, showing you the messages in your Inbox. -
In the toolbar, click on the Show Folders button. This takes you to a page that lists all of your email folders, as shown in Figure 4-13. Figure 4-13. Click on the Show Folders button to see a listing of your Mail folders, shown here. 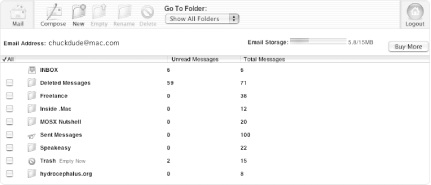
-
On this page's toolbar, click on the New icon to create a new email folder. You will see a new folder appear at the top of the list of folders, with a blank field next to it. Type in something that will let you quickly identify that folder with the POP account; for example "Work Mail" or "My ISP", as shown in Figure 4-14. After entering the name for the folder, click on the Save button at the lower right of the page. The page will refresh, showing you the new folder you've created. Figure 4-14. Give a name to that new folder. 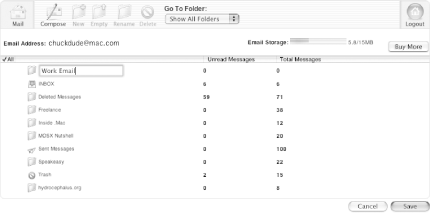
-
Now click on the Mail icon at the far left of the toolbar; this will take you to your main Mail page. -
In the toolbar, click on the Preferences icon to go back to the Mail preferences page; once there, scroll back down to the Check other POP Mail section. -
In the fields for this section, enter the following information: -
Description : Enter something simple such as your work email address (for example, mine would be chuck@oreilly.com ), or something easy, such as "My Work Email". -
Incoming Mail Server : Type in the name of your incoming mail server; you should obtain this from your ISP or from your system administrator at work. -
User Name : Enter the username for your POP email account. The username for your POP mail account appears before the @ symbol in the email address. For example, if my work email address is chuck@oreilly.com , my username is chuck . -
Password : Enter the password you use to access your email from the POP server. -
In the pop-up menu next to Import POP To, select the name of the folder you created earlier (for example, Work Mail or My ISP). -
And the all-important step: make sure that there is a checkmark in the box next to Leave Messages on Server. The reason for this is because the next time you go to download your POP mail from wherever you mainly do, the messages you've been reading through the .Mac web-based Mail interface will still be there to download to your computer. -
Click on the Save button to save your changes.  | If you have more than one POP account that you'd like to check as well, click on the Get Other Mail button and repeat all of the steps listed here. Don't forget to create a folder to filter the POP mail in to. | |
Now the next time you check for new messages, your POP mail will download along with your .Mac mail, and the POP mail will filter its way into the folder you created for it. (It's just a shame that you can't set up rules or filters for other incoming messages so you could automatically redirect them to other email folders. For this, you'll have to rely on the Mail application that ships with Mac OS X instead.)  | If you receive a lot of mail with lots of attachments at one or more of your POP accounts, be warned that you can quickly exceed .Mac's base email storage of 15 MB. Use this feature judiciously, or plan to watch the meter on your email account quickly go into the red. | |
If you decide at a later time that you want to disable POP mail forwarding, go back to Mail's preferences page, delete the entries from the fields, and then click the Save button to save the changes. |


 Show All Folders.


