Constructing a Database System
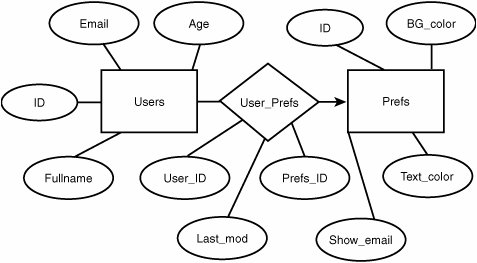
| Now that your database system is installed, it's time to get started creating a working database. This is a process that involves careful planning and design; you can't just indiscriminately create tables and columns without an eye toward maximum efficiency. Likewise, you can't simply assume that you'll be able to go back and redesign the system later as you learn how it should be done. Although database schemas can be changed, it's not terribly easy to do so, and in some cases it can't be done without loss of data or without destabilizing your own web application code built on top of the existing schema. Before you do anything else, you'll need to create your database. This amounts to little more than creating an empty directory (via the MySQL or PostgreSQL interface) that will hold your tables and indexes. Log in to the database using the mysql command-line interface and issue the CREATE DATABASE command as follows: # mysql -p Enter password: Welcome to the MySQL monitor. Commands end with ; or \g. Your MySQL connection id is 8 to server version: 3.23.51 Type 'help;' or '\h' for help. Type '\c' to clear the buffer mysql> create database PictureArchive; Query OK, 1 row affected (0.02 sec) In PostgreSQL, you can use the command-line tool createdb (which you must run as the pgsql user) to open up the new database, as shown here: # su -l pgsql $ createdb PictureArchive CREATE DATABASE Designing TablesBefore you begin creating the tables for your database, it's best to come up with a conceptual diagram for how your data will be organized and how the relations will be mapped. This is typically done with an Entity-Relationship (E-R) diagram. A sample E-R diagram is shown in Figure 29.3. Figure 29.3. Sample E-R diagram showing a simple relationship between two tables, Users and Pictures. In this diagram, two sample tables (Users and Pictures) are denoted by rectangles, and their component attributes (columns) are shown as ellipses. Relations between tables are shown with arrows, their shape and direction chosen by convention to indicate the type of relationship. Because the User_ID column in Pictures refers explicitly to the ID field in Users, you can use an arrow directly from the Pictures table to the Users table, showing that it's a "many-to-one" relationship. Arrows in E-R diagrams point toward the "one" side of such a relationship; in a "one-to-many" relationship, the arrow would point from Users to Pictures. In a "one-to-one" relationship, such as one where a second table has one entry per user, a double-headed arrow would be used. In more complex data sets, you will want to use tables that represent relations between other tables, possibly with the addition of further data fields. Let's say you want to add a table to PictureArchive that describes a set of layout profiles for the website (so that each user can select the way the site appears for himself). This new table, called Prefs, would have fields such as Background_color, Text_color, a Boolean value describing whether or not to display the user's email address, and an integer ID. This table must be related to each user somehow, but the Prefs table doesn't have a field that refers to a specific user (like Pictures does), because each record in Prefs is just a set of attributes that should be assignable to any number of different users. You don't want to add another field to Users to specify the Prefs ID for each user. Therefore, the solution is to create a new table, called User_Prefs, that contains no actual data, but instead describes the "many-to-one" relationship between Users and Prefs. The E-R diagram for this is shown in Figure 29.4. Figure 29.4. Sample E-R diagram showing data entities and relationship sets. The User_Prefs table is represented with a diamond because it is just a relationship set, rather than a table of data in its own right. It contains just three columns: User_ID, Prefs_ID, and a third column called Last_mod, which stores the date (in UNIX time, an integer) when the user last updated his preferences. This way, each time a user updates his preferences (through some mechanism in the website that you create, as you'll learn later), the update process simply creates a new entry in the User_Prefs table rather than an existing entry having to be updated (and the changes could be rolled back by simply deleting the most recently added record). The insertion of the new entry could be accomplished with a query like the following, executed (for instance) by a CGI script: INSERT INTO User_Prefs (User_ID,Prefs_ID,Last_mod) VALUES ("5","3","1030745048"); Then, when the user views his page, your code can query the database for the most recent entry in User_Prefs for this user, find the Prefs_ID, and query for the attributes of that Prefs entry in order to generate the page according to those attributes. Here is an example of those queries: SELECT Prefs_ID FROM User_Prefs WHERE User_ ORDER BY Last_mod DESC LIMIT 1; ... [ Extract the value of Prefs_ID into $prefs_id, as we will see later ] SELECT Background_color,Text_color,Show_email FROM Prefs WHERE ; Alternatively, if you're even more adventurous, you can combine these into a single query with a join: SELECT Background_color,Text_color,Show_email FROM User_Prefs,Prefs WHERE User_Prefs.User_ AND User_Prefs.Prefs_ID=Prefs.ID ORDER BY Last_mod DESC LIMIT 1; You can even do a three-way join to get all of a user's information out of the Users table as well as his latest entry in Prefs, as shown here: SELECT Fullname,Email,Age,Background_color,Text_color,Show_email FROM User_Prefs,Users,Prefs WHERE Users. AND User_Prefs.User_ID=Users.ID AND User_Prefs.Prefs_ID=Prefs.ID ORDER BY Last_mod DESC LIMIT 1; Planning out the structure of your tables in this way, before you even begin creating them, will save you a lot of heartache later on when you might otherwise have had to redesign everything from inside a running system. Creating TablesNow that you have a working design in mind for your database, you can begin creating tables. This is done with the CREATE TABLE query command. The syntax for this command in its most common form is fairly simple, but it does require the knowledge of what kinds of data types are available, whose attributes can be complicated. The most common of these are shown in Table 29.1, although more types are available as well and are fully documented at the MySQL and PostgreSQL websites.
Let's create the tables discussed already in the PictureArchive example. The Users table needs to have an integer ID field, text strings for the Fullname and Email fields, and another integer for Age. The following code creates that table: CREATE TABLE Users (ID INT, Fullname VARCHAR(64), Email VARCHAR(32), Age INT);The Prefs table will have an integer ID, six-character text fields for the two color fields (which you will populate with hex values), and an ENUM for Show_email (because MySQL doesn't have BOOLEAN). This code creates that table: CREATE TABLE Prefs (ID INT, Background_color VARCHAR(6), Text_color VARCHAR(6), Show_email ENUM("Y","N")); After entering the CREATE TABLE commands, issue a DESCRIBE Users command to view your handiwork, as shown here: mysql> DESCRIBE Users; +----------+-------------+------+-----+---------+-------+ | Field | Type | Null | Key | Default | Extra | +----------+-------------+------+-----+---------+-------+ | ID | int(11) | YES | | NULL | | | Fullname | varchar(64) | YES | | NULL | | | Email | varchar(32) | YES | | NULL | | | Age | int(11) | YES | | NULL | | +----------+-------------+------+-----+---------+-------+ 4 rows in set (0.00 sec)After some data has been entered into a table, the output from any queries you make at the command line will be returned in a tabular format, along with the time it took to process the query. If the columns are too wide for your screen, they will wrap rather than truncate; this can lead to a confused-looking display. Being selective in which fields you query for will help keep the output readable. The following example shows a couple of multiline INSERT queries that populate the Users table, followed by the tabular output from a judiciously restricted SELECT query: mysql> INSERT INTO Users (ID,Fullname,Email,Age) -> VALUES (1,"Joe Smith","jsmith@somewhere.com",22); mysql> INSERT INTO Users (ID,Fullname,Email,Age) -> VALUES (2,"Alice Walker","awalker@elsewhere.com",31); mysql> SELECT ID,Fullname,Email,Age FROM Users; +----+--------------+-----------------------+------+ | ID | Fullname | Email | Age | +----+--------------+-----------------------+------+ | 1 | Joe Smith | jsmith@somewhere.com | 22 | | 2 | Alice Walker | awalker@elsewhere.com | 31 | +----+--------------+-----------------------+------+ 2 rows in set (0.00 sec) Indexes and KeysYou now have working tables that can be used in active queries. Setting up a complete database is not quite that simple, however. One other thing to consider when designing your tables is how they will be indexed. Indexing determines the ordering of data within a database and is what allows databases to be as fast as they are. You saw a brief discussion of indexing using hash tables in a note in Chapter 13, "Users, Groups, and Permissions;" a fuller description is necessary here because indexes using hash tables are a big part of any database administrator's life. Think about looking up a word in the dictionary; if you were looking for the word sleep, but you didn't know what "alphabetical order" was, you could literally spend weeks searching linearly through the dictionary until you found it. But because you know where the letter S is in the alphabet, you know how to zero in directly on the word and find it very rapidly. Computers are the same way. If they have no indexing scheme by which to look up a piece of data, they can only search linearly through the data store for italthough they can do it faster than you can, it's still an unacceptably slow solution in most high-performance database contexts. Therefore, you have to create appropriate indexes (or hash functions, which for computers are similar to our concept of alphabetical order) and keys (such as the first letter of sleep) to help the database find its way through the data. All tables of entity data (those that would be depicted with rectangles in an E-R diagram) should have a primary key. This is a column specifically designated to be the value upon which the data in the table should be automatically indexed. Values in this column should be specified as NOT NULL (in other words, they can't have a NULL valuea blank input value will become 0 for numeric data types and an empty string for text types). All values in the primary key column must also be unique. This sounds like a role tailor-made for the integer ID columns in our tables. Indeed, the best practices in creating tables often call for the first column in every table to be a numeric ID that's the primary key and that also has the AUTO_INCREMENT attribute specified. This makes the column behave in a special way: If you insert rows into a table with an AUTO_INCREMENT column (which must also be a primary key), you can simply leave the value for that column blank or NULL, and the database will automatically fill in the next unused integer (the highest number in the column plus one) for each new row. This is perfect for the purposes of this chapter; you'll get a new unique ID number for each entry you put into your tables, and you don't even have to calculate it yourself. Normally, you would specify these attributes at table-creation time: CREATE TABLE Users (ID INT NOT NULL PRIMARY KEY AUTO_INCREMENT, Fullname VARCHAR(64), Email VARCHAR(32), Age INT); However, because in this case your tables are already created, you can use the ALTER TABLE command to change the ID column to your taste: ALTER TABLE Users CHANGE ID ID INT NOT NULL PRIMARY KEY AUTO_INCREMENT;Note PostgreSQL does not have AUTO_INCREMENT; instead, it has a special data type called SERIAL (which is more efficient in that it's a built-in type rather than a function). The SERIAL data type is not subject to the same keying restrictions as AUTO_INCREMENT, but it acts much the same. Use SERIAL instead of INT to create an autoincrementing ID field. Note that in PostgreSQL, if you specify NULL (instead of 0) for the ID field in an INSERT operation, NULL will be entered instead of the next available integer, which you would get if you simply didn't provide a value for that field. NULL trumps the SERIAL property in PostgreSQL. MySQL's AUTO_INCREMENT, by contrast, is invoked on any NULL or 0 entry into such a field. You can specify other keys on other columns in the table by using the KEY attribute after the variable name at table-creation time, or by using the ADD INDEX statement in the ALTER TABLE command. Issuing one of these commands creates an index on each key you specify. You can also create indexes based on multiple columns. This approach is useful when the unique combination of two columns taken together is what's usefully unique in a table. You can create indexes based on multiple columns like so: ALTER TABLE Users ADD INDEX (Email,Fullname);This code will result in a MUL tag (for "multiple," meaning that the table has multiple indexes) appearing in the Key column of the output of describe Users. It's very important to try to anticipate which tables will be accessed a lot and which will have a large amount of data. Indexing these tables properly, with the keys being the columns on which those tables will most frequently be searched, can cause unbelievably dramatic improvements in performance. You'll see more about tuning your database for speed later in this chapter, in the "Optimizing Database Performance" section. Maintaining SecurityAccessing your databases as root isn't a particularly good idea. You will likely want to enable other usersregular usersto access their own databases on your system; this is especially true when you connect the database to the Web. Each database has access privileges that can be given to individual users at different hosts, and a properly set up database system has those privileges doled out completely but carefully. Let's say your PictureArchive database needs to be accessible by the user frank on the local system. frank needs to have the ability to create tables, add data to them, select and delete data from them, update them, and drop them. (The ability to create and drop tables is necessary in order for him to handle temporary tables.) You can grant frank these privileges with the GRANT command in MySQL: GRANT CREATE,SELECT,INSERT,UPDATE,DELETE,DROP ON PictureArchive.* TO frank@localhost IDENTIFIED BY 'password' WITH GRANT OPTION; If you want to be more lenient, you can use GRANT ALL PRIVILEGES instead of explicitly listing the privileges to grant. You can also grant privileges on specific tables within PictureArchive (by entering the name of those tables instead of the asterisk, which means "all tables"), or you can grant them on all tables on all databases by entering *.* in place of PictureArchive.*. Replace password with the password frank wishes to use; putting it in single quotes as an argument to IDENTIFIED BY will hash the password and put it into the system in an encrypted format. Finally, the optional WITH GRANT OPTION gives frank the ability to grant privileges to other users himself. The analogous functionality in PostgreSQL is the createuser tool, which provides the same options in an interactive fashion at the regular system command line, as shown here: # su -l pgsql $ createuser -P Enter name of user to add: frank Enter password for user "frank": Enter it again: Shall the new user be allowed to create databases? (y/n) y Shall the new user be allowed to create more new users? (y/n) y CREATE USER To provide user-level security on the databases, you may want to edit /usr/local/pgsql/pg_hba.conf and uncomment the following sample lines (and comment out the current active configuration lines): # TYPE DATABASE IP_ADDRESS MASK AUTH_TYPE AUTH_ARGUMENT local sameuser md5 local all md5 admins If you want, you can create a file called admins in /usr/local/pgsql/data, with one database username per line; only those users will be allowed to work with the databases. You can do the same with each new database you createsimply add a different file for each database, with the name of the user who owns it, and the name of the file in place of admins in this example. Alternatively, you can enforce a policy whereby local users can connect, without passwords, only to their own databases (those that have names that match the usernames). For instance, the user frank would have a database called "frank." This can be done with the following configuration line: local all ident sameuser The security model for PostgreSQL is generally more advanced and robust than MySQL's, but it also requires more study in order to harness it properly. Refer to the online documentation at http://www.postgresql.org/docs for further information. |