Creating an Emergency Repair Disk
Windows 2000 includes several tools that might be able to rebuild your system in the event of a catastrophic failure. One of these tools is an Emergency Repair Disk, which contains configuration information about your computer. In Windows NT 4, you needed to remember a cryptic command to create an Emergency Repair Disk; in Windows 2000, the ERD-creation process has found a home in Backup.
TIP
Create a new Emergency Repair Disk whenever you change your hardware configuration, modify disk partitions, or install new software.
To create an Emergency Repair Disk:
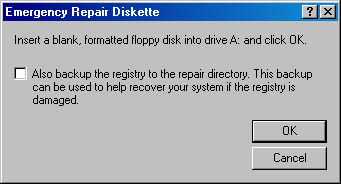
- Insert a blank, formatted floppy disk in your computer's floppy disk drive.
- On the Welcome tab, click Emergency Repair Disk.
- For maximum protection, select the check box in the Emergency Repair Diskette dialog box, which backs up the registry to the %SystemRoot%\Repair\RegBack folder.
In addition to creating files on the floppy disk, creating an Emergency Repair Disk also copies a number of files to the %SystemRoot%\Repair folder.
The next step in preparing for disaster is to make sure your Windows 2000 Professional CD is handy. The Emergency Repair Disk relies on the setup program that lives there, and even if you copied it to your hard disk, you might not be able to get to it in your time of need.
SEE ALSO
For information about using the Emergency Repair Disk, see "What to Do if Windows 2000 Doesn't Start."
Finally, make a complete backup of your system, including the System State. Repeat this step regularly and frequently!
EAN: 2147483647
Pages: 317
- ERP Systems Impact on Organizations
- The Effects of an Enterprise Resource Planning System (ERP) Implementation on Job Characteristics – A Study using the Hackman and Oldham Job Characteristics Model
- Data Mining for Business Process Reengineering
- Intrinsic and Contextual Data Quality: The Effect of Media and Personal Involvement
- A Hybrid Clustering Technique to Improve Patient Data Quality
- Chapter I e-Search: A Conceptual Framework of Online Consumer Behavior
- Chapter VII Objective and Perceived Complexity and Their Impacts on Internet Communication
- Chapter VIII Personalization Systems and Their Deployment as Web Site Interface Design Decisions
- Chapter X Converting Browsers to Buyers: Key Considerations in Designing Business-to-Consumer Web Sites
- Chapter XI User Satisfaction with Web Portals: An Empirical Study