Working with Local User Accounts and Groups
![]()
Local Users And Groups is a tool in the Computer Management console that lets administrators (the built-in Administrator account plus any other members of the Administrators group) manage user accounts. If you have administrative privileges, you can use this program to do the following:
- Create, rename, disable, and delete accounts
- Change account properties
- Create and delete groups
- Add users to or remove users from groups
In addition, members of the Power Users group can use Local Users And Groups to create user accounts and groups, and they can modify the user accounts and groups that they have created.
TIP
You can perform some basic user account management tasks in Users And Passwords, a Control Panel item. But you'll quickly run into its limitations and want to switch to Local Users And Groups. Fortunately, there's an easy way: in Users And Passwords, click the Advanced tab and then click the Advanced button.
To get to Local Users And Groups:
- In Control Panel, open Administrative Tools and then open Computer Management.
TIP
You can also open Computer Management by right-clicking My Computer and choosing Manage.
- In the left pane, under Computer Management (Local), expand System Tools and then select Local Users And Groups. See Figure 27-1.
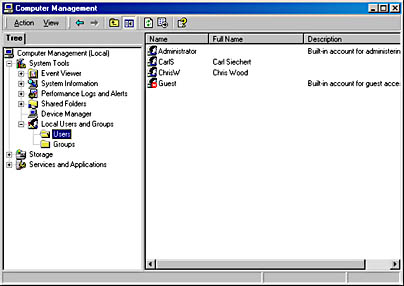
Figure 27-1. Local Users And Groups is the tool within Computer Management where you create and maintain local user accounts and groups.
Creating an Account
To add a new user to your system:
- In Local Users And Groups, select Users.
- Open the Action menu and choose New User.
- In the User Name box, type the name the new user will use to log on.
- In the Full Name and Description boxes, type whatever descriptive information you want. Although Windows doesn't use this information, it appears in Local Users And Groups (among other places), which allows you, for example, to sort your user list by full name.
The New User dialog box appears.
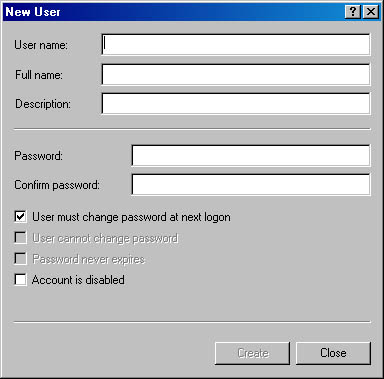
This name must be unique. (That is, no other user accounts on your computer can have the same user name.) The name must be 20 characters or fewer, and can't contain any of these characters: " / \ [ ] : ; | = , + * ? < >
User names are not case sensitive (that is, a user who logs on can type the user name in uppercase, lowercase, or any mixture of the two), but Windows retains the case that you type here whenever it displays the user name.
TIP
To make the Full Name useful for sorting, be sure to enter the information consistently for all users. For example, always enter firstname lastname or always enter lastname, firstname.
- In the Password box (and the Confirm Password box), enter the password the user will employ for his or her first logon.
NOTE
Passwords in Windows 2000 are case sensitive. To log on, a user must type uppercase (capital) and lowercase letters exactly the way they're entered in the New User dialog box.
- Click Create to create the user account. If you want to add another user (the New User dialog box remains open), repeat the above steps; otherwise, click Close if you're finishing creating user accounts.
The typical procedure is to supply an initial password and require the user to change it during the first logon. To set things up that way, select the User Must Change Password At Next Logon check box.
If you select the Password Never Expires check box, that setting overrides any password age that you specify via Local Security Policy. For more information about password settings, see "Setting Password and Lockout Policies."
Modifying a User Account
After you create an account, you can modify it. In Local Users And Groups, right-click the user name and choose Properties or, more simply, double-click the user name. The user's properties dialog box appears, as shown in Figure 27-2.
Specifying Group Memberships
New users by default are assigned to the Users group. To change this affiliation or add a new user to one or more additional groups, click the Member Of tab in the properties dialog box. The Member Of tab lists the groups to which the user account currently belongs.
To add a new group, click Add. In the Select Groups dialog box that appears (see Figure 27-3), select the groups you want the account to be a member of, click Add, and then click OK to return to the properties dialog box.
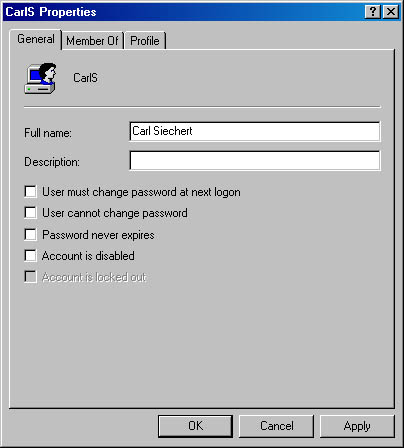
Figure 27-2. Double-click a user name to display its properties dialog box, where you can view and modify account settings.
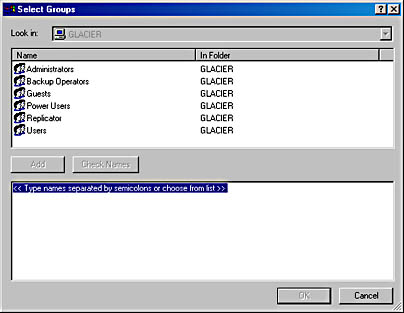
Figure 27-3. The Select Groups dialog box lists all the local groups to which you can add a user.
To remove a group from the Member Of tab, simply select it and click Remove.
Creating a Roaming Profile
A user profile is a file used by Windows 2000 to re-create a user's preferred system environment (including such items as screen colors, desktop and Start-menu items, network connections, and so on) when that user logs on.
Windows 2000 maintains a default user profile and ordinarily makes that the starting point for any new user. When a user logs on for the first time, Windows 2000 creates a new folder to store the new user's own profile, and copies the default profile into that new folder. Changes that the user makes to the default profile are then recorded in the user's copy, not in the default profile.
For network users, administrators can create special user profiles called roaming profiles. A roaming profile is stored on a server (a copy is kept locally as well, for use in case the server is unavailable at logon), allowing the domain user to have the same environment settings regardless of where he or she logs on.
To create a roaming profile for a new user, click the Profile tab in the user's properties dialog box, shown in Figure 27-4. In the Profile Path box, type the location of the profile folder, in the form \\server\share; that is, use a universal naming convention (UNC) path name rather than a drive letter.
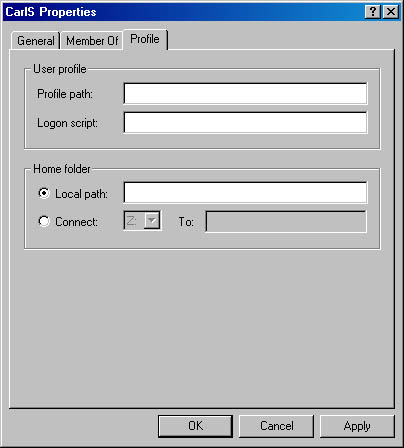
Figure 27-4. The Profile tab lets you specify the location of profile information.
NOTE
If you're setting up the folder on the server that contains the profile information, you must share the folder, and you must grant Full Control of the folder to the Everyone group.
Specifying a Logon Script
A logon script is a program file that runs whenever a user logs on. Any file with extension .bat, .cmd, or .exe can be used as a logon script.
To employ a logon script on a user's local computer, specify the path and name of the script file in the Logon Script box of the Profile tab, shown in Figure 27-4.
TIP
Use Environment Variables in the PathA useful environment variable is %username%, which contains the user name of the current user. By using each user's user name as the name of their profile folder or file, you can then enter %username% in the Profile tabs af all your users to simplify administration.
Specifying a Home Folder
A user's home folder is the default folder that appears in the File Open and File Save As dialog boxes (except for newer applications that default to the user's My Documents folder and older applications that specify their own working folder). It is also the default folder for Command Prompt sessions. The home folder can be local or on a server, and users can share a common home folder. To specify a local home folder, enter a path specification in the Local Path box of the Profile tab, shown in Figure 27-4.
To use a folder on a network server as a home folder:
- Select Connect on the Profile tab.
- Enter an available drive letter in the box to the right of the Connect button (or click the arrow to the right of the box to select an available drive letter from a list).
- Enter the full network (UNC) path specification for the remote folder in the To box.
Changing Passwords
To change a user's password, in Local Users And Groups, right-click the user name and choose Set Password. The Set Password dialog box appears, in which you can type a new password. Note that you can't ever determine a user's current password. If he or she forgets the password, you can't recover it but you can provide a new one.
TIP
If you don't already have Local Users And Groups open, you'll find it easier to change passwords by using Users And Passwords in Control Panel. There, you simply select a user name and click Set Password.
Changing Your Own Logon Password
Oddly, unless you're a member of the Administrators group, you can't use Users And Passwords to change your own password. Furthermore, Local Users And Groups won't let you change your network password if you log on to a domain. To change the password for your own local or domain user account:
- From anywhere in Windows 2000 (you don't need to have any particular application running), press Ctrl+Alt+Delete to display the Windows Security dialog box.
- Click Change Password.
- Type your current password in the Old Password box. Then type your new password twice to ensure that you've typed it accurately. If the New Password and Confirm New Password lines don't match, or if your entry on the Old Password line is incorrect, Windows rejects your new password.
- Click OK in the message box that appears, and then click Cancel or press Esc to close the Windows Security dialog box.
Renaming, Deleting, and Disabling Accounts
To rename an account, in Local Users And Groups, right-click the user name and choose Rename. Note that changing the account's name means changing the user name—the name the person uses to log on to Windows 2000.
SEE ALSO
For information about security IDs, see "Introducing Windows 2000 Security."
To delete an account, right-click it and choose Delete. Windows 2000 displays a prompt informing you that if you delete an account and then subsequently create a new account with the same user name, none of the properties, rights, or permissions of the old account will be applied automatically to the new one. Because Windows 2000 assigns a new SID to the new account, you will have to set up the reinstated user from scratch.
TIP
If you're not comfortable with right-clicking and shortcut menus, you'll find the Rename and Delete commands on the Action menu.
If you are removing a user from your system with the expectation that that user will return after some period of time, you might find it more convenient to disable the account rather than delete it. You can then reenable the account (with all its properties, rights, and permissions) at the appropriate time.
To disable an account, double-click its entry to open its properties dialog box, and then select the Account Is Disabled check box. To reinstate a disabled account, visit the same dialog box and clear this check box.
NOTE
You can't delete the built-in Administrator and Guest accounts. If you don't want anyone to log on using the Guest account, disable it.
Creating a New Local Group
To add a new local group to your system:
- In Local Users And Groups, select Groups.
- Open the Action menu and choose New Group.
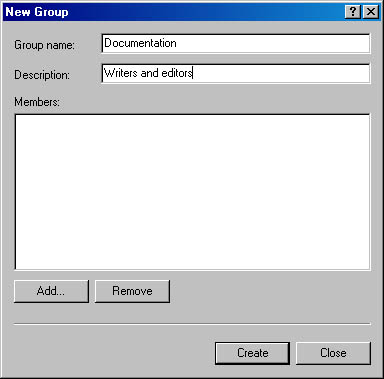
- Give the group a name (use the same rules as for user accounts) and, optionally, a description.
- Click Add to open the Select Users Or Groups dialog box, shown below.
- In the Look In box, select your computer name to add local user accounts to the group, or select the name of the domain that has the users or groups you want to add. Then select the name of the user or group you want to include and click Add.
- Click Create to create the new group; add more groups if you want (the New Group dialog box remains open), or click Close if you're finished creating groups.
The New Group dialog box appears.
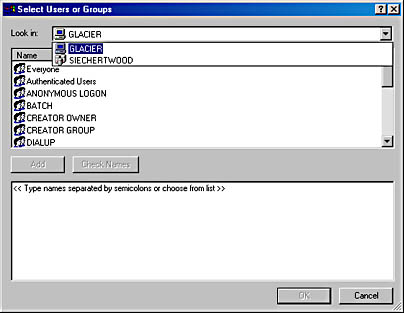
Repeat this step to add all the users and groups you want, and then click OK to return to the New Group dialog box.
Changing the Properties of a Local Group
To change the description or membership of a local group, double-click the group name in Local Users And Groups. In the properties dialog box that appears, click Add to add members to the group. To remove one or more users, select their names and click Remove.
EAN: 2147483647
Pages: 317
- ERP System Acquisition: A Process Model and Results From an Austrian Survey
- Context Management of ERP Processes in Virtual Communities
- Intrinsic and Contextual Data Quality: The Effect of Media and Personal Involvement
- Healthcare Information: From Administrative to Practice Databases
- A Hybrid Clustering Technique to Improve Patient Data Quality