Getting Around in the Windows Vista Taskbar
In Windows Vista, by default, the taskbar is locked so that it is always displayed, as shown in Figure 2-1. The Start button, shown on the far left, is one of the key features on the taskbar. Quick Launch items are displayed to the right of the Start button, followed by buttons for running programs, and then the notification area. Each of these areas has feature enhancements, which are discussed in the sections that follow.
![]()
Figure 2-1: The taskbar in Windows Vista
Working with the Quick Launch Toolbar
By default, the Quick Launch toolbar displays a quick access button for the desktop. A new feature in Windows Vista is the ability to add any program directly to the Quick Launch toolbar from the Start menu. To do this, click the Start button, navigate to the program on the Start menu that you want to be able to access quickly, and then right-click the program name. Last, select Add To Quick Launch to add the program to the Quick Launch toolbar.
The Quick Launch toolbar is displayed by default. If the Quick Launch toolbar isn’t displayed and you want to display it, right-click the Start button, and then select Properties. In the Taskbar And Start Menu Properties dialog box, click the Taskbar tab, and then select the Show Quick Launch check box.
Using Taskbar Thumbnails, Windows Flip, and Windows Flip 3D
In earlier versions of Windows, the taskbar displayed a button for each running program. Clicking the button allowed you to display the program window in front of all other windows. Windows XP included an enhancement that grouped similar taskbar buttons. For example, if you opened eight folders in Windows Explorer, these items would be grouped together under one taskbar button. Clicking the taskbar button would then display a dialog box with an entry for each folder window, allowing you to select which folder window to display.
Windows Vista significantly enhances the taskbar by modifying taskbar grouping and also providing the following taskbar improvements:
-
Live taskbar thumbnails
-
Windows Flip
-
Windows Flip 3D
Using Live Taskbar Thumbnails
When you move the mouse pointer over a taskbar button, Windows Vista displays a live thumbnail of the window, showing the content of that window. The thumbnail is displayed regardless of whether the window is minimized and regardless of the type of content. If the content in the window is being updated, such as with a running process or a video, the thumbnail continuously updates to reflect the live state of the window. For grouped taskbar buttons, Windows displays a thumbnail of the most recently opened window and makes the thumbnail appear to include a group of windows.
Using Windows Flip
When you press Alt+Tab, Windows Vista displays a flip view containing live thumbnails of all open windows, as shown in Figure 2-2. Holding down the Alt key keeps the flip view open. Pressing Tab while holding down the Alt key allows you to cycle through the windows. Because the thumbnails are live views, the thumbnails continuously update to reflect their current state regardless of the type of content. When you release the Alt key, the currently selected window is brought to the front. You can also select a window and bring it to the front by clicking the thumbnail.

Figure 2-2: Working with Windows Flip view
Using Windows Flip 3D
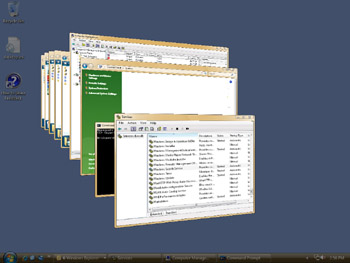
When you press the Windows logo key and Tab, Windows Vista displays a 3D flip view. As Figure 2-3 shows, the Flip 3D view provides a skewed 3D view of all open windows. Holding down the Windows logo key keeps the Flip 3D view open. Pressing the Tab key while holding down the Windows logo key allows you to cycle through the windows. Because the 3D window views are live, the windows continuously update to reflect their current state regardless of the type of content. When you release the Windows logo key, the currently selected window is brought to the front. You can also select a window and bring it to the front by clicking the 3D window view.

Figure 2-3: Working with Windows Flip 3D view
Working with the Notification Area
The notification area is on the far right on the taskbar. By default, the notification area is divided into two areas:
-
An area for standard notification icons, such as those used by programs you’ve installed
-
An area for system notification icons, such as those for the clock, volume, network, and power
Unlike earlier versions of Windows, notification area configuration in Windows Vista is controlled on a separate tab in the Taskbar And Start Menu Properties dialog box. To modify the default settings, right-click the Start button, and then select Properties. In the Taskbar And Start Menu Properties dialog box, click the Notification Area tab. You can then manage how notification icons are used.
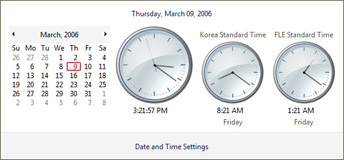
You can display the date and time by clicking the clock in the notification area. As Figure 2-4 shows, the system clock is significantly different from earlier versions of Windows. You can use the date and time to view the current month’s calendar and browse a month-to-month calendar. Time can be shown with a traditional clock or a digital clock, and if you click the Date And Time Settings link, you can add up to two additional clocks for other time zones.

Figure 2-4: The system clock
Getting multiple clocks to display different time zones simultaneously is definitely pretty cool, and definitely something a lot of people have asked me about. If you use the time display as a cheap calendar—like I often do—you’ll be happy to know that Windows Vista includes a full-blown calendaring program called Windows Calendar, which you can start by clicking Start, pointing to All Programs, and clicking Windows Calendar. Changing the system time is more involved than it used to be, however, and you still need to have administrator privileges.
To change the time, you must click the clock in the notification area on the taskbar and then click the Date And Time Settings link. In the Date And Time Properties dialog box, click the Change Date And Time button to change the date and time, or click Change Time Zone to change the time zone. After you change the date and time or the time zone and click OK twice, the time is updated to reflect your changes.
By default, Windows Vista automatically synchronizes system time with an Internet time server once a week. The goal of synchronization is to ensure that system time is as accurate as possible. By default, the time server used for synchronization is time.windows.com. Although other time servers can be selected, businesses with networks might prefer to have computers synchronize with internal time servers. For more information about configuring time and using Internet time servers, refer to Microsoft Windows Vista Administrator’s Pocket Consultant (Microsoft Press, 2006).
William Stanek
Author, MVP, and series editor for the Microsoft Press Administrator’s Pocket Consultants
EAN: 2147483647
Pages: 101