Doing More with Pictures: Photo Montages, Albums, and Slide Shows
FrontPage makes creating photo galleries easy. In fact, most photo galleries can be created in a just few minutes. That s because all you need to do is provide the photos, the captions, and the descriptions, and FrontPage does the rest of the work ”including creating the necessary thumbnail images, links, and markup. Although designed for high-resolution photos, we ve found this feature is also useful for showcasing products and services. With this approach, each photo could be a picture of a product, a page from a product brochure, or even a full- color ad.
Inserting a Photo Gallery into a Web Page
Using the photo gallery feature in FrontPage 2003, you can create:
-
Photo montages With a photo montage, your photo gallery has thumbnail images of your pictures that are displayed in a pattern like a collage. Clicking on a thumbnail image displays the full- size picture in a new window. Picture captions are displayed when the mouse pointer is over a thumbnail image.
-
Photo albums With photo albums, you can choose a horizontal or vertical layout for the thumbnail images in your photo gallery. Captions and descriptions of each thumbnail are displayed below or to the right of the picture, depending on layout. Clicking on a thumbnail image displays the full-size picture in a new window.
-
Slide shows With slide shows, thumbnail images of your pictures are arranged in a row that scrolls across the top of the page, and the selected picture is displayed full-size in the center of the page, along with its caption and descriptive text. Clicking on a thumbnail image in the top row displays the full-size picture in the center of the page.
You can insert a photo gallery into any existing page, or create a new page in the web in which the gallery will reside. Once you have a page open for editing, you can create a photo gallery by completing the following steps:
-
Choose Insert, Picture, New Photo Gallery. This displays the Photo Gallery Properties dialog box, shown in Figure 8-1.
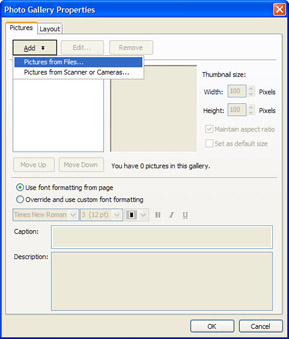
Figure 8-1: Use the Photo Gallery Properties dialog box to add and organize the pictures for your photo montage, album or slide show. -
Click Add, and then choose Pictures From Files. Next, use the File Open dialog box to choose the photos you want to add to the gallery. Select multiple files, using the Shift and Ctrl keys.
-
Pictures you ve added to the gallery are displayed in alphanumeric order in the Add list box, as shown in Figure 8-2. You can adjust the order of photos by selecting a picture, and then clicking Move Up or Move Down, until the picture is in the desired location in the list. Repeat this step to change the order of other pictures.
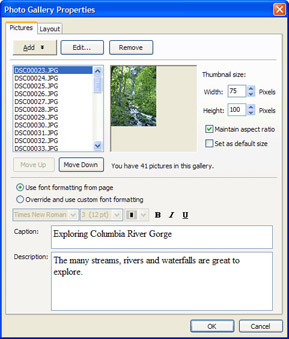
Figure 8-2: Once you add pictures to the gallery, you can size thumbnails, order the pictures, and add captions and descriptions. -
Thumbnails for pictures are generated automatically. To set the size of a thumbnail, select the filename in the Add list box, and then use Width and Height options to set the desired size.
Note It s a good idea to maintain the original aspect ratio, which will reduce the possibility that the thumbnail graphic will be blurred or distorted . If you want all thumbnail images to be the same size, select Set As Default, and then use the Width and Height options to set the default size for all thumbnails in the photo gallery.
-
Each thumbnail can have a separate caption and description associated with it. In the Add list box, select the filename of the photo you want to work with, and then type the text for the caption and description in the fields provided.
Caution Don t enter a description if you plan to create a photo montage. Descriptive text is not displayed with photo montages.
-
On the Layout tab, select the layout for the photo gallery: Horizontal Layout, Montage Layout, Slide Show, or Vertical Layout, as shown in Figure 8-3. If you use a horizontal or vertical layout, set the number of pictures per row. You can have from 1 to 10 pictures per row.
-
Click OK to add the photo gallery to the page.
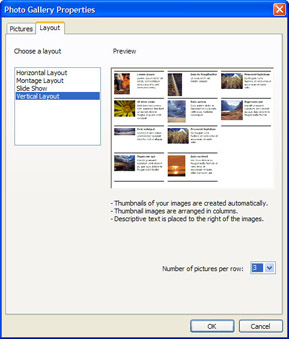
Figure 8-3: Select the layout you want to use; with vertical or horizontal layout, don t forget to set the number of pictures per row.
Customizing the Formatting of Captions and Descriptions
By default, the text used in captions and descriptions is formatted using the font settings from the Web page in which the photo gallery resides. In most cases, this is a good setting to use, if your Web site uses themes. Still, you may find that you want a particular picture to have a different font face and formatting for captions and descriptions, and you can do this by completing the following steps:
-
Open the page containing the photo gallery, and then double-click on any of the photo gallery components .
-
In the Photo Gallery Properties dialog box, select the filename for the picture that you want to use the custom settings, and then choose Override And Use Custom Font Formatting.
-
Select the caption, or a portion of the caption text, and then use the font options to set the font type, size, color, and highlighting for the selected text. You can use different settings for different sections of the caption.
-
Select the Description, or a portion of the description text, and then use the font options to set the font type, size, color, and highlighting for the description. You can use different settings for different sections of the description.
-
Repeat Steps 2-4 to customize the font formatting of other pictures, and click OK to save the changes.
Managing Existing Photo Galleries
You can change photo gallery settings, rotate or crop photos, and add or remove pictures, at anytime . To manage a photo gallery, follow these steps:
-
Open the page containing the photo gallery, then double-click on any of the photo gallery components.
-
To add pictures, click Add in the Photo Gallery Properties dialog box, and then select Pictures From Files. Next, use the File Open dialog box to choose the pictures you want to add to the gallery.
Note Select multiple files using the Shift and Ctrl keys. New pictures are added to the end of the current list, and you can use the Move Up and Move Down buttons to change picture order, as necessary.
-
To rotate, resize, or crop the full-size pictures in the gallery, select a picture you want to edit in the Add list box, and then click Edit. This opens the Edit Picture dialog box, shown in Figure 8-4 on the following page. You can now choose from the following options:
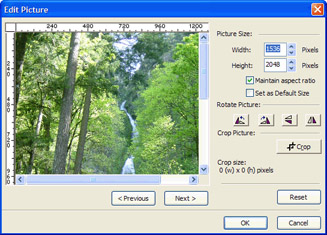
Figure 8-4: Use the Edit Picture dialog box to resize, rotate and crop the pictures in the photo gallery.-
Set Picture Size Set the desired size of the picture, using the Width and Height options. If you want all full-size pictures to be the same size, select Set As Default, after you enter the desired width and height.
-
Rotate Picture Use the Rotate Right, Rotate Left, Flip Horizontal and Flip Vertical buttons to rotate the picture to the desired position.
-
Crop Picture Click Crop and then position the pointer in the upper left corner of the area you want to crop. Afterward, click and hold the mouse button, and drag down and right until the desired crop area is highlighted.
-
-
To remove pictures from a gallery, select the filename of a picture you want to delete, and then click Remove.
Caution When you remove a picture, any associated caption and description are deleted, as well. If you later decide to add the picture back into the gallery, you will need to enter the caption and description again.
-
Click OK to close the Photo Gallery Properties dialog box when you are finished.
EAN: 2147483647
Pages: 179