| Announcements are used for posting items that may be of interest to users of the site and can be used in various ways. Management can use announcements to point out relevant news items such as a court ruling on an issue related to the company's business or the merger of two competitors. Human Resources can use announcements for posting internal notices such as a promotion, when someone will be on vacation, or the birth of an employee's child. When certain SharePoint sites are created, an announcements list is created automatically and placed on the site's home page. By default, only the five most recent announcements appear on the home page. However, all items on the announcements list are available for viewing on the announcements page. Announcements can also automatically be removed from the home page by setting an expiration date. After the expiration date, the announcement is available on the announcements page only when the All Items view is selected. Because announcements can be used for a wide variety of purposes, access to the creation of items on this list should be monitored. The announcements list is a good candidate for limiting the creation to a few select individuals and/or for requiring approval before items are posted. Creating a New Announcement to Share Information with Other Users A new announcement can be created from the announcements List page, or from any page where the announcements list is displayed (such as the home page). To add an announcement, follow these steps: 1. | Browse to the default view of the announcements list.
| 2. | Click on New Item. This brings up the Create Announcement page.
| 3. | Enter a title for the announcement.
| 4. | Enter the text for the announcement in the Body field. In SharePoint 2003, many formatting options can be applied when entering the text such as bold, underline, italics, font type and size, color, bullets and numbering, and justification (left, right, center).
| 5. | Optionally, enter an expiration date. If entered, the announcement no longer appears on the home page after the expiration date.
| 6. | Click on Save and Close to save the item.
|
Windows SharePoint Services does not allow an image to be associated with the announcement by default, but by adding a hyperlink column, pointing to an image, and choosing to display the hyperlink as an image, you can achieve the same effect. The steps to do this are as follows: 1. | From within the announcements list, click on Modify Settings and Columns.
| 2. | Click on Add a New Column under the Columns section.
| 3. | Name the column Image and select Hyperlink or Picture. In the Optional Settings for Column section, in the Format URL As drop-down menu, choose Picture. Make sure that Add to Default View is selected and click OK.
| 4. | From the Customize Announcements page (ListEdit.aspx) in the Views section, click All Items to change the order in which the columns appear in the All Items view.
| 5. | In the Columns section, change the number in the drop-down menu next to Image to 1. Click OK.
| 6. | Click on Go Back to "Announcements." Then add an item to the list using the steps outlined earlier in the chapter in the section "Keeping the List Up-to-DateAdding, Changing, and Deleting List Items," and include a URL to an image stored on the SharePoint server. The All Items view will now include a picture.
|
To change the home page List View to include a picture, follow these steps: 1. | Click on the down arrow in the title bar and click Modify Shared Web Part.
| 2. | Under Selected View, choose All Items from the drop-down menu. Click Apply. As shown circled in Figure 12.19, the picture displays on the home page. In this case, the resolution is 160x70 pixels, so that the picture doesn't take up too much space.
Figure 12.19. Changing the home page List View. 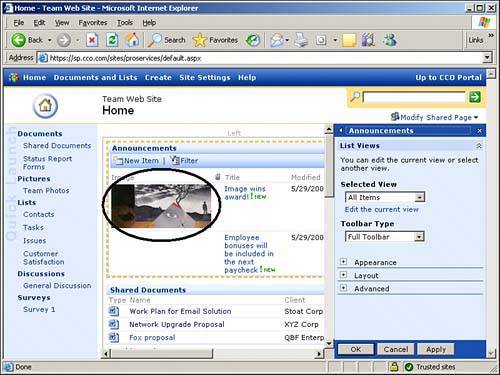
|
Adding a News Listing on the Portal The process of adding a news listing on the portal is slightly different. From the portal News area (a default area) follow these steps to add a news listing: 1. | In the Actions list, click Add News.
| 2. | In the Title and Description section, type a title and description for the news listing.
| 3. | In the Content area either enter the URL where the listing can be found, or select Add News Listing by Entering Text, and then click on Open Text Editor.
| 4. | In the Dates section, enter a start date and, if appropriate, an expiration date.
| 5. | Choose a Group from the drop-down menu.
| 6. | Enter a URL for an image to associate with the news item.
CAUTION See the note in Chapter 11 in the "Picture Properties" section concerning the "tricky" method that needs to be used to get the URL of the actual file. It is easy to point to a .jpg snapshot version of the file that SharePoint creates by accident. | 7. | Click on Change Location to move the listing to a different area, or to have it appear in multiple areas.
| 8. | In the Audience section, select the audience and click Add; then click OK.
|
Figure 12.20 shows the new news listing (about a quick brown fox) that was added, with a 60x60 pixel .tif file of a typewriter as an image. Note that by default, this news listing also shows up on the Home page of the portal. Figure 12.20. News area with a new news listing and associated image. 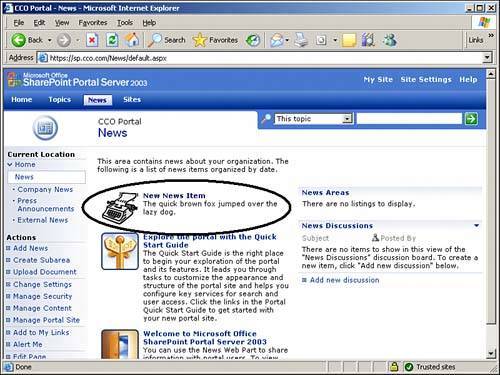
You also have the option of adding an additional image that will appear as an icon image when the news listings are viewed in the All Listings page by following these steps: 1. | From the portal News area, click Manage Content in the Actions menu; then select Portal Listings.
| 2. | From the All Listings page, hover over the news item, click the down arrow, and select Edit.
| 3. | You then see the Edit News Listing page (speditlisting.aspx) with several tabs available: General, Publishing, Display, and Search. Click on the Display tab and enter the appropriate URL for the small icon image. Then click OK.
|
As shown in Figure 12.21, two different images can be associated with a listing. In this case, typewriter.jpg (60x60 pixel image) and typewriter 16x16.jpg (16x16 pixel image) are chosen. Figure 12.21. Edit News Listing page. 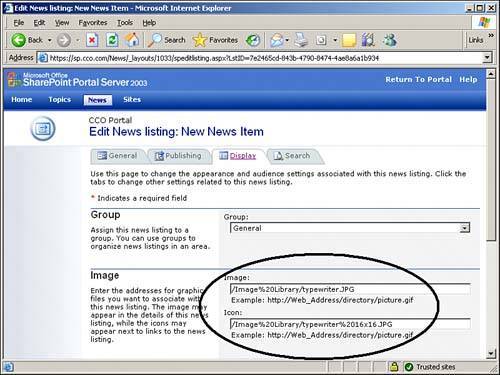
A common practice on the News area is to change the way the news listings are displayed because by default they are displayed the same way as they appear on the portal Home page. This may not be an effective way to display new listings if there are more than a handful. To change the view in the News area, follow these steps: 1. | Click on Edit Page in the Actions menu.
| 2. | Click on Modify Shared Page in the upper right-hand corner of the page, click on Modify Shared Web Parts, and then click on Latest News. The Web Part modification pane opens, as shown in Figure 12.22.
Figure 12.22. Web Part modification pane in the News area. 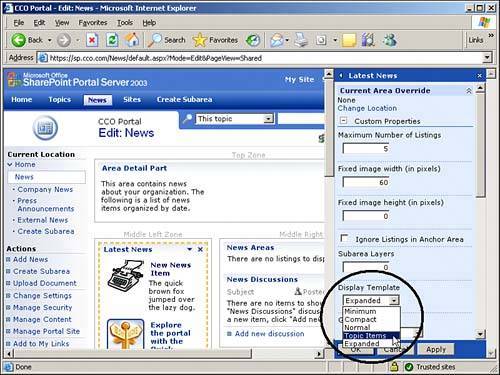
| 3. | Change the Display Template from Expanded to Topic Items. Click OK. Figure 12.23 shows the resulting change in the News area, which many users find a more efficient use of space.
Figure 12.23. News area with Topic Items Display template. 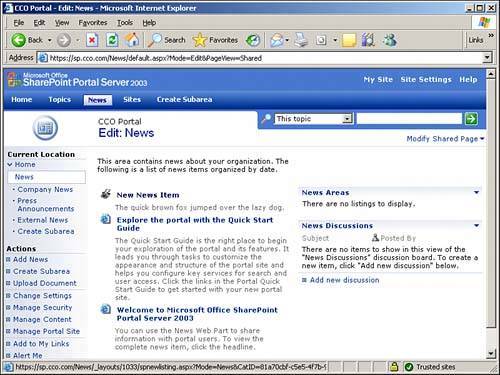
|
|