| Although you probably realize by now that you sometimes need to leave the Windows graphical user interface (GUI) behind to make repairs or perform maintenance, the Windows GUI is where most work gets done. The following sections discuss these elements of the Windows GUI: Network Neighborhood/My Network Places is discussed in Chapter 21, "Networking and Internet Connectivity," and Chapter 22, "Troubleshooting Principles," and Device Manager is discussed in Chapter 19, "Installing and Configuring Hardware in Windows." My Computer The My Computer icon might be the single most important icon for maintaining and working with Windows. My Computer provides access to the following features and utilities: -
Open My Computer to view the local drives on your system, available network drives , and the Control Panel folder. Additional options are available in various Windows versions. -
Right-click My Computer to choose options such as Properties (which opens the System properties sheet), the Windows Explorer, Search/Find, drive mapping, and creating shortcuts. My Computer can open a separate window for each object you open, or you can change the contents of the My Computer window to display the contents for each object. You can change this option by clicking View, Folder Options, and selecting Custom from the Folder tab. In Windows 95, opening My Computer does not start the Windows Explorer unless Internet Explorer 4.0 or above is installed. When Internet 4.0 or above is installed, Windows 95 will work like Windows 98/Me/2000/XP, which open Windows Explorer when My Computer is opened. The Windows Explorer The Windows Explorer is the file-management utility used by Windows (see Figure 18.6). Windows 98/Me/2000/XP can use Explorer to view both local drive/network and Internet content; Windows 95 and Windows NT 4.0 can view only local or network drives with Explorer unless Internet Explorer (IE) 4.0 or above is installed. Figure 18.6. The Windows Explorer in Windows 98 (Classic view); the selected object's name appears in the Address bar. 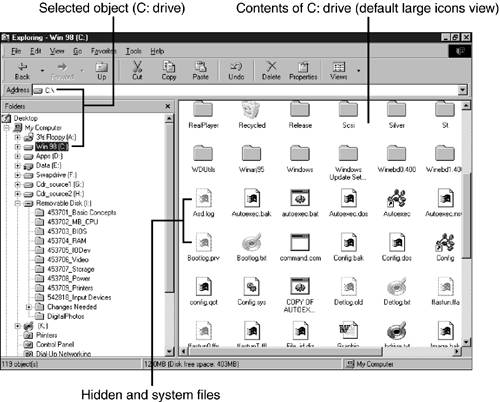  | By default, Windows Explorer doesn't display hidden and system files unless the View options are changed; see "Changing Viewing Options in Windows Explorer," p. 628 for details. |
Windows Explorer can be started in any of the following ways: -
From the Start menu, click Start, Programs, Windows Explorer (Windows NT 4.0/9x) or Start, Programs, Accessories, Windows Explorer (Windows Me/2000/XP). -
From the command line, type Explorer and press Enter. -
Open My Computer in Windows 98/Me and 2000/XP to start Explorer automatically. To start Windows Explorer from My Computer in Windows NT 4.0/95 if Internet Explorer 4.0 or above is not installed, use either of the following options: -
Right-click My Computer and select Explore Use this option to display the contents of My Computer in the right Explorer window. -
Right-click any object in My Computer and select Explore Use this option to display the contents of the object in the right Explorer window. Classic and Web View Windows Explorer can be set to display objects in either Classic or Web view. Classic view (refer to Figure 18.6) is similar to the original Windows Explorer in Windows 95; Web view (see Figure 18.7) requires that Internet Explorer 4.0 or above be installed on Windows 95. It's a standard option with Windows 98/Me and Windows 2000. (Windows Me's Web view adds a zoomable preview window for bitmaps and photos below the file properties display.) Figure 18.7. The Web view in Windows 2000 is being used to display the contents of the C: drive. The properties for the C: drive (the selected object in the left window) are displayed in the right window.  Common Tasks View (Windows XP) The Windows XP version of Windows Explorer uses a supercharged version of Web view known as the Common Tasks view as its default (see Figure 18.8). Like Web view, the Common Tasks view displays the properties of the selected object, but also displays a preview when available. However, the most significant new feature is the changeable task pane in the upper-left side of the display. Figure 18.8. The Common Tasks view of a folder in Windows XP. The Details pane at lower left displays a preview of the selected file as well as its properties. The File and Folder Tasks task pane at upper left changes its name and contents to provide task options suitable for the folder or selected object. 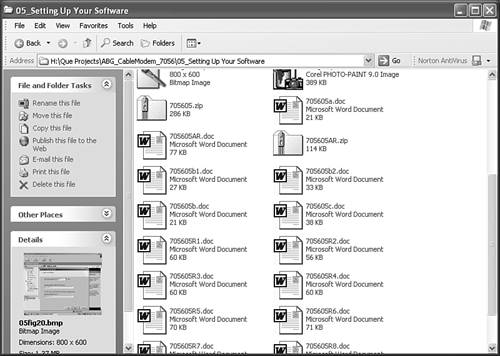 tip  | To switch between Common Tasks and Classic view, click the Folders icon on the toolbar. |
The contents and name of the task pane change according to the characteristics of the selected or displayed object. For example, display My Computer, and the task pane is titled System Tasks, with a choice of options such as View System Information, Add or Remove Programs, or Change a Setting. The contents of Other Places also changes to display related objects. Changing Viewing Options in Windows Explorer By default, Windows Explorer prevents users from seeing information such as -
File extensions for registered file types ; for example, a file called LETTER.DOC will be displayed as LETTER because WordPad (or Microsoft Word) is associated with .DOC files. -
The full path to the current folder. -
Files with hidden or system attributes, such as Bootlog.txt and Msdos.sys . -
Folders with hidden or system attributes, such as INF (used for hardware installation). Concealing this information is intended to make it harder for users to "break" Windows, but it makes management and troubleshooting more difficult. To change these and other viewing options, follow this procedure: -
Start Windows Explorer. -
Click View, Folder Options and select the View tab. -
Select the options you want (see Figure 18.9). I recommend the following changes for experienced end users: Figure 18.9. The Windows Explorer Folder Options, View menu in Windows 98 (left) and Windows XP (right) after selecting recommended options for use by technicians and experienced end users. 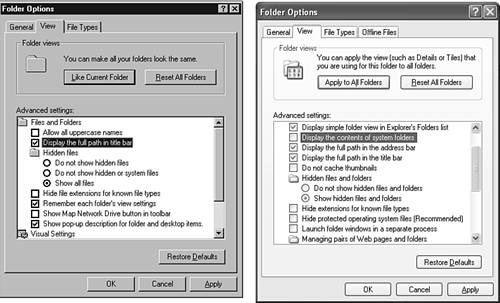 If you are maintaining or troubleshooting a system, I also recommend you change the following: You should probably change these settings back to their defaults before you return the system to normal use. -
To apply these settings to all folders, click Like Current Folder. -
Click OK to apply and close the Folder Options menu. Objects such as files and folders can be displayed in at least four ways within Windows Explorer: -
Large icons The default (refer to Figure 18.6); Windows XP calls this option Tiles. -
Small icons Displays more objects onscreen without scrolling vertically; might require the user to scroll horizontally to view multiple columns . Windows XP calls this option Icons. -
List Displays more objects onscreen than large icons in a single column. -
Details The same size of icons used by Small or List, plus size and last-modified date details (refer to Figure 18.7). Windows XP adds two new options: -
Thumbnails Displays a thumbnail (small- sized graphic) sample of previewable files and folders (.BMP, .JPG, and some other graphics file formats and folders containing these files) in the selected folder and uses large tiled icons for non-previewable files. Thumbnail view can be used in any folder. -
Filmstrip Displays a larger preview of the selected graphic file at the top of the right window, and smaller thumbnails below it. Buttons below the large preview can be used to rotate the graphic or to move to another graphic. This view is available in the My Pictures folder or other folders that contain digital photos in formats recognized by Windows Preview, such as .TIF or .JPG (see Figure 18.10). Figure 18.10. The new Filmstrip view in Windows XP is used for folders containing digital photos (.TIF or .JPG files). Note that the task pane lists Picture Tasks such as printing photos or copying items to a recordable/rewritable CD. 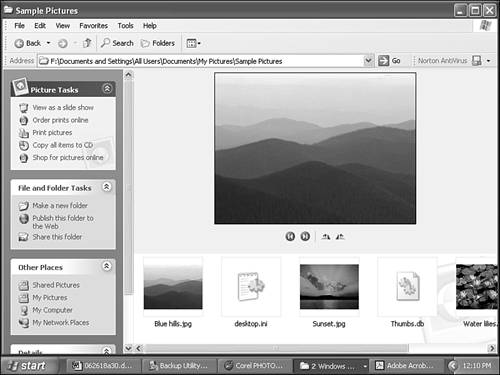  | The Windows 2000 View menu is similar to the Windows XP menu shown here. The Windows NT 4.0 and Windows Me menus are similar to the Windows 98 menu. Windows 95 uses a simplified version of the Windows 98 menu. |
To change the view for the current folder, use the Views button in Figure 18.6 or the View pull-down menu. Control Panel The Control Panel is the major starting point for adjusting the hardware and user interface settings in Windows. It contains the following hardware-related icons; open the icon to see and adjust the current settings: -
Add New Hardware (Windows 9x/Me); Add/Remove Hardware (Windows 2000); Add Hardware (Windows XP ) Installs new PnP and legacy hardware. The Windows 2000 Wizard also troubleshoots and removes hardware. -
Display Adjusts monitor, video adapter, and Windows desktop settings. -
Game Controllers Adjusts settings for joysticks, steering wheels, and other game controllers. -
Internet Options Adjusts Internet settings used by Internet Explorer and other Microsoft products. -
Keyboard Adjusts keyboard repeat rate and language. -
Modems Adjusts, installs, and tests modems and serial ports. -
Mouse Adjusts and installs mouse devices and similar pointing devices. -
Multimedia Adjusts multimedia device settings. -
Network Installs and configures network hardware and software. -
Power Management Enables, disables, and adjusts power management settings. -
Printers Installs and removes printers and adjusts printer settings. -
Sounds Configures sound playback during specified system events. -
System Displays and configures Device Manager and other hardware settings including Performance, and general Windows information, performance, and hardware profiles. -
Telephony Configures telephony device drivers and dialing settings used by modems and similar devices. | | Windows NT 4.0 doesn't have a unified wizard for adding hardware. |
Other Control Panel icons such as Add/Remove Programs, Administrative Tools, and Accessibility Options are primarily software related; some user-installed software and devices also add icons to the Control Panel. You can open the Control Panel folder from the Start button, My Computer, or the Windows Explorer: -
Click Start, Settings, Control Panel The Control Panel will open a new window onscreen. (The Control Panel icon is located in the root Start menu in Windows XP.) -
Open My Computer and select the Control Panel The Control Panel's contents will be displayed in the right window or in a new window, depending on the settings you use for My Computer. -
Open the Windows Explorer and select the Control Panel The Control Panel's contents will be displayed in the right Explorer window (see Figure 18.11). Figure 18.11. The Windows 98 Control Panel as viewed in Windows Explorer.  | | Windows Me's default is to display only the most commonly used Control Panel icons. Click View All Control Panel Options to see all the icons. |
Open any Control Panel icon to see current settings and make adjustments for the devices it controls. If the Classic view is used for the Control Panel folder, double-click an icon to open it. If Web view is used, a single click will open an icon. Windows XP's Category and Classic Views of the Control Panel The Category view shown in Figure 18.12 is the default in Windows XP. When you click on an icon, it displays various tasks and provides you with a shortcut to classic Control Panel icons (also shown in Figure 18.12). If you're a Windows newcomer, you might prefer the Category view's task-oriented design. However, if you're already familiar with Control Panel, you'll probably prefer to click the Switch to Classic View option in the task pane. The Classic view of the Windows XP Control Panel is very similar to the Windows 98 Control Panel shown in Figure 18.11. Figure 18.12. The Windows XP Control Panel in its default Category view, and the submenus triggered by each icon. Note that the Add or Remove Programs and User Accounts icons have no submenus. 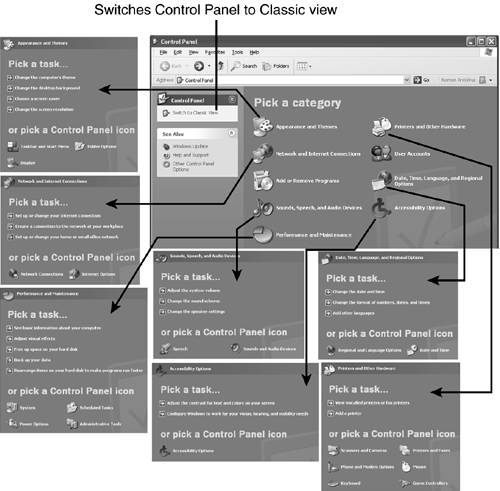 The Switch to Classic View task shown in Figure 18.12 is actually a toggle. No matter which Control Panel view you prefer, the task pane provides the option to switch to the other one. Shortcuts to Control Panel Icons Some Control Panel icons can be accessed through properties sheets. If you right-click any of the items in Table 18.3 and select Properties, you will open the Control Panel icon listed. Table 18.3. Popular Shortcuts to Control Panel Icons | Properties Sheet | Control Panel Icon Opened | | My Computer | System | | Desktop | Display | | Network Neighborhood or My Network Places | Network | | Taskbar | Taskbar and Start Menu | Taskbar and System Tray (systray) Even before you click on the Start menu, most Windows installations already have several programs running in the System Tray (also known as the systray or SysTray), which is located in the lower-right corner of the screen, next to the clock. Microsoft also likes to refer to this as the Notification area (refer to Figure 18.14). Figure 18.14. The Taskbar and System Tray (Notification area) on a typical Windows XP system and their properties sheet. Older versions of Windows don't offer the grouping and hide inactive icon options shown here. 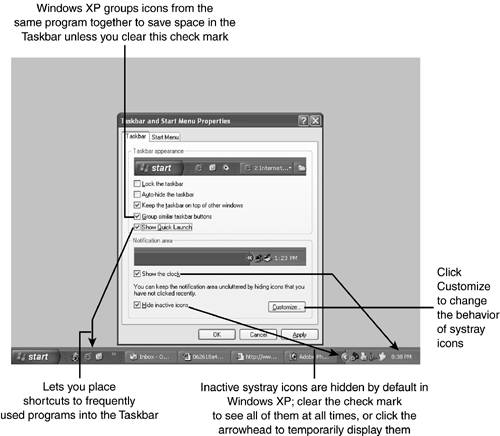 Although programs you launch manually can wind up in the System Tray, most programs you find there are started automatically from one of these locations: -
The Startup group in the Start menu -
Load= or Run= statements in Win.ini -
Shell=explorer.exe filename in System.ini -
Various Registry keys, such as HKEY_LOCAL_MACHINE\Software\Microsoft\Windows\CurrentVersion\RunHKEY_LOCAL_MACHINE\Software\Microsoft\Windows\CurrentVersion\RunServices tip | | These and other methods for autolaunching programs, including methods used by spyware, are discussed at http://www.elfqrin.com/docs/autostart-win.html. |
Figure 18.13 shows the Run key in the Registry of a Windows XP system with over 20 entries. Running so many programs can slow down the Windows startup process, use up memory and, with Windows 9x/Me, can cause the system to be short of free system resources as soon as the system starts. (See "Using the Windows 9x/Me Resource Meter" in Chapter 20 for details.) Figure 18.13. The contents of HKEY_LOCAL_MACHINE\Software\Microsoft\Windows\CurrentVersion\Run indicates this computer starts over 20 processes at startup. Other autostart methods such as the Startup group can start additional programs and processes. 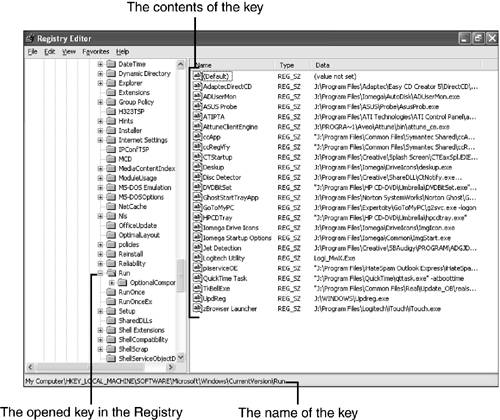 tip | | You can disable startup programs in the systray by using the Microsoft System Configuration utility ( Msconfig ); see Chapter 20 for details. |
Most systray programs wait for an event (such as a disk insertion or a mouse click) after they are started. To see what each icon in the systray does, right-click the icon. The System Tray is part of the Taskbar , which displays running programs that do not insert themselves into the systray. By default, the Taskbar displays one row of program icons, reducing the amount of space given to each program as more and more programs are run. Figure 18.14 shows a typical Windows XP system's System Tray and Taskbar and their properties sheet. To display the Taskbar's properties sheet, right-click on an empty section of the Taskbar and select Properties. tip | | To prevent the Taskbar from being accidentally resized or dragged, enable the Lock the Taskbar option in the Taskbar properties sheet. You can also autohide the Taskbar to provide more display area with the Taskbar properties sheet. When the Taskbar is set to autohide, it is displayed only when you move the mouse to the edge of the screen where the Taskbar is hiding or if you press Ctrl-Esc to bring up the Start menu. |
To make the Taskbar more useful if you have many programs running, you can resize it by dragging its top edge: Drag its top edge up to create additional rows or drag the top edge down to the edge of the screen to make it vanish . You can also drag the Taskbar to any side of the screen. Start Menu With all versions of Windows covered on the A+ Certification Exams, you can add items to the Start menu , remove items from it, create or remove folders, move an item from one folder to another, and switch between large icons (default) and small icons. If Internet Explorer 5.0 or later is installed, you can also right-click on the menu and select Sort by Name. Windows XP adds additional customization features, including automatic addition of the most frequently used programs to a special section of the Start menu. Adding, Removing, and Sorting Start Menu Items and Folders The Start menu is comprised of shortcuts to programs and other objects on your system. The method used to add shortcuts to your Start menu varies with the version of Windows you use. With Windows 9x and Windows NT 4.0, follow this procedure: -
Right-click on an empty portion of the Taskbar and select Properties. -
Click Start Menu Programs. -
Click Add. -
You can enter the path to the program (such as C:\Windows\Pbrush.exe ) or click the Browse button to locate the program for which you are making a shortcut. Click Next. -
Select the folder to place the shortcut in, or click New Folder to create a new folder for the shortcut. Enter a name for the new folder if desired. Click Next. -
The shortcut name created by Windows is displayed. To keep the name created by Windows, click Finish. You can also change the name as desired and click Finish. -
Click OK. The new shortcut (and new folder, if any) appears on your Start button menu. tip | | Along with Add and Remove, most versions of Windows also have an Advanced button (see Figure 18.15), which activates a Windows Explorer view of the Start menu. Use this view if you want to drag shortcuts between folders or nest one folder of shortcuts inside another. Figure 18.15. The Windows 2000 Advanced (Start Menu) properties sheet is shown at left. Click the Advanced button to display the Windows Explorer view of the Start menu shown at right. 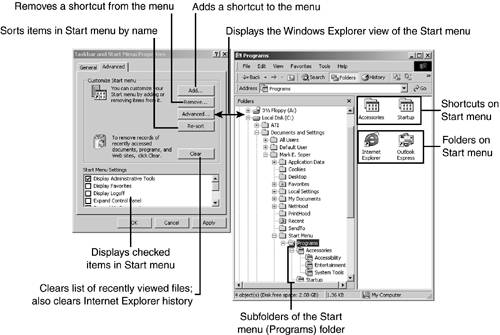 |
With Windows 2000/Me -
Right-click on an empty portion of the Taskbar and select Properties. -
Click Advanced (see Figure 18.15). -
Follow steps 37 for Windows 9x/NT 4.0. With Windows XP (if the default Windows XP Start menu is used) -
Right-click on the Start button. -
To add a shortcut for the current user only, select Explore. To add a shortcut for all users, select Explore All Users. -
The Start menu folder is opened in the left window (it resembles Figure 18.15); shortcuts on the Start menu are shown in the right window. To see additional Start menu folders, click the plus sign (+) next to Programs in the left window. -
To create a new folder for the shortcut, click the folder in the left window where you want to create the shortcut to open it in the right window. Right-click an empty area in the right window and select New, Folder. Name the folder as desired. -
To select a folder for the shortcut, click the folder in the left window. The folder's contents appear in the right window. -
Click File, New, Shortcut to start the Shortcut Wizard. -
You can enter the path to the program (such as C:\Windows\Pbrush.exe ) or click the Browse button to locate the program for which you are making a shortcut. Click Next. -
The shortcut name created by Windows is displayed. To keep the name created by Windows, click Finish. You can also change the name as desired and click Finish. -
Click OK. The new shortcut (and new folder, if any) appear on your Start button menu. | | Windows XP can also be configured to use the Classic Start menu ( see "Adjusting Advanced Start Menu Properties," p. 639 , for details). |
If the Classic Start menu is used -
Right-click on an empty portion of the Taskbar and select Properties. -
Select the Start Menu tab and click the Customize button. -
Follow steps 37 for Windows 9x/NT 4.0. To remove an item from the Start menu, follow the steps to add an item, but instead of adding a new item, click the Remove button and select the shortcut to remove. If you use the Windows Explorer view of the Start menu, press Del to send the shortcut to the Recycle Bin, or Shift-Del to discard the shortcut. tip | | It's much easier to add shortcuts to the Windows XP Start menu if you switch to the Classic Start menu. Even if you prefer the normal Windows XP menu, I recommend you switch to the Classic Start menu, add the shortcuts you need to make, and switch back to the default menu. |
To sort the shortcuts, follow these procedures: -
With Windows 95/NT 4.0, install Internet Explorer 5.0 or greater; then follow the procedure for Windows 98/Me. -
With Windows 98/Me/2000, click Start, Programs, right-click a folder or shortcut, and select Sort by Name. -
With Windows 2000/Me, open the Taskbar and Start Menu properties sheet, click Advanced, and click Re-sort. -
With Windows XP, click Start, All Programs, right-click a folder or shortcut, and select Sort by Name. Adjusting Advanced Start Menu Properties You can adjust the appearance of the Start menu in various ways, depending upon the version of Windows in use. These customizations are available from the Taskbar and Start Menu properties sheets described in the previous section. Table 18.4 lists the customization options available by Windows version. Table 18.4. Customizing the Start Menu | Option | Windows Version | | 95 | NT 4.0 | 98 | Me | 2000 | XP | | Clear shortcuts to recently opened documents | Yes | Yes | Yes | Yes | Yes | Yes | | Clear IE browser history | No | No | No | Yes | Yes | Yes [2] | | Select objects to appear on Start menu and Taskbar from list | No | No | No | Yes | Yes | Yes | | Most frequently used programs are automatically added to Start menu [1] | No | No | No | No | No | Yes | | Choice of icon size [3] | Yes | Yes | Yes | Yes | Yes | Yes | [2] In classic Start Windows XP Start Menu mode only . [1] In default Windows XP Start Menu mode only. User can also adjust the number of programs to display . [3] This option is located on the Taskbar options properties sheet in some versions of Windows . Windows XP's Start Menu properties sheet (in default mode) offers more customization options than any previous version. The General tab includes options for Click the Advanced menu to select -
Whether to automatically open submenus -
Whether to highlight newly installed programs -
Which standard items to include on the Start button and whether to list them as links or menus -
Whether to list most recently used documents (see Figure 18.16) Figure 18.16. The Windows XP General (left) and Advanced (right) Start Menu properties sheets.  Making Desktop Shortcuts Some Windows programs add shortcuts to your desktop as well as to the Start menu. However, if you don't have a shortcut on the desktop for a program you frequently use, it's easy to create one. | | To add a desktop shortcut , right-click the Windows desktop (not on an existing icon); select New, Shortcut, and then follow steps 46 for making a Start menu shortcut with Windows 9x as listed in "Adding, Removing, and Sorting Start Menu Items and Folders," p. 636 . |
Accessories/System Tools The Accessories folder in Windows is where to go to find most of the utilities and programs Microsoft supplies with Windows. Of the folders within the Accessories folder, click System Tools to find the utilities and programs you need to prevent and solve problems. The contents of the System Tools folder can vary with the version of Windows installed and the options used during installation. If you install Windows 9x/Me and Windows NT 4.0 with an option other than Typical, some tools might not be installed. The following sections examine typical selections in the System Tools menu not covered elsewhere in this book: -
Backup -
Character Map -
Disk Cleanup -
Drive Converter (FAT32) -
DriveSpace -
Maintenance Wizard -
Scheduled Tasks -
System Monitor -
Welcome to Windows | | Some versions of Windows place these utilities in the Accessories menu rather than the System Tools menu. If your Windows installation doesn't include a listed utility, open the Control Panel, click Add/Remove Programs, and click the option to install Windows components (sometimes referred to as Windows Setup). Follow the prompts to install the tool needed. |
To start these tools, click Start, (All) Programs, Accessories, System Tools, and click the tool desired. Windows Backup The Windows Backup programs supplied with Windows are primarily intended to back up your data. Backup and restore programs differ from conventional file copy routines in these ways: -
Backups are typically compressed; file copies performed with COPY or XCOPY/XCOPY32 generally are not. -
Backups can span a large file onto two or more separate pieces of supported media; COPY and XCOPY/XCOPY32 cannot subdivide a large file. -
Backups must be restored by the same or compatible program; files copied by COPY or XCOPY/XCOPY32 can be retrieved by Windows Explorer and standard Windows programs. -
Backups can be stored to tape, floppy disk, or other types of removable storage such as Zip drives (but not rewritable CD or DVD); COPY and XCOPY/XCOPY32 can work only with drives that can be accessed through a drive letter or a UNC (Universal Naming Convention) network path. However, COPY and XCOPY/XCOPY32 can be used with CD-RW rewritable DVD, and CD-R media that have been formatted for UDF (drag-and-drop) file copying. | | The Microsoft Backup utility for Windows Me must be installed manually from the add-ons folder of the Windows Me CD. The Microsoft Backup utility for Windows XP Home Edition must also be installed manually from the \ValueAdd\MSFT\NTBACKUP folder on the Windows XP Home Edition CD. |
You can also start the Windows Backup program from the Tools menu of the drive properties sheet: -
Open the Windows Explorer. -
Right-click a drive. -
Select Properties. -
Select Tools. -
Click Backup Now to start Backup. The Windows Backup program supports backups to a wide variety of drive types, including tape drives, floppy disk drives, and removable-media drives such as Zip drives, but not rewritable CD or DVD drives. During the backup process, you can specify the following: -
Which drive(s) to back up -
Which files to back up, selecting all files or new and changed files only -
Whether to back up the Windows Registry -
Where to create the backupto tape drive, floppy disk, another hard disk, or a removable-media drive -
How to run the backupwhether to use compression, passwords, and other options Table 18.5 compares the major features of the Windows Backup programs. Table 18.5. Windows Backup Versions Compared | Feature | Windows Version | | 95 | NT 4.0 | 98 | Me | 2000 | XP | | Manual backup/restore process | Yes | Yes | Yes | Yes | Yes | Yes | | Wizard-driven backup/restore process | No | No | Yes | Yes | Yes | Yes | | Backs up Windows Registry | Yes | Yes | Yes | Yes | Yes [1] | Yes [1] | | Creates Windows Emergency Repair Disk | No | No | No | No | Yes | No | | Supports Automated System Recovery (ASR) [2] | No | No | No | No | No | Yes | | Supports command-line operation [3] | No | Yes | No | No | Yes | Yes | | Features built-in scheduler | No | No | No | No | Yes | Yes | [1] Backs up Registry as part of backing up System State data . [2] Requires user to perform a special ASR backup, which creates an ASR disk and a special minimal Windows installation that can be used to restore a regular backup. ASR is supported by Windows XP Professional only . [3] Uses the command NTBACKUP with various options . Windows 95 and NT 4.0's versions of Backup lack wizards, but all other versions feature Backup and Restore Wizards to guide you through the backup and restore processes, or you can cancel the wizard and select the options you want. Windows Backup will prompt you for additional tape or disk media as needed throughout the backup process. Figure 18.17 illustrates the Windows 98 Backup program; other versions have a similar interface. Figure 18.17. Setting up a backup job with the Windows 98 Backup program.  Character Map Character Map , which is found in all versions of Windows on the A+ Certification Exams, provides an easy way to add an accented , mathematical, scientific, or iconic character to a document. To use Character Map -
Start your application; then start Character Map. -
Select the font you want to use from the pull-down menu. -
Use the preview mode to view the characters in that font (see Figure 18.18). Figure 18.18. Selecting a character with Character Map. Other characters from other fonts have already been selected for copying.  -
Click Select to choose the character. -
Repeat steps 24 to choose other characters. -
Click Copy to place the character(s) on the Windows Clipboard. -
Move the cursor to the desired location in your document. -
Click Paste to place the character(s). | | Given the limitations of the Windows Backup programs, many users prefer a third-party solution. If you want to be able to read existing Windows Backup files, but want more features (true disaster recovery, support for CD-R/CD-RW/DVD media, support for more tape drives, and so on), consider backup software made by Veritas (www.veritas.com), such as Backup Exec or BackUpMyPC (made by Veritas for Stomp, Inc.www.stompinc.com). |
Disk Cleanup Disk Cleanup was introduced in Windows 98 to provide an easy way to reduce disk clutter. Disk Cleanup can be used to -
Compress old (seldom-used) files. -
Remove temporary Internet files and offline Web pages. -
Empty the Recycle Bin. -
Delete other types of temporary files, including those left behind by Microsoft Publisher and the Content Indexer. Click More Options to remove unused optional Windows components, installed programs, and older System Restore restore points (see Figure 18.19). Figure 18.19. The standard Disk Cleanup (left) and More Options (right) menus. Use the Disk Cleanup menu to remove temporary and other unwanted files, and the More Options menu to remove unneeded programs and restore points.  Scheduled Tasks Starting with Windows 98, you can configure Windows to run a program automatically with the Scheduled Tasks Wizard. Start the wizard, select the program you want to run, and specify if you want to run the program daily, weekly, monthly, at startup, when you log on, or one time only. Next, specify what day of the week, what time, and for what period you want to run the task. With Windows 2000 and XP, you can also specify a username and password, which can be used to log onto the system and run the task. At the end of the process, you can display the advanced properties for the task to further customize the process. Drive Converter This utility, found only in Windows 98, can convert a drive from the FAT16 file system to the more efficient FAT32 file system. | | Windows 2000 and XP can convert FAT16 and FAT32 drives to NTFS with the command-line Convert utility. The Windows NT 4.0 version of Convert converts FAT16 drives to NTFS (Windows NT 4.0 doesn't support FAT32). |
DriveSpace Windows 9x features a real-time drive-compression utility called DriveSpace . Windows Me can use DriveSpace-compressed drives, but doesn't include the capability to compress a drive with DriveSpace. Windows NT 4.0/2000/XP don't support DriveSpace, but include their own compression features as part of the NTFS file system. Maintenance Wizard Windows 98 and Windows Me's Maintenance Wizard can be used to schedule and configure the disk defragmentation, ScanDisk error checking, and Disk Cleanup utilities. For more information about these utilities, see the individual entries elsewhere in this chapter. | | Windows NT 4.0, 2000, and XP use the Performance and Networking tabs of the Windows Task Manager (see Chapter 22) to provide a simplified view of system performance. For a more complete, customized view of system performance, Windows NT 4.0, Windows 2000, and Windows XP all use the Performance Monitor. This tool can be launched from the Administrative Tools folder in the Start menu. |
System Monitor Windows 9x and Me feature a customizable System Monitor , which can be used to monitor the performance of the Dial-Up Adapter, Disk Cache, File System, Kernel, Memory Manager, and Microsoft Network Client. You can select from a variety of measurements in each category, select from line, bar, or numeric charts , adjust the update frequency, and create a logfile. Use System Monitor to help fine-tune the performance of a system or the network (see Figure 18.20). Figure 18.20. The System Monitor configured to track eight different measurements of system performance.  Computer Management Console Windows 9x/Me have minimal management features included, because they are designed to be used by home or small-business users who aren't networked or have very simple networks. Windows NT 4.0, 2000, and XP, on the other hand, are designed to work in corporate networks, and have management tools to match. | | You can also create your own console with a customized list of management tools by running MMC (Microsoft Management Console) with Start, Run in Windows 2000/XP. |
Windows NT 4.0's management tools are located in the Administrative Tools folder of the Start menu, whereas Windows 2000 and XP's management tools can be started from the Administrative Tools folder in Control Panel or from the Computer Management Console . To open the Computer Management Console, right-click on My Computer and select Manage. The Computer Management Console is a comprehensive management tool that allows the administrator of a Windows 2000 or XP system access to several different administrative tools that can be used to manage your computer. The major categories in Windows XP (Windows 2000 is similar) include -
System Tools Tools in this category include -
Event Viewer Tracks system events and problems -
Performance Displays system performance -
Services Manages system services -
Shared Folders Manages network shared folders and users -
Local Users and Groups Manages groups and users -
Performance Logs and Alerts Views logs of system performance, events, and problems -
Device Manager Manages hardware settings -
Storage Tools in this category include -
Removable Storage Manages flash, disk, and optical removable storage devices -
Disk Defragmenter Defragments drives -
Disk Management Prepares hard disks and manages drive letters -
Services Tools in this category include -
Services Manages services running on the computer -
WMI Control Manages Windows Management Instrumentation service -
Indexing Service Manages indexing service To view details about a managed object, click the object in the left window and the information will appear in the right window. Right-click on an object and select Properties for more detailed information. Figure 18.21 shows the Application event viewer on a Windows XP system being used to view the details of an application error. Figure 18.21. Viewing the details about an application error using the Application Event Viewer. The left window displays other major components of Windows XP's Computer Management Console. 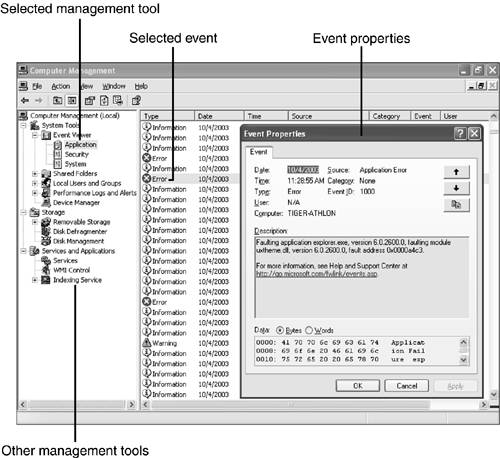 |