SecureUpdate
|
SecureUpdate is a tool for the easy management of both versioning and licensing for both Check Point and OPSEC products. This component can be a real lifesaver, as you'll understand if you've ever had to manually upgrade several dozens of licenses.
The GUI interface features two panels, one for Products and one for Licenses. These can be selected by clicking on the appropriate tab within the window. Figure 13.34 illustrates this GUI panel.
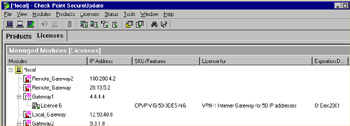
Figure 13.34: SecureUpdate GUI
The real blessing of the SecureUpdate tool is that of centralized management and authority. Using this product, you can apply updates to your Check Point modules in a timelier manner, update licenses, and modify the currently licensed machines. Before you begin doing this, however, you should know about a new feature of FireWall-1 NG. This feature is called Central Licensing and uses what is known as a license repository.
In previous versions of FireWall-1, you had only one licensing option, that of a local license. Local licensing mandated that the license be tied to the IP address of the module. This model wasn't very flexible and made upgrades very difficult and migrations nearly impossible. Central licensing binds the license to the address of the management server and allows several benefits.
-
When you change the IP address of the firewall module, the license remains useable. This has not always been the case.
-
All licenses are bound to only one IP address. This allows great flexibility in your FW-1 deployment. Imagine the scenario where your network boundaries are migrated from one provider to another, and with that comes a new network block. Using central licensing makes that address change a piece of cake. Licenses can be taken from one module and given to another and managed from this central location.
Note that while local licenses can still be used with FW-1 NG, you won't be able to use them like central licenses. This means that they can't be detached from their module after they have been installed.
Before you can begin using the functionality of SecureUpdate product, some common-sense things have to be in place. Obviously, there needs to be connectivity between the management module and the modules that are being maintained. For your purposes, connectivity implies both IP connectivity and FW-1 connectivity (SIC). Once this is all in place, you are on your way to licensing bliss.
Licenses can be added to the license repository in one of two ways. The first, more tedious method is to copy the license details by hand. This is annoying and can lead to typographical errors, (although support exists to paste the license details from the clipboard, obviating the need to hand-type) so you probably will not want to add licenses in this way. The second method is to import a file created by the Check Point User Center. To begin, select Licenses | New License from the SecureUpdate tool bar. This will allow you the choice of adding manually or importing from a file. Figure 13.35 illustrates this menu option.
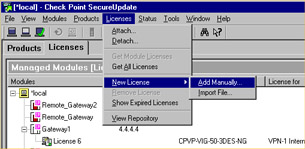
Figure 13.35: Adding a License
If you opt to add the license manually, you'll see a window with a slew of fields that you'll need to fill out, or as mentioned previously, you can paste the values from the clipboard. If you select Import File, you'll see the standard file browse window. Also under this menu option is the ability to view the License Repository. The Repository is a listing of all installed licenses and allows a filtered view. It can show you all licenses, all attached licenses, or all unattached licenses. This is a handy way to get a feel for what spare licenses you have, as well as enabling you to attach and detach central licenses. Remember that the old style licenses can't be detached once they are installed (SecureUpdate automatically attaches them to the proper module when they are imported). Figure 13.36 shows us the license repository.
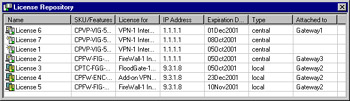
Figure 13.36: License Repository—View All Licenses
Using the Repository, license administration is as easy as right-clicking. In the Figure 13.36, you'll see all licenses. Notice that several of them are not attached to a specific module. To use these licenses, simply right-click on its entry and select Attach. At this point, you'll see a listing of the defined workstations with Check Point modules. Select the desired system and select OK.
One other very helpful feature is the ability to view expired licenses. To do this, right-click anywhere within the Repository window and select Show Expired Licenses. This presents a window (shown in Figure 13.37) listing the licenses that are no longer valid. Selecting an expired license entry and clicking on Properties shows you what module the expired license is attached to.
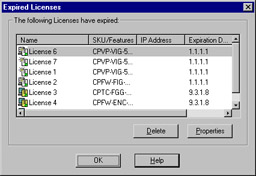
Figure 13.37: Expired Licenses
|
EAN: 2147483647
Pages: 240