Managing Categories
| One of the design requirements was that users be able to create, edit, and delete categories. The purpose of categories is to assist users in organizing their album. For example, users might add two categories to their album: Friends and Places. When adding a new picture to their album, they could optionally assign the picture with a given category. When visitors view a particular user's photo album, they will be able to filter the pictures by category. The PhotoAdmin folder's two web pagesDefault.aspx and ManageCategories.aspxcontain all of the functionality for managing a photo album, including managing categories and pictures. These pages are the most involved and complex pages in the website. It would benefit us, then, to break the involved task of managing a photo album into a series of simpler tasks:
In this hour we'll knock out subtasks 14, with subtasks 57 left for the next hour. Restricting Anonymous Users from Visiting the Administration PageBecause the web pages in the PhotoAdmin folder are used by authenticated users to manage their photo album, it's important that we restrict anonymous users from visiting the pages in this folder. As we discussed in Hour 20, the access rights for an ASP.NET website can be configured through the ASP.NET Website Administration Tool. Take a moment to load the Website Administration Tool by going to the Website menu and choosing the ASP.NET Configuration menu option. After the ASP.NET Website Administration Tool loads, click on the Security link and then, from the Access Rules box, click on the Create access rules link. As Figure 23.9 shows, select the PhotoAlbum folder from the list on the left, choose the Anonymous Users and Deny radio buttons, and click OK. This will prevent unauthenticated users from visiting this page; if they attempt to do so, they'll be automatically directed to the login page. Figure 23.9. Configure the access rights to prevent anonymous users from visiting the administration page. Retrieving the List of Categories for the Logged-On UserTo display, edit, delete, and insert categories, we first need to add a SqlDataSource control to PhotoAdmin/ManageCategories.aspx that retrieves the appropriate records and also includes the INSERT, UPDATE, and DELETE statements. There are a few, new subtleties when adding this particular SqlDataSource control. One such subtlety involves identifying the currently logged-on user. The Categories table contains all of the categories created by all users in the system. However, in ManageCategories.aspx, we want to show only the currently logged-on user's categories. The UserId column in the Categories table identifies which users have created what categories. Therefore, all we need to do is add a filter expression to the SELECT statement's WHERE clause to return only those Categories records whose UserId column equals the currently logged-on user's UserId. Unfortunately, the SqlDataSource control wizard does not provide a way to create a WHERE clause parameter whose value is equal to the currently logged-on user's UserId. It does, however, allow us to set the WHERE clause parameter value based on a Web control on the page; therefore, we can add a Label Web control to the page whose Text property is assigned the currently logged-on user's UserId value and then use this Label control's value in the WHERE clause parameter. To accomplish this, add a Label Web control to the content region in ManageCategories.aspx. Set the Label's ID property to UserIdValue, clear out its Text property, and set its Visible property to False so that the Label is not shown in the user's browser. Next, to assign the currently logged-on user's UserId value to the Label control, go to the page's source code portion and create the Page_Load event handler. (You can also create this by double-clicking in the content region.) In the Page_Load event handler, add the following line of code: UserIdValue.Text = Membership.GetUser().ProviderUserKey.ToString() The Membership class provides a number of methods for working with ASP.NET's membership features. It has methods like CreateUser(), GetUser(), GetAllUsers(), DeleteUser(), and others. The GetUser() method, as you may have guessed, returns information about the currently logged-on user, and the ProviderUserKey property returns the user's UserId value. (The .ToString() method is called on the ProviderUserKey property value because this value is a unique identifier, and we need to convert it into a string to store it in the Label's Text property.) We assign this value to the Label control UserIdValue's Text property.
Now that we have a Label Web control on the page that is assigned the currently logged-on user's UserId value, we can use this in the WHERE clause generated by the SqlDataSource control. Start by dragging and dropping a SqlDataSource control from the Toolbox onto the Design view and setting its ID property to categoriesDataSource. Next, start the control's wizard and, from the Configure the Select Statement screen, choose the Categories table from the drop-down list and check the CategoryID, UserId, and Name columns. Click on the ORDER BY button and opt to have the results ordered by the Name column. Because we need to allow the user to insert, edit, and delete categories, click the Advanced button and check the Generate INSERT, UPDATE, and DELETE Statements check box. You do not need to check the Use Optimistic Concurrency check box. Next, add a WHERE clause parameter so that only the currently logged-on user's categories are returned. Specifically, click on the WHERE button and, from the Add WHERE Clause dialog box, choose to add a parameter on the Column UserId with the Operator = and the Source set to the UserIdValue control (see Figure 23.10). Figure 23.10. Add a WHERE clause filter to show only the logged-on user's categories.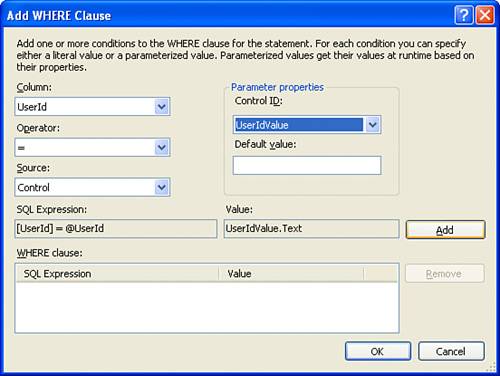 Go ahead and complete the categoriesDataSource wizard. The final SQL SELECT statement should be as follows: SELECT [CategoryID], [UserId], [Name] FROM [Categories] WHERE ([UserId] = @UserId) ORDER BY [Name] We still have one more important configuration issue with the SqlDataSource control. When working with a filter expression or an INSERT, UPDATE, or DELETE statement that contains a uniqueidentifier column, we need to manually change the SqlDataSource's parameter collections. Listing 23.1 shows the declarative markup you should see for the categoriesDataSource SqlDataSource control. (Note that many of the properties within the opening <asp:SqlDataSource> tag have been omitted for brevity.) Listing 23.1. The SqlDataSource Control's Declarative Markup
The UserId<asp:Parameter> and <asp:ControlParameter> elements on lines 6, 11, and 14 have their Type property set to Object. For uniqueidentifier values, you need to remove the Type property altogether. That is, lines 6 and 14 should both be changed to <asp:Parameter Name="UserId" /> and line 11 should be changed to <asp:ControlParameter Control Name="UserId" PropertyName="Text" />
These two subtletieshaving to express the currently logged-in user's UserId value through a Label control and having to manually remove the Type property from the SqlDataSource control's UserId parametersmust be performed to have this page function as expected and without error. Adding a New CategoryWhen visiting ManageCategories.aspx, a user needs to be able to view, edit, delete, and insert the categories specific to his photo album. Although all of these actions can be accomplished using the DetailsView, the DetailsView allows the user to view only one record at a time. Ideally, the user would be able to see all of the categories he has created. The GridView provides an interface for listing all categories, but it doesn't permit users to add new records. Because neither the DetailsView nor the GridView controls will suffice alone, we will use both a DetailsView and a GridView on this pagethe DetailsView for adding new categories and the GridView for displaying, editing, and deleting existing categories. In this section we will examine adding and configuring the DetailsView; in the section "Viewing, Editing, and Deleting Categories," we'll look at adding the GridView. To allow the user to add new categories, add a DetailsView to the page, set its ID property to dvCategoriesInsert, associate it with the SqlDataSource control categoriesDataSource, and check the Enable Inserting check box from the smart tag. By default, the DetailsView is displayed in a read-only mode, showing the value of a particular record from its associated SqlDataSource control. A user visiting the page can add a new record by clicking the Insert button, which renders the DetailsView in insert mode. Because, for this page, the DetailsView exists solely to add new records, we want it to be perpetually in insert mode, rather than requiring the user to click the New link. To accomplish this, set the DetailsView control's DefaultMode property to Insert. The DetailsView's insert mode shows two TextBox controls: one for UserId and one for Name. However, we don't want to let the user choose the value of UserId; rather, the value of UserId should be the logged-on user's own UserId. Therefore, we need to remove the UserId field from the DetailsView's insert mode. Furthermore, because the DetailsView will always be displayed and always be displayed in insert mode, it doesn't make sense to have a Cancel button. Go to the DetailsView control's smart tag and click on the Edit Fields link, bringing up the Fields dialog box. To remove the UserId BoundField from the insert interface, select the UserId BoundField from the list of fields in the lower-left corner and delete the field altogether. To hide the Cancel button, click on the New, Insert, Cancel command field and clear out the value of the CancelText property. At this point your screen should look similar to Figure 23.11. In particular, note that the page has the UserIdValue Label, whose Text property is set to the currently logged-on user's UserId value; the SqlDataSource control categoriesDataSource, which returns the logged-on user's categories and provides INSERT, UPDATE, and DELETE support; and the dvCategoriesInsert DetailsView control, which is shown in its insert mode with just the Name BoundField. Figure 23.11. A DetailsView control has been added and configured to support inserting.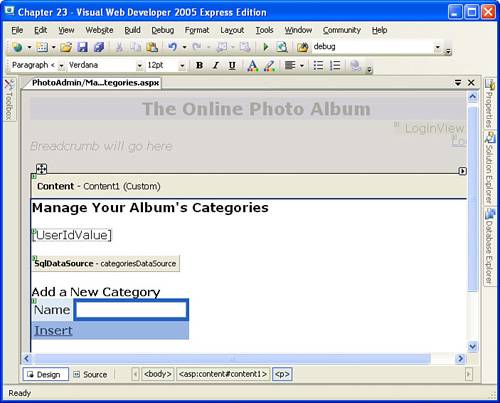 One more important step is still left. Right now, if you try to add a new category, you'll receive this error: "Cannot insert the value NULL into column 'UserId'". The reason is that we removed the UserId BoundField from the DetailsView; therefore, when the Insert button is clicked, the database INSERT fails because no value is specified for the UserId of the new category. To remedy this, we need to create an event handler for the DetailsView control's ItemInserting event. In this event handler we can programmatically set the value of the UserId to the currently logged-on user's UserId value. To create this event handler, go to the code portion of ManageCategories.aspx and choose the DetailsView dvCategoriesInsert from the top-left drop-down list and the event ItemInserting from the top-right drop-down list. Then add the following single line of code in the event handler: e.Values("UserId") = Membership.GetUser().ProviderUserKey This sets the UserId value that will be inserted into the database to the value of the currently logged-on user's unique identifier.
With this one line of code, we can now add categories. Take a moment to view the page through a browser. When visiting PhotoAdmin/Default.aspx, you can add a new category for the logged-in user by entering a category name and clicking Insert. Currently, there's no display of existing categories on the page, but if you view the Categories table's data through Visual Web Developer, you can see any newly added categories. Figure 23.12 shows PhotoAdmin/Default.aspx when viewed through a browser. Figure 23.13 shows the contents of the Categories table, viewed through Visual Web Developer, after five categories have been added by Jisun. Figure 23.12. To add a new category, simply enter the name and click Insert.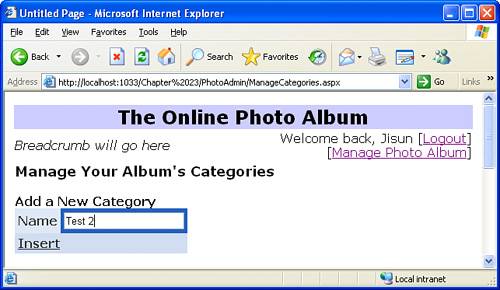 Figure 23.13. The categories added can be seen when listing the Categories table's data.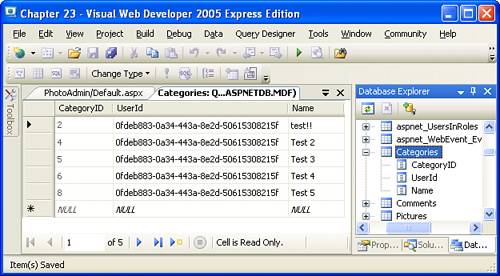
Ensuring That the User Enters a Value for the Category NameThe Categories table requires that each record have a value for the Name column. Therefore, if you visit ManageCategories.aspx and click the Insert button without entering a category name, an error message will be displayed, explaining that the Name column cannot be assigned a Null value. To remedy this situation, we need to use a RequiredFieldValidation control in the DetailsView's inserting interface. In Hour 16, "Deleting, Inserting, and Editing Data," we saw that the DetailsView's inserting interface can be customized by using TemplateFields; in Hour 12, "Validating User Input with Validation Controls," we looked at the validation Web controls, including the RequiredFieldValidator control, which checks that input has been entered into the specified Web control. To ensure that the user enters a value for the new category's name, complete the following steps:
By default, when a form is submitted, all validation controls on the page check to determine whether the control they are observing contains valid data. This behavior can be undesirable when we're working with a single page that has two separate user interfaces that each need their own validation logic. Specifically, our page will have two such separate user interfaces: one for adding a new category and one for listing, editing, and deleting existing categories. By default, the validation controls added here in the Add a New Category user interface will still fire when the user is editing an existing category. Thankfully, ASP.NET provides a way to group validation controls and associate them with a particular Button. The ValidationGroup propertyused in steps 4 and 6creates a group of validation controls and associates that group with a Button control. All validation controls with the same ValidationGroup property value are considered grouped, and any Button control that has its ValidationGroup property set will cause only those validation controls with the same ValidationGroup property to fire when clicked. Step 4 creates a validation group named CategoryInsert, of which the RequiredFieldValidator is the sole member, and then associates the DetailsView's Insert Button with this validation group in Step 6. After you have completed these steps, save the ASP.NET page and then view it through a browser. Now if you click the Insert button without providing a value for the new category's name, you should see an instructional message, as shown in Figure 23.14. Figure 23.14. An instructional message is displayed if the user forgets to add a category name.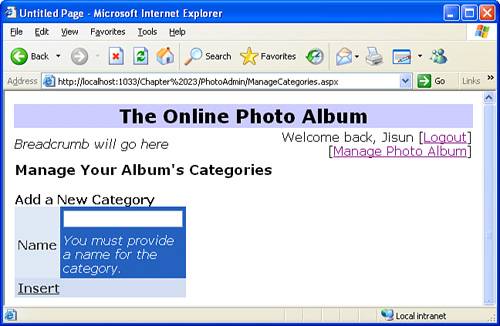 Viewing, Editing, and Deleting CategoriesWith the DetailsView for adding new categories in place, all that remains is to add the GridView control that will display the user's existing categories, as well as allow the user to update and delete these categories. To accomplish this, add a GridView beneath the DetailsView control, associate it with the SqlDataSource control categoriesDataSource, and set its ID property to gvCategories. Because this GridView will list all categories and allow the user to edit and delete categories, from the smart tag, check the Enable Paging, Enable Sorting, Enable Deleting, and Enable Editing check boxes.
By default, the GridView lists all of the columns from the associated SqlDataSource control, which includes the CategoryID and UserId columns. However, we don't want to allow the user to edit the UserId value for a given category, nor is there any real reason why we would want to show the CategoryID value. Therefore, from the GridView's smart tag, click the Edit Columns link and remove the CategoryID and UserId BoundFields. When the user is editing the GridView, an error will occur if she does not provide a value for the category's name. To ensure that the user provides this value, we need to customize the GridView's editing interface by turning the Name BoundField into a TemplateField and adding a RequiredFieldValidator. Furthermore, this RequiredFieldValidator's ValidationGroup property must be set to some unique valuelet's use CategoryEditand the GridView's CommandField's ValidationGroup property must be set to this same value. As we saw in the "Adding a New Category" section earlier in this hour, when using the DetailsView to insert a new category, we needed to programmatically provide the currently logged-on user's UserId value. Because we removed the UserId BoundField from our GridView and because the SqlDataSource control's UpdateCommand expects a value for the UserId column, we need to provide this value programmatically when updating a record through the GridView. This is accomplished in much the same manner as with the DetailsView. Start by creating an event handler for the GridView's RowUpdating event. In that event handler, add the following single line of code: e.NewValues("UserId") = Membership.GetUser().ProviderUserKey Listing 23.2 contains the complete source code portion of the ManageCategories.aspx page at this point in time. Lines 46 show the Page_Load event handler, where the currently logged-on user's UserId value is stored in a UserIdValue Label control so that we could use this value in the SqlDataSource control's wizard. Lines 811 show the DetailsView control's ItemInserting event handler, and lines 1316 show the GridView's RowUpdating event handler, which we just added. These two event handlers both provide the currently logged-on user's UserId for inserting or editing purposes. Listing 23.2. The Complete Source Code Portion for ManageCategories.aspx
At this point you can further customize the GridView's properties. As with the other controls added throughout this hour, I used the Auto Format Wizard and selected the Classic option. I also set the GridView's EmptyDataText property to "You currently do not have any categories". Furthermore, showing 10 records per page resulted in what seemed to me a too lengthy GridView, so I set the GridView's PageSize property to 5. Congratulations! You have completed the functionality for adding, editing, viewing, and deleting categories! Take a moment to test this new functionality. Try adding some new categories and then editing, deleting, sorting, and paging through these newly created categories. Also, note that the categories displayed are user-specific. If you log off and then return to ManageCategories.aspx logged on as another user, you won't see the categories you just created. Figure 23.15 shows how to edit an existing category. Figure 23.15. A user can change the name of his categories. |
EAN: 2147483647
Pages: 233