| First you should understand what a domain is. In the real world, you can have more than one application running on any server. Now, each computer can have more than one server running on it, or many servers can be running on different computers. Again, each of these servers can have resources associated with it, or a common resource can be associated with all the servers in a cluster. These servers can be grouped into logical units, based either on their geographic locations or on their functions. Each such logical grouping is called a domain. Hence, a domain can contain one or more WebLogic Servers, along with their associated resources. In WebLogic, each domain has a single config.xml file containing all its configuration settings. Generally, as can be seen in Figure B.4, a single administrative server handles multiple domains. Figure B.4. A domain, managed servers, and an administrative server.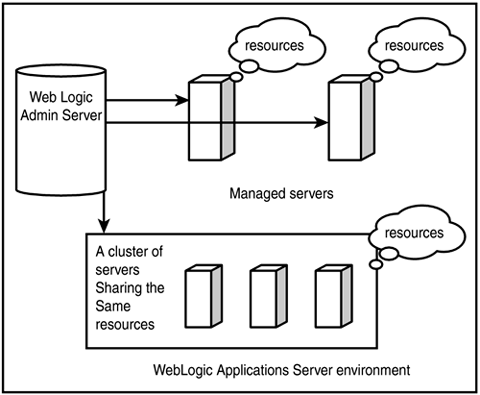
To create your own domain for deploying your examples, you need to run the configuration wizard. To do this in the GUI mode, navigate to Start > Program Files > BEA WebLogic Platform 7.0 > Configuration Wizard. Alternatively, you can open a command-prompt window and navigate to the USER_INSTALL_DIR\common\bin directory and execute dmwiz.cmd (or dmwiz.sh). Then follow these steps: -
When you start the configuration wizard, it will first prompt you to enter the name and the kind of domain you wish to make; see Figure B.5. Enter mydomain in the text box, and select WLS Domain, a typical installation with no custom applications. Then click the Next button. Figure B.5. First screen of the configuration wizard.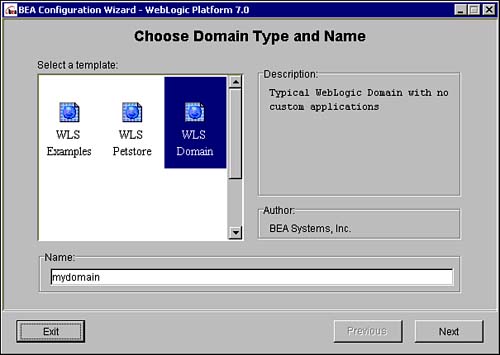
-
The next screen enables you to choose the server type. Here are the choices: Single Server (Standalone Server) This kind of server can host applications and also acts as the administrative server. This is advisable for a development environment but not for a production environment. Admin Server with Managed Server(s) This option is suitable for an environment where the administrative server is to be hosted on one server, while the applications run on one or more managed servers. Admin Server with Clustered Managed Server(s) This option creates a domain with a separate administrative server, dedicated to a single server or set of managed servers arranged as a cluster. This option should be selected to help set up the basic network configuration for a cluster of multiple servers. Managed Server (with owning Admin Server configuration) This option results just in extending an already existing WebLogic Server domain. This option creates only a new managed server, which will be associated with this existing WebLogic Server domain. Choose this option, and then click Next. -
The next screen asks you to specify the domain location. By default, the path shown is user_projects in your BEA_HOME directory. Change user_projects to user_domains; see Figure B.6. Then click the Next button. Figure B.6. Choosing the location of your domain directory.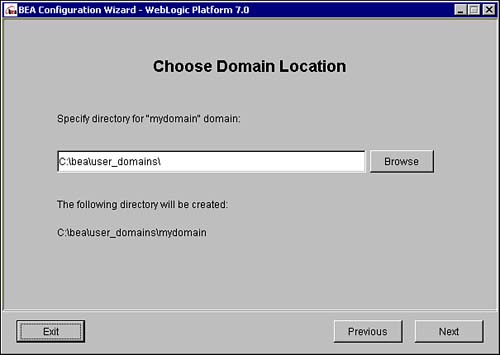
-
A screen for entering information about the administrative server is displayed next; see Figure B.7. Enter the name of your computer in the Admin Server Name or IP text box to put your administrative server on your local host. If you are going to manage this domain from some other server, you can enter the name and the port number of that server here. However, if you choose to enter some other name here, then when you wish to log onto the Administration Console for this domain, you need to access it as http://yourAdminServerName:port_number/console. Leave the rest of the information untouched. Note here that the name of the Managed Server is your computer name. Click the Next button. Figure B.7. Entering the administrative server information.
-
You now see the screen for configuring your managed server. Click the Next button here. -
You now see a screen to specify a user ID and password for your domain. Enter user and password, respectively. Reconfirm the password password in the next text box. Note: You can specify any user ID and password here. Make a note of the user ID and password, though, because you will need them to boot up the WebLogic Server and start the Administration Console for this domain. -
When you click Next after configuring your user ID and password, the next screen gives you the choice of installing this domain as a Windows service. Click No. (You can click Yes if you wish!) Then click the Next button. -
You now have a choice to install this domain in the Windows Start Menu. Click No. (Again, you can click Yes if you wish.) Then click the Next button. -
Now a screen shows you the configuration details of your new domain server; see Figure B.8. Verify that the information is correct, and then click Create. Figure B.8. Your domain server configuration details.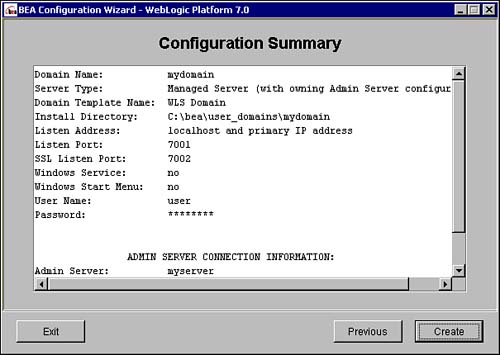
You now have successfully installed your own domain, called mydomain. You should see a screen indicating the successful completion of the configuration wizard. Click the End Configuration Wizard radio button and then the Next button. In the Windows Explorer, you will see a directory called user_domains along with the other directories in the BEA HOME directory. This directory contains your domain directory. Note The preceding description is of the GUI mode specifically. For a command-mode installation, invoke the appropriate cmd or sh file of the configuration wizard installable file: dmwiz.cmd -mode=console or dmwiz.sh mode=console Figures B.1 through B.8 illustrate a Windows GUI of the WebLogic 7.0 Server and a domain for the same. For details for the Unix platform, please refer to the WebLogic documentation: http://e-docs.bea.com/wls/docs70////admin_domain/configwiz.html
What Does the Configuration Wizard Do? The main function of the configuration wizard is to obtain input from the user so as to create a config.xml file, essential for the working of a domain. This config.xml file is stored in the domain directory (in this case, the directory mydomain under the user_domains directory). Also, to start up the WebLogic Server and manage your applications, a couple of scripts are required. The configuration wizard creates these scripts. The domain directory contains all the files required to run the domain server. Following are the important directories made in the domain directory: applications In this directory, you save all the application code that has to be run (for example, your servlets and EJB applications). The WebLogic Server looks in this directory to load the required EAR or WAR files. logs This directory contains the logs for all server-related activities. In addition to these directories, the following files are made: setEnv.cmd and setEnv.sh startWebLogic.cmd and startWebLogic.sh startManagedWebLogic.cmd and startManagedWebLogic.sh demokey.pem and democert.pem The setEnv, startWebLogic, and startManagedWebLogic files are addressed a little later in this appendix. A Windows shortcut to the server services is also created, and the network and security configurations are set up. |