Resizing Tables
|
| < Day Day Up > |
|
You won't always know how large a table is going to be when you first begin creating it. Word provides options for helping you control the size of your table and offers flexibility for resizing your table exactly the way you want. This section explains how you can work with Word to best handle table-sizing issues.
Understanding AutoFit
When you first create a table using the Insert Table dialog box, you're given the option of choosing AutoFit for your table. AutoFit enables you to automatically resize your window as needed, and it is actually already working, by default, to create fixed column widths in your table. AutoFit offers three options:
-
Fixed Column Width Enables you to choose a specific width for the columns you create.
-
AutoFit To Contents Adjusts the width of columns to accommodate the data you enter.
-
AutoFit To Window Sizes a table so that it fits within a Web browser window. This size changes depending on the size of the window, which means that the table will be automatically redrawn as many times as the user resizes his or her browser window.
Tip Test AutoFit To Window If you want to see how resizing your table will affect the rest of the text displayed in your document, you can easily test AutoFit To Window by creating your table, choosing AutoFit To Window (you can do this before you create the table or afterward), and then displaying the table in Web Layout view. When the table is displayed, resize your document window. The table is automatically reformatted so that it always fits within the borders of the window.
Resizing an Entire Table
Although AutoFit does a fine job of keeping on top of the way your table needs to grow (or shrink), there will be times when you want to make those changes yourself. Resizing a table is a simple matter of click-and-drag editing. Start by selecting the table (click the table move handle). Then follow these steps:
-
Scroll to the end of the table. In the lower right corner, you see a table resize handle.
-
Position the pointer over the table resize handle. The pointer changes to a double-headed arrow.
-
Drag the corner of the table in the direction you want the table to be resized. The cells of the table are redrawn to reflect the new size.
Note You can resize tables only in Print Layout and Web Layout views. Although you can see a table in Normal view, the table resize handle is not available.
The Table Properties dialog box gives you two very different sizing options. To open this dialog box, click in your table and choose Table, Table Properties. To create a table based on a fixed measurement, click the Table tab and in the Size section, select the Preferred Width check box and enter the width for the table you're going to create. Click the Measured In arrow and select Inches; then click OK.
The best use of this feature, however, is in creating a table that reformats automatically based on the size of the browser window. In other words, if you're viewing your table as part of a Web page, and you reduce the size of your browser window, the table will reformat so that it will stay visible, even in the smaller window. This is a great feature if you're often switching back and forth between applications and want to keep your information open on the screen. To create a table whose dimensions are based on a percentage of screen display, click the Measure In arrow, select Percent, and then click OK. The table will be reformatted as needed to stay within the size of the Web browser window.
Changing Column Width
The fastest way to change the width of a column is also the easiest. You simply position the pointer over the dividing line of the column you want to change and, when the pointer changes to a double-headed arrow, drag the border in the desired direction. Be sure that you've "grabbed" the border for the entire column, however; it's possible to move the border for a single cell, which won't help if you want to make an entire column wider or narrower. (You'll be able to tell that you've grabbed the entire column when you see the dotted column guide along the length of the table.)
Changing Row Height
Changing row height is similar to changing column width. Position the pointer on the row border you want to change. When the pointer changes to a double-headed arrow, drag the border in the desired direction.
| Tip | Add space to table rows We don't need statistics to tell us that nobody wants to read a cramped table. You can help the readers of your document get your point more easily by providing enough space in your table rows. By default, Word is a bit skimpy on row height (less than a quarter of an inch); you might want to increase your rows to at least 0.25 inch if the space in your document allows. |
Distributing Data Evenly in Rows and Columns
Distributing your data refers to the process of spacing and aligning data within cells. By default, when you create a basic table and enter text, the text aligns along the left border of the cell, placed in the first line of the cell. To distribute your data evenly in the rows in your table (spacing it evenly between the top and bottom margins of the row), click Distribute Rows Evenly on the Tables And Borders toolbar.
To distribute the data evenly among the columns in your table, as shown in Figure 13-6, click Distribute Columns Evenly.
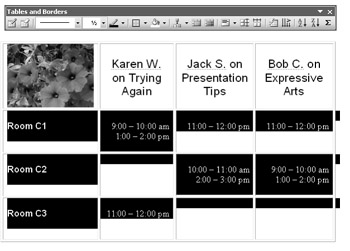
Figure 13-6: Data is distributed evenly among columns and rows in the selected table.
Changing Text Direction
While we're talking about distributing data, how about rotating the text in your table cells? Word provides a capability that enables you to turn your horizontal text to the vertical axis, which gives you the means to create interesting column headings for your tables.
You can change the direction of your text whether you've already entered data or you're just beginning to add data to your table. If you're changing the direction of existing text, select the text, and then click Change Text Direction on the Tables And Borders toolbar. Clicking this button rotates the text 90 degrees to the left. The vertical column headings in the table in Figure 13-7 were created using this button.
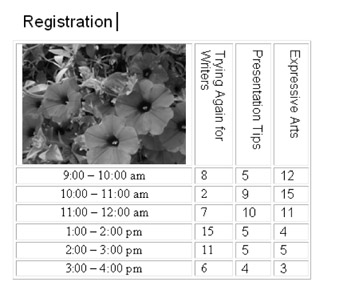
Figure 13-7: The column headings in this table have been rotated 90 degrees.
If you want to change the direction yet again, click Change Text Direction a second time. Now the text rotates a further 180 degrees, so that it faces the other edge of the table. Click the button again, and the text returns to normal. If you're setting the direction for text that you are about to enter, simply click the button and then type your text.
|
| < Day Day Up > |
|
EAN: 2147483647
Pages: 373