Editing Tables
|
| < Day Day Up > |
|
Getting the data into table form is only half the battle. Once your data is entered, you'll no doubt want to reorganize it, edit it, add to it, and delete some of it. That means adding rows and columns—perhaps moving the rows you already have—and deleting others. You might decide to rearrange the order of columns, which means moving data from one side of the table to the other. That's where Word's formatting features come in.
Displaying Table Formatting Marks
 One of the secrets in moving and editing table data successfully lies in seeing the unseen. Each table cell, row, and column is given a marker that delineates the end of the items in the table format. When you move, copy, or paste information, these unseen markers might go along, giving you unexpected results at best, or overwriting your existing data at worst. To display the hidden marks in your current Word table, select the table by clicking the table move handle and then click Show/Hide on the Standard toolbar. The various table formatting marks will appear, as shown in Figure 13-5.
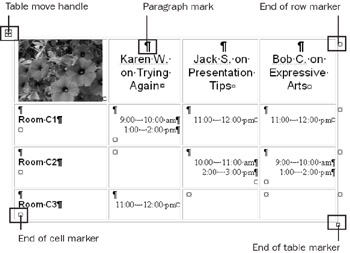
Figure 13-5: Table Formatting Marks identify the end of individual cells, rows, columns, and the table itself.
| Tip | Control the way formatting marks are displayed in your document If you don't see all the formatting marks you expect, someone may have set the View options to limit the ones that are displayed by default. You can turn all the formatting marks back on by choosing Tools, Options, and clicking the View tab. In the Formatting Marks section, click All; then click OK. Now all of your formatting marks will appear automatically whenever you click Show/Hide. |
Selecting Table Cells
To move and copy rows, columns, and cells, start simply by selecting them to let Word know which data you want to work with. As you get comfortable working with tables, you'll discover the tricks to selecting just the data you want for various operations. Table 13-2 lists selection methods you'll use in working with tables.
| Tip | Use multiple table selections You can select noncontiguous sections of a table by pressing and holding Ctrl while you click additional selections. In a product listing, for example, this capability enables you to choose only the products that will be included in the 2003 catalog and copy them to a new table, leaving behind all the 2002 offerings. |
| Selection | Method | Use |
|---|---|---|
| Entire table | Click the table and then click the table move handle that appears in the upper left corner of the table. | You want to move, copy, format, or delete an entire table. |
| Single row | Click outside the table to the left of the row. | You want to reorder, format, copy, move, insert, or delete a row. |
| Single column | Click outside the table just above the column. | You want to move, format, copy, insert, or delete a column. |
| Single cell | Click to the left of any data entered in the cell. | You want to move, copy, delete, or clear that cell. |
| Multiple cells, rows, or columns | Drag across the elements you want to select. | You want to move, format, copy, or delete sections of a table. |
Copying Table Data
Although copying is basically a simple operation, copying table data can be a pain. The data can sometimes go where you don't expect it; for example, if you want to copy all the information into one cell in the new table, the data might instead be spread over the entire row, replacing existing data. If you want to copy multiple cells to multiple cells in the new table, the incoming cells might all be lumped into the cell at the insertion point. How do you avoid these kinds of copy surprises?
First, know what you're copying. The trick is to select cell data if you want to copy cell data; likewise, select the cells themselves (or rows or columns) if that's what you want to copy. By capturing the table formatting marks when you highlight the section you want to copy, you can be sure you get the results you expect.
Next, know where you're copying to. If you are copying a row or a column, make sure you've allowed enough room for the incoming data so that important entries won't be overwritten and lost. Once you've selected what you want to copy and you've planned the copy destination, press Ctrl+C to copy and Ctrl+V to paste, as usual.
Inserting Columns
You can expand and add to your table easily. One way to do this is by adding new columns. There are two different ways to add columns to the right or left of an existing column. One method causes Word to reconfigure the width of the existing columns, so that the width of the overall table is no wider than it was before you inserted a column. The other method maintains the widths of existing columns and widens the table by the width of the new column.
To add a new column to your table, select the column beside which you want to create the new column. To select the entire column, click on the top border of the column. When the column is selected, the Insert Table button on the Standard toolbar will change to Insert Columns. Click Insert Columns to add the new column. If your table is already the width of the text column, the new column is added without any widening of the table. If your table is narrower than the text margins allow, the new column is inserted and the columns to the right of the column move to make room.
| Tip | Choose right or left, above or below The buttons on the Standard toolbar don't give you quite as much flexibility as menu commands do. Here's an example: by default, Word inserts columns to the left of the selected column and rows above the selected row. If you use the Insert Column button to add a column to your table, you must accept this default. However, if you choose Table, Insert and then select Columns To The Right or Rows Below, you can tell Word exactly where to insert a column or row. |
Inserting Rows
Inserting rows is similar to inserting columns. Begin by selecting the row below which you want to insert a new row. Select the entire row by clicking to the left of the first cell of the row. The entire row is highlighted.
Click Insert Rows on the Standard toolbar (this button replaces the Insert Table button when a row is selected). Word inserts the new row just above the currently selected row.
| Tip | Insert multiple rows and columns If you want to insert more than one row or column, select the number of rows or columns you want to add. (It doesn't matter whether the rows and columns have data in them or not.) For example, if you want to insert three rows, select three rows in the current table before choosing the commands necessary to add the rows. |
Inserting Cells
In some circumstances, you might want to insert cells in a table without adding an entire row or column. You might need to do this, for example, when you have overlooked a product name and number in your listing and need to add it without changing the entire table. To insert cells in a table, simply select the cell (or cells) below which you want to insert new cells. Choose Table, Insert, Cells. The Insert Cells dialog box appears, as shown below. Click Shift Cells Down to place the new cells above the selected cells. Click Shift Cells Right if you want to move the existing cells to the right to make room for the new cells. Click OK to insert the cells. The cells are added and the existing cells are moved as specified.

Deleting Columns, Rows, and Cells
If you decide that you don't need certain rows or columns after all, or if you have empty rows you didn't use, you can easily delete them. Simply highlight the rows or columns, choose Table, Delete, and choose what you want to delete from the Delete submenu.
When you choose to delete cells in a table, Word displays the Delete Cells dialog box so that you can identify where you want remaining cells to be shifted. Click your selection, and click OK to return to the document.
Moving Rows and Columns
In some instances, you might want to select parts of your table and move them to other parts of your document, perhaps creating a new table, moving rows to another position in the table, or turning the table information into text. When you want to move rows or columns, simply select the rows or columns you want to move and drag the selected block to the new location. The table rows or columns are relocated as you specified.
Merging Cells
Sometimes tables seem to grow out of proportion. If this has happened to your table and you're looking for a way to consolidate data, you can use Word's Merge Cells command to take data from separate cells and combine it in one cell. To merge cells in your table, select the rows or columns you want to merge and choose Table, Merge Cells. The data is combined into a single cell.
| Note | You'll probably need to do some editing to get your data looking the way you want after a merge. Data takes on the format of the receiving cell, and you might wind up with extra lines and odd capitalization as a result. |
Splitting Cells
As you might imagine, splitting cells is the opposite of merging them. When you've got a collection of data that you want to divide into separate cells, rows, or columns, you can use Split Cells on the Tables And Borders toolbar (or the Split Cells command on the Table menu). To split cells, begin by selecting the cell, row, or column you want to split. Click Split Cells on the Tables And Borders toolbar. In the Split Cells dialog box, enter the number of columns and rows over which you want to divide the data. If you have previously merged the data you are now splitting, Word "remembers" the number of columns and rows and suggests those values for the division. To retain the basic format and apply existing row and column formatting to the new columns and rows, leave the Merge Cells Before Split check box selected. Click OK to split the cells.
| Tip | Adjust column sizes After you split cells in your table, you'll probably need to redistribute the space in the columns. To resize a column quickly, point to the column border in the top row of the column you want to change. When the pointer changes to a double-headed arrow, drag the column border in the direction you want to resize the column. When the column is the size you want it, release the mouse button. |
|
| < Day Day Up > |
|
EAN: 2147483647
Pages: 373