Step 4.4 How to Generate a Key Using PuTTY
Problem: How do you generate a key pair using PuTTY?
Action 4 4 1 Generating a public private key pair with PuTTY
PuTTY comes with the program PuTTYgen to generate public and private key pairs. To use PuTTYgen:
- Double-click on the desktop icon created for PuTTYgen or select it from the Start Menu to execute the program.
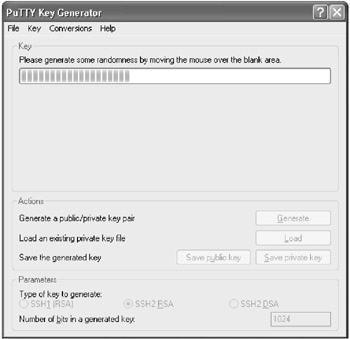
- The window that appears contains three sections: Key, Actions and Parameters . Since we do not have a key pair yet, we need to generate one. However, we first need to decide on which parameters to supply.

In the Parameters section are three options for the type of key to generate. SSHv1 only supports one type of key, so if you need to authenticate to a server that only supports SSHv1 make sure the radio button next to SSH1 (RSA) is selected.
If you will be connecting to a server that supports SSHv2, you have two choices for keys: SSH2 RSA and SSH2 DSA. The server you are connecting to may only allow one type of key, so you may have no choice as to what type of key you need to create. Click on the radio button next to the type of key you choose to create.
- Select the length of the key. The default length for a key within PuTTYgen is 1024 bits, which should be sufficient. Unless you need to change the length for specific reasons, leave 1024 in the Number of bits in a generated key field.
- Once both the key type and length are selected, click on the Generate button in the Actions section.
- PuTTYgen will now ask you to create some randomness by moving your mouse around the blank area of the program window. Move your mouse around until the progress bar fills completely.
- When the progress bar has filled completely, it will be reset and PuTTYgen will begin to create your key. Once the progress bar has filled once again, the key will have been created and a new window will appear.
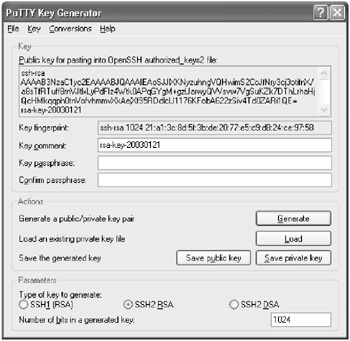
- The new window has a number of fields that you should fill in before saving the public and private key. The first is the Key Comment field.
The Key Comment field allows you to add a comment to help you remember the purpose of this key-pair. This comment will be displayed whenever PuTTY asks you for the passphrase to unlock the key. A comment is not required, so it can be left blank.
- The next field is the Key Passphrase field. This is the phrase for which you will be prompted whenever you try to connect to a remote system. There are no minimum requirements for creating the passphrase and in fact it can be blank. A good passphrase, however, should be at least 6 words in length with random case and punctuation. See step 4.2 for more information on creating a good passphrase.
As you enter a passphrase into the Key Passphrase field, you will not be able to see what you are typing as asterisks or bars will appear to prevent anyone from "shoulder surfing" and seeing your passphrase.
Note You may be tempted to leave your passphrase blank. Don't! While there are times when this may be necessary, generally you should never have a blank passphrase for your personal account. If you left the passphrase blank and someone were able to get your private key, they would be able to authenticate to the remote server as you without authentication. The only time you should use a blank passphrase is when you need to run scripts automatically using SSH. When this happens, you should create and lock down a separate account on the remote server to minimize the potential damage if the account were compromised.
- Retype the passphrase in the Confirm passphrase field. This is to avoid potential typographical errors.
Note Make sure your passphrase is obscure but memorable as there is no way to recover it!
- Next, click on the Save private key button in the Actions section to save your private key to disk. If the passphrases you typed do not match, an error will appear.
- If your passphrase fields match, a dialog box will appear asking you where on disk to save the private key. The directory into which you choose to save the private key should be appropriately protected, to keep your private key as secure as possible. You could even keep it safe on a floppy disk, as long as the floppy disk is secured.
- Type in a filename for the key in the File name field.
- The Save as type field should display PuTTY Private Key Files. If it does not, select it from the drop down list.
- Click on the Save button. If the save is successful, you will be returned back to the PuTTYgen screen.
- Now you need to save your public key. Click on the button named Save public key .
- This will open a dialog box similar to the one that was used to save the private key. In the dialog box, select the directory to which you want the public key saved.
- Once the destination directory for the public key has been selected, type the filename for the key into the File name field. The drop down box for the Save as type will display All files . This is fine, as the public key will be saved as a normal text file that you can copy as needed. You may wish to consider using a ".pub" extension for the public key.
- Click on the Save button. If the save is successful, you will be returned back to the PuTTYgen screen.
Action 4 4 2 Setting up public key authentication
Now that your public and private keys are created, you need to set up the remote server to accept our newly generated keys:
- Leaving PuTTYgen open, launch PuTTY and open up a connection to the server with which you wish to use public key authentication. Enter your authentication information when prompted to log in to the server.
- After receiving a prompt, enter cd .ssh . This will place you into the directory where you will store your public key.
- Look at the listing for the directory by typing ls “l . The name of the file you are looking for will depend on the version of OpenSSH you are using. If you are using SSHv1 or SSHv2, you want to find a file called authorized_keys . If you are using an early version of SSHv2, the file may be named authorized_keys2 .
login as: sshuser
 sshuser@server.example.com's password: *******

 [sshuser@server.example.com]$ cd .ssh
 [sshuser@server.example.com]$ ls -l
 total 2
 -rw-rw-r-- 1 sshuser sshuser 226 Aug 11 12:46 authorized_keys
 -rw-r--r-- 1 sshuser sshuser 223 Aug 10 13:27 known_hosts

 [sshuser@server.example.com]
 $
If the file does not exist, you can create it with your favorite editor. (In the rest of this example, we will refer to this file as the authorized_keys file, although the actual filename may differ depending on your version of SSH.)
- At the command prompt of the remote machine, use your favorite editor to open or create the authorized keys file.
- Switch back to PuTTYgen on your Windows desktop. In the Key section, there is a window entitled Public key for pasting into OpenSSH authorized_keys2 file :. Highlight all of the text within that window and copy it into the Windows buffer by pressing Control+C.
- Switch back to your SSH session with the authorized_keys file loaded in your favorite editor. Paste your public key into the file by pressing Control+V or Shift+Insert. Your public key should be pasted into the file as one continuous line (although the text will probably wrap). Save the file and exit your editor. If the authorized_keys file did not previously exist, make sure that the file is saved with the appropriate name, depending on your version of SSH.
- We now need to set the correct owner and permissions on the authorized_keys file. Run ls “l again at the command prompt to review the owner and permissions of the authorized_keys file.
Note If the authorized_keys file does not have the correct owner or permissions, your SSH server may not allow you to log in using public key authentication.
[sshuser@server.example.com]$ ls -l
 total 2
 -rw-rw-r-- 1 sshuser sshuser 238 Jan 21 22:20 authorized_keys
 -rw-r--r-- 1 sshuser sshuser 223 Aug 10 13:27 known_hosts
 [sshuser@server.example.com]$
- The user ID of the user you are trying to log in as should own the file (the owner is the third column in the ls “l listing). If it is not, change ownership now using the chown command as shown below.
[sshuser@server.example.com]$ chown sshuser authorized_keys
- The file permissions are the first column of the ls “l listing. The file should be readable by everyone but only writable only by the owner of the file. The correct permissions should be as follows :
-rw-r--r-- 1 sshuser sshuser 238 Jan 21 22:20 authorized_keys
If the authorized_keys file permissions are incorrect, change them with the chmod command, as shown below:
[sshuser@server.example.com]$ chmod 644 authorized_keys
Action 4 4 3 Using PuTTY to log in with public key authentication
Now we need to tell PuTTY to use public key authentication to log into the server:
- Double-click on the icon that was created for PuTTY or select it from the to start another instance of PuTTY.
- In the Session category of the PuTTY configuration screen, enter the host name or IP address of the server that you've configured for public key authentication.
- Make sure the SSH protocol is selected by clicking on the radio button next to SSH in the Protocol section.
- In the left-hand window, select the Connection->SSH->Auth category. This is the category that controls some of the options for SSH authentication:
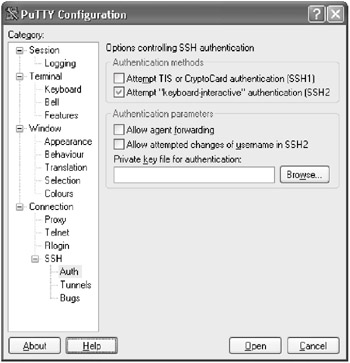
- In the section marked Authentication parameters , click on the Browse button located below the field entitled Private key file for authentication: .
- Click on the Browse button and a dialog box will appear allowing you to specify the private key file you created for your connection to the server. Once you have selected the private key file, click on the Open button and you will return to the PuTTY configuration screen. The name of the file in which the private key is stored should now be listed in the Private key file for authentication: field.
- Click on the Open button. PuTTY will now attempt to contact the remote server and authenticate using public key authentication.
- Next, PuTTY will ask for your user name. This is the user name of the account on the remote host.
- If public key authentication has been configured correctly, you will be told that you are authenticating with your public key and you will be asked for the passphrase for your key.
login as: sshuser
 Authenticating with public key sshuser@server.example.com
 Passphrase for key "sshuser@server.example.com": ***************************
 [sshuser@server.example.com]$
- If the passphrase was not entered correctly, you will be given 2 more attempts to try again. After the 3rd attempt, the SSH connection will either abort, or, if the OpenSSH server has been configured to allow both public key AND password authentication, you will be prompted for the account password.
Action 4 4 4 Use public key authentication from the command line PuTTY tools
We have seen that we can use public key authentication with PuTTY, the graphical SSH interface, but sometimes we may want to use public key authentication when using the PuTTY command line tools PSCP, PSFTP and Plink.
Each of these programs provides a “i command line option for specifying the path and filename of the file containing the private key. Whenever the “i option is specified for any of these tools, they will automatically try to authenticate using public key authentication.
The following example shows how to use PSCP to transfer files using public key authentication. The same procedure is used for PSFTP and Plink:
- Open a Windows command prompt by clicking on the Start Menu and selecting Run . In the Open prompt, type cmd if you are running Windows NT/2000/XP or command if you are running Windows 9x/ME and press the OK button.
- At the Windows command prompt, use PSCP to copy a file using the -i option with the path and file name of the file containing the private key, as shown below:
C:	emp>pscp -i "c:	empmykeysmy_private.PPK" test.pl sshuser@server.example.com:.
 Authenticating with public key sshuser@server.example.com
 Passphrase for key "sshuser@server.example.com": *************************

 test.pl 22 kB 22.0 kB/s ETA: 00:00:00 100%
 C:	emp>
Action 4 4 5 Removing your public private keys
Since your public and private keys are stored locally in a file, removing them is as simple as deleting the file. Of course, this will only delete them on your local machine and not any servers where you may have copied your public key. To remove those, refer to Action 4.3.4.
SECTION I - Obtaining, Compiling and Installing OpenSSH
- Step 1.1 Install OpenSSH to Replace the Remote Access Protocols with Encrypted Versions
- Step 1.2 Install SSH Windows Clients to Access Remote Machines Securely
SECTION II - How to Use OpenSSH Clients for Unix-to-Unix Connectivity
SECTION III - How To Use PuTTY/WinSCP For PC-To-Unix Connectivity
- Step 3.1 Use PuTTY as a Graphical Replacement for telnet and rlogin
- Step 3.2 Use PuTTY / plink as a Command Line Replacement for telnet / rlogin
- Step 3.3 Use WinSCP as a Graphical Replacement for FTP and RCP
- Step 3.4 Use PuTTYs Tools to Transfer Files from the Windows Command Line
SECTION IV - Using Public Key Authentication
- Step 4.1 Authentication with Public Keys
- Step 4.2 Passphrase Considerations
- Step 4.3 How to Generate a Key Pair Using OpenSSH
- Step 4.4 How to Generate a Key Using PuTTY
- Step 4.5 How to use OpenSSH Passphrase Agents
- Step 4.6 How to use PuTTY Passphrase Agents
- Step 4.7 Using Public Key Authentication for Automated File Transfers
SECTION V - Troubleshooting SSH Connections
SECTION VI - Advanced SSH Topics
- Step 6.1 Port Forwarding
- Step 6.2 Using Port Forwarding Within PuTTY to Read Your E-mail Securely
- Step 6.3 X11 Forwarding
Conclusion
Appendix - Sample sshd_config File
EAN: 2147483647
Pages: 90
