Step 3.1 Use PuTTY as a Graphical Replacement for telnet and rlogin
Problem: Now that PuTTY is installed, we need to learn how to utilize it for invoking remote interactive connections from a Windows host to a UNIX server running OpenSSH.
Action 3 1 1 Configure PuTTY to connect to a remote machine
Now that PuTTY is installed, it can be used to connect to remote machines running the OpenSSH server. The graphical component of PuTTY is used to connect to remote machines and create a telnet or rlogin-like shell session.
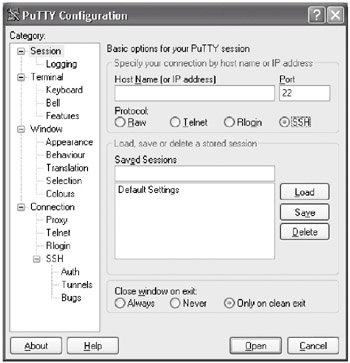
- First, double-click on the icon that was created for PuTTY or select it from the Start Menu to start the program. A window will display as shown below. This is where the configuration of each SSH session can be changed.
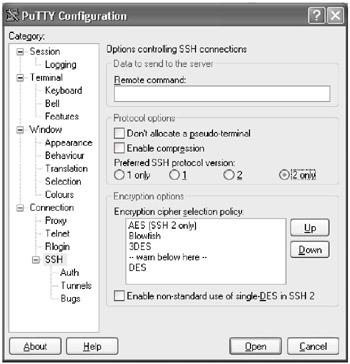
On the left side of the configuration window is a list of categories. Clicking on any of the categories will display in the right-hand window the different options that are configurable for the SSH session. PuTTY comes with a very useful help file that describes each of the options in detail. Except for the SSH version specification, the default for each option is reasonable and secure, so the majority of them should not have to be changed.
SSH version 1 has known weaknesses and should be avoided. Select SSH version 2 only by clicking on the SSH category and selecting 2 only from the Preferred SSH protocol version , as shown below.
- If it is not already selected, click once on the Session category. This will display the most basic options that need to be configured for the SSH session.
The upper section of the window will display an entry for the Host Name or IP address of the machine to which you wish to connect, the Port Number on which the service is listening and which protocol to use. Since we want to create an SSH session, make sure SSH is selected and type in the Host Name or IP address of the machine to which you wish to connect. Leave the Port Number set to 22 as this is SSH's default port.
OPTIONAL Below the connection settings is an area where you can load, save or delete sessions. To save a session, type a name for the session in the area below the Saved Sessions text and click on the Save button. The name you have given the session will appear and can now be recalled by either double-clicking on the name or selecting the name and clicking on the Load button. This is to provide a way to quickly recall settings for specific sessions.
- Once the hostname or IP address of the machine to which you wish to connect has been entered, click on the Open button at the bottom of the window. The configuration windows will disappear and PuTTY will attempt to connect to the machine you specified.
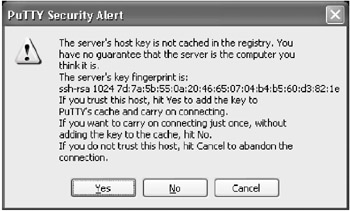
If PuTTY is successful, a terminal window with an empty black background and a PuTTY Security Alert, as shown below, will appear. The security alert is telling you that you have not connected to this machine before and the machine's host key has not been seen before. This message is normal for the first time connecting to a server via SSH. Afteryou contact the administrator or a user of the machine to verify that the server's key fingerprint is correct, click the Yes button. The administrator or user can verify the server's key fingerprint by executing the following command on the server:
$ ssh-keygen -l -f file
Where file is the name of the host's public SSH key, such as /etc/ssh/ssh_host_key.pub . The result will look similar to the following and should match the key fingerprint previously given:
1024 7d:7a:5b:55:0a:20:46:65:07:04:b4:b5:60:d3:82:1e
Keep in mind that the fingerprint must be transmitted in a secure manner (i.e. by a phone call to the administrator of the remote system), since SSH relies on these keys and the fingerprint is the simple proof for a valid key. For obvious reasons, SSH does not provide a way to fetch such fingerprints remotely from an SSH server.
- You should only see this message the first time you successfully connect to a server with PuTTY. If you see the message on a subsequent attempt, something is wrong “ see action 5.2.6 for possible security risks. Also, if you get a dialogue stating that "the cached host key does not match" see action 5.2.7.
If the connection is not successful, a black window will appear after you click the Open button, but instead of the expected PuTTY security alert, a timeout error will appear.
- After you click the Yes button in the security alert window, the black window will display user ID and password prompts. If you enter your authentication information correctly, you will receive a shell prompt. You are now connected to the remote machine.

SECTION I - Obtaining, Compiling and Installing OpenSSH
- Step 1.1 Install OpenSSH to Replace the Remote Access Protocols with Encrypted Versions
- Step 1.2 Install SSH Windows Clients to Access Remote Machines Securely
SECTION II - How to Use OpenSSH Clients for Unix-to-Unix Connectivity
SECTION III - How To Use PuTTY/WinSCP For PC-To-Unix Connectivity
- Step 3.1 Use PuTTY as a Graphical Replacement for telnet and rlogin
- Step 3.2 Use PuTTY / plink as a Command Line Replacement for telnet / rlogin
- Step 3.3 Use WinSCP as a Graphical Replacement for FTP and RCP
- Step 3.4 Use PuTTYs Tools to Transfer Files from the Windows Command Line
SECTION IV - Using Public Key Authentication
- Step 4.1 Authentication with Public Keys
- Step 4.2 Passphrase Considerations
- Step 4.3 How to Generate a Key Pair Using OpenSSH
- Step 4.4 How to Generate a Key Using PuTTY
- Step 4.5 How to use OpenSSH Passphrase Agents
- Step 4.6 How to use PuTTY Passphrase Agents
- Step 4.7 Using Public Key Authentication for Automated File Transfers
SECTION V - Troubleshooting SSH Connections
SECTION VI - Advanced SSH Topics
- Step 6.1 Port Forwarding
- Step 6.2 Using Port Forwarding Within PuTTY to Read Your E-mail Securely
- Step 6.3 X11 Forwarding
Conclusion
Appendix - Sample sshd_config File
EAN: 2147483647
Pages: 90
- Article 326 Integrated Gas Spacer Cable Type IGS
- Article 336 Power and Control Tray Cable Type TC
- Example No. D2(b) Optional Calculation for One-Family Dwelling, Air Conditioning Larger than Heating [See 220.82(A) and 220.82(C)]
- Example D3(a) Industrial Feeders in a Common Raceway
- Example No. D4(a) Multifamily Dwelling
