Lesson 1: The Site System Creation Process
This lesson describes how site systems are created and how site components create a site system. The concept of site change was introduced in Chapter 2, Lesson 4, "The Installation Modification Process."
After this lesson, you will be able to
- Configure site systems using the SMS Administrator console.
- Describe how SMS processes a request to create a site system.
Creating and Modifying Site Systems
Site systems are created and existing site system roles are modified from the Site Systems node in the SMS Administrator console. Figure 10-1 shows the roles of the SERVER1 site system.

Figure 10-1. How to view the roles of the SERVER1 site system in the SMS Administrator console.
A site system's roles are viewed, enabled, disabled, and, in some cases, configured from the tabs shown in Figure 10-1. For example, a software metering server's temporary data cache is configured from the Software Metering Server tab.
A new site system is configured by selecting the Site Systems node and choosing New from the Action menu. The four types of site systems created from the New option are Windows NT Server, Windows NT Share, NetWare Bindery Volume, and NetWare NDS Volume. A Windows NT/2000 Server can be configured to serve all these roles. A Windows NT/2000 Share is only configured as a CAP or distribution point. To support NetWare client computers, NetWare bindery and NDS systems are configured as logon points, distribution points, and client access points (CAPs).
NOTE
NetWare site system options only appear if you have installed SMS 2.0 NetWare support.
The site server, SMS Provider, site database, and software metering database roles are not assigned from the Site Systems node. A site server is installed during an SMS installation or through the creation of a secondary site from a primary site. The SMS Provider is installed during an SMS installation and resides either on the site server or the site database server. The SMS Provider role cannot be reassigned. For more information on the SMS Provider, see Chapter 2, Lesson 2, "SMS Preparation and Installation." The site database and software metering database roles are modified using the SMS installation/modification routines.
Site System Accounts
Site systems run various SMS services on behalf of the site server. A user account on the site server is required so that the site server can access systems management data created by the background services. By default, the site server attempts to connect to site systems using the SMS Server Network Connection Account and then the SMS Service account. The SMS Service account is a highly privileged account, so using this account for site system access is a security risk. The following paragraphs list alternative user accounts (with fewer site privileges) that are either automatically created by SMS based on the site configuration or manually configured for site system use.
SMS Remote Service Accounts
There are two SMS Remote Service accounts, one that is created for non-site server Windows NT/2000 CAPs, the other for non-site server Windows NT/2000 logon points.
The remote service account created for CAPs is called the SMS Remote Service account. The SMS Executive service uses this account to communicate with non-site server CAPs. This account is created automatically when the CAP site system role is assigned to a computer other than a site server.
The remote service account created for non-site server logon points is called the SMS Logon Service account. This account is used by the SMS NT Logon Discovery Agent service when it needs to communicate with the site server on behalf of the logon point. This service is active only if either the Windows Networking Logon Client Installation or Windows Networking Logon Discovery methods are enabled.
TIP
If your CAPs or logon points operate in a domain other than that of the site server, configure the other domains to trust the domain in which the site server operates. After the trust relationship is established, you can use the site server's SMS Remote Service account in the domains where the CAP or logon points operate.
Software Metering Service Account
This account is created automatically if software metering servers are running in the site. See Chapter 5 for more information on this service account.
Site System Accounts
The three types of accounts used to connect to Windows NT/2000, NetWare NDS, and NetWare bindery site systems are shown in Figure 10-2.
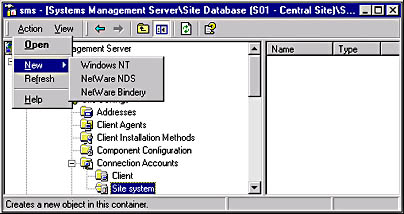
Figure 10-2. Creating Site System accounts in the SMS Administrator console.
The SMS Executive uses the site system account SMS Server Network Connection account to access logon points for installation and maintenance and to collect inventory from CAPs. This site system account is also used by the SMS Executive if the SMS Service account fails to access resources. The Windows NT Site System account is created automatically when the site server is installed. If the account is removed, a site system reset function recreates this user account and password. The account can also be created by selecting the Windows NT option, as shown in Figure 10-2.
The NetWare NDS and NetWare Bindery Site System accounts provide site server access to NetWare site systems. On NetWare bindery servers (NetWare 3.x or NetWare 4.x in bindery-emulation mode), the NetWare Bindery Site System account provides access to NetWare disk volumes. On NetWare NDS servers (NetWare 4.x only), the NetWare NDS Site System account provides access to NetWare container objects and disk volumes. The site system account and password created on the site server must also be created on the NetWare server for successful site server-to-NetWare site system communication. The NDS Site System account created on a NetWare 4.x server must be granted NetWare Admin permissions on the NDS containers. NetWare Bindery Site System accounts must be granted Supervisor equivalence. If communication fails while the site system account is being used, the site server will attempt to connect using the SMS Service account. Therefore, consider creating an SMS Service account as a backup on the NetWare site system using the same username and password as that specified for the SMS Service account on the site server.
SMS Site Address Account
This account is created for site-to-site communications. Site-to-site communications are discussed in Chapter 11, "Setting Up Multiple Sites."
The Site System Change Process
Whenever configuration changes are made in the Site Settings node, several SMS components work together to carry out the change. Figure 10-3 shows the configuration change process.
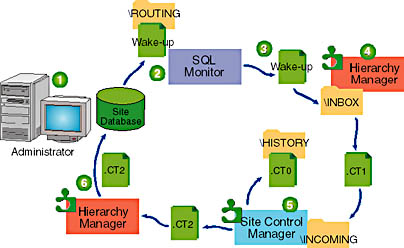
Figure 10-3. A graphical look at the site system change process.
The steps may vary slightly, depending on the change that is made, but the general process is as follows:
- The administrator proposes a change (modifying an existing site system or creating a new site system) to the system's configuration using the SMS Administrator console.
- A SQL stored procedure detects the change and writes a wake-up file in \SMS\BIN\I386\ROUTING, which is the SQL Monitor's inbox.
- SQL Monitor on the computer running the site database detects the wake-up file and creates a wake-up file for Hierarchy Manager.
- Hierarchy Manager checks the site control table in the site database to determine the current site configuration and the proposed change.
This change is written to the site database by the SMS Provider.
Hierarchy Manager creates a delta site control file and writes it as a .CT1 file to SMS\INBOXES\SITECTRL.BOX\INCOMING.
NOTE
Other SMS components create delta site control files for Site Control Manager.
- Site Control Manager reads the delta site control file, copies the current .CT0 file to \HISTORY and creates a new .CT0 file. It then creates a .CT2 file and copies it to Hierarchy Manager's inbox.
- Hierarchy Manager receives the .CT2 file and updates the site database with the new file.
Other components "wake up" when the site control file is changed; each one checks the section that applies to that component and implements any requested changes.
Exercise 46: Configuring the Site Server to Monitor the Creation of a Site System
In this exercise, you view SMS log files to verify the discovery and addition of SERVER2 as a component server in the site. Two applications, the SMS Service Manager and SMS Trace, will be used to perform this exercise and Exercise 47. These two exercises require SMS Service Manager to configure logging and SMS Trace for monitoring Windows NT Server discovery and site system creation. Chapter 14, "Monitoring and Troubleshooting SMS," discusses these applications in depth.
- Expand the Tools node in the SMS Administrator console.
- Select the SMS Service Manager node.
- From the Action menu, select All Tasks and then choose Start SMS Service Manager.
- In the left pane of the SMS Service Manager, expand S01.
- In the left pane, expand Components and then select the SMS_SITE_CONTROL_MANAGER.
- Select the SMS_SITE_CONTROL_MANAGER from the details pane.
- From the Component menu, select Logging.
- Select the `Logging enabled' checkbox from the SMS Component Logging Control Dialog _ Single component dialog box and click OK.
- The SMS Service Manager appears.
- Repeat the same process of enabling logging from the SMS Service Manager but this time enable logging for the SMS_WINNT_SERVER_DISCOVERY_AGENT and then the SMS_DISCOVERY_DATA_MANAGER.
- After you have enabled logging for these threads, close the SMS Service Manager.
The SMS Service Manager appears.
The Components and Servers objects appear.
The SMS_SITE_CONTROL_MANAGER appears in the details pane.
The SMS Component Logging Control Dialog - Single component dialog box appears.
EAN: 2147483647
Pages: 107