Lesson 2: Installing and Configuring Windows 95
In this lesson, we take a look at how to set up Windows 95.
After this lesson you will be able to:Estimated lesson time: 45 minutes
- Upgrade and install Windows 95.
- Describe the Windows 95 boot-up process.
Installing Windows 95
Windows 95 can be installed as an upgrade to Windows 3.x; from MS-DOS; on a new machine; or as a dual-boot system with either Windows 3.x, Windows NT, or other operating systems. Each method has unique requirements and limitations. The basic process is the same for all installations, but you must be sure that you understand the differences that do exist so that the final result is the solution you or your client needs. In many cases, you might have to compromise to achieve the best results.
Hardware Requirements
The minimum recommended requirements (and you should be familiar with these for the Certification test) differ from the practical requirements to run Windows 95. Let's look at both.
Minimum Requirements
The minimum requirements recommended by Microsoft and covered by the test are:
- A 386DX personal computer or better.
- At least 4 MB of random access memory (RAM).
- At least 40 MB of hard disk space reserved for the operating system.
By selecting the typical Windows setup, Windows 95 uses 30 MB of hard disk space and reserves at least 8 to 10 MB for swap space on the hard disk. Windows 95 still needs to create a VM environment and the more hard disk space available, the better Windows 95 operates.
If your computer suddenly gives you a number of different read/write error messages or its performance declines dramatically, it is possible that you don't have enough hard disk space to handle the swapping requirements of Windows 95. The first step in troubleshooting such conditions is to free up hard disk space and defragment the hard disk drives.
What You Really Need
In order to run Windows 95 with the applications commonly found on a desktop such as word processors, spreadsheets, and databases, you should not use anything less than:
- A 486DX 66-Mhz machine.
- 8 MB of RAM or more.
- A 520-MB hard disk drive.
TIP
Windows 95 will start outperforming Windows For Workgroups on a 486 computer after you increase RAM from 8 MB to 16 MB.
Additional Hardware
It is recommended that the following additional hardware be included on a Windows 95 installation:
- Modem and/or network interface card (NIC).
- Microsoft Mouse or compatible pointing device.
- Sound card and speakers.
How Much RAM Is Enough?
The amount of RAM really needed depends on the user and which applications are to be run. Typical Microsoft Office users can usually work quite well with 8 MB of RAM. Moderate users of the Copy and Paste commands will need to increase RAM to at least 16 MB. If users require their applications to be a click away (all running at the same time), they will need 32 MB of RAM. In the 32-bit Windows world, additional RAM will always boost performance. Remember:
- You can never have too much RAM.
- RAM is the key to optimization of Windows.
- The simplest and least expensive way to improve the speed and performance of any computer is to add RAM.
- Moore's Law: Processing power doubles every 18 months (from Gordon Moore, cofounder of Intel).
- Parkinson's Law of Data: Data expands to fill the storage space available (from the original Parkinson's Law: Work expands to fill the time available).
Upgrading from Windows 3.x (Windows 95 Version A)
Windows 95 installation is a relatively painless affair (in most cases) and requires minimal intervention. Before starting an installation, consider the following:
- The more complicated the system, the more complicated the installation.
- Incompatible hardware is probably the number one cause of installation problems.
- Conflicting software is probably the number two cause of installation problems.
- Patience and persistence are two requirements for a Windows 95 upgrade.
Before you start the installation, consider the following:
- Back up, back up, back up! Make copies of all the current system files—.INI, .GRP, AUTOEXEC.BAT, CONFIG.SYS, .DLL, and all critical data files. You can use the MS-DOS version of MSD (Microsoft Diagnostics) to record (and print) a complete configuration of the system.
- The best tool for an installation is a pad of paper and a pencil. Write everything down. Document, document, document!
- It is probably better to remove any questionable hardware and software before starting the installation. Be sure to back up any data files and check the integrity of the installation disks. Reinstall after Windows 95 is up and running.
- Check the Microsoft Internet Web site for its incompatible hardware list. Search: www.microsoft.com.
- Be sure to turn off all TSRs (terminate-and-stay-resident programs) and active programs before starting the installation.
- Check the CMOS (complementary metal-oxide semiconductor) setup for any antivirus programs and deactivate. Windows 95 installation does not like virus protection. You will need to open the BIOS setup and disable virus checking before proceeding. While you are there, document your CMOS.
Windows 95 Installation Process
The Windows 95 installation process can be divided into five distinct steps:
Step 1—Startup and System Check
Run the SETUP.EXE from either the CD (best choice) or Disk 1. Windows 95 is shipped on CD; if your computer does not have a CD-ROM drive, you can request the floppy disk version from Microsoft. The setup process goes like this:
- SETUP looks through the system for a previous version of Windows. If you are installing the upgrade version, it must find the previous version of Windows or it will not install.
- SETUP runs SCANDISK. You must correct any disk problems before continuing the install. If problems are encountered, run SCANDISK again after they are repaired.
- SETUP confirms that the system is ready to accept a new operating system (OS).
- SETUP checks for the presence of an extended memory manager (HIMEM.SYS) and a disk cache (SMARTDrive). If they are not present, it loads XMSMMGR.EXE and SMARTDrive.
- SETUP checks for any TSR programs and device drivers.
- If SETUP was started from MS-DOS and this is an upgrade, it copies the basic Windows 3.1 files to a temporary directory (WININSTO.400). It uses the old GUI to get started.
- SETUP looks for a directory named Old_dos.x and asks if you want to remove it.
- SETUP adds the following to the AUTOEXEC.BAT file:
@if exist c:\wininst0.400\suwarn.bat call c:\wininst0.400\suwarn.bat @if exist c:\wininst0.400\suwarn.bat del c:\wininst0.400\suwarn.bat |
If for any reason the installation process aborts, this will display a warning that Windows 95 was not installed completely and that you need to rerun SETUP and choose the Safe Recover option.
Step 2—Information Collection
This step runs the Installation wizard, which presents a step-by-step series of dialog boxes. The purpose of this process is to collect any custom information required, including:
- The directory in which to install Windows 95.
- Which components to install.
- Your name and company name.
- Any network configurations.
SETUP creates a text file named SETUPLOG.TXT in the root directory. This file stores the requested information.
Step 3—Hardware Detection
SETUP attempts to automatically determine all hardware—IRQs, addresses, DMA (direct memory access), and so forth. If the hardware is Plug and Play-compatible, the detection manager simply queries the BIOS for the information. With legacy (the older non-Plug and Play) devices, it is more complicated (and dangerous). This low-level detection can cause device drivers to go haywire and cause delays to the system. Therefore, Windows looks for "hints" of these devices. This is called safe detection.
Hardware devices are divided into four classes: sound cards, SCSI (Small Computer System Interface) controllers, network adapters, and proprietary CD-ROM drives. Windows SETUP will look in the following places for information about these devices:
- The DEVICE= lines in CONFIG.SYS
- Device drivers residing in memory
- The hard drive, for files that might be associated with a driver (*.drv, for instance)
- Read-only memory strings
- Warnings in MSDET.INF that spell out prescribed actions
Remember, SETUP is looking for "hints." If it makes an incorrect assumption, problems can occur when Windows 95 tries to run for the first time. (Consider uninstalling any questionable legacy devices before starting the Windows 95 installation.) The data found during the search is stored in a file called DETLOG.TXT in the root directory of the C drive. It is not deleted at the end of setup, and can be examined if you like.
After finding all the devices, SETUP creates the Registry (the database for this information). During this process, go get a cup of coffee and a doughnut. This might take awhile, and you will need a break, anyway.
Step 4—Startup Disk Creation and File Installation
SETUP next asks if you want a startup disk created. (It is highly recommended that you select "yes.") This will create a bootable floppy disk with several useful files. This is also called an emergency startup disk, and you can create one at any time, on any Windows 95 computer, by selecting the Startup Disk tab of the Add/Remove icon found in the Control Panel.
The following files are put on the emergency startup disk:
- ATTRIB.EXE
- CHKDSK.EXE
- COMMAND.COM
- DEBUG.EXE
- DRVSPACE.BIN
- EBD.SYS
- EDIT.COM
- FDISK.EXE
- FORMAT.COM
- IO.SYS
- MSDOS.SYS
- REGEDIT.EXE
- SCANDISK.EXE
- SCANDISK.INI
- SYS.COM
- UNINSTALL.EXE
After creating the startup disk, SETUP checks the SETUPLOG.TXT file and begins copying all the necessary files from the CD (or floppy disks) to the hard disk.
NOTE
If you are installing Windows 95 or 98 on a laptop that can support only a CD-ROM or a floppy disk drive in a single bay, you can defer creating the emergency startup disk by choosing cancel when the dialog box that prompts you to insert a floppy disk appears.
Step 5—Windows Configuration
Now that everything has been copied to the hard disk drive, Windows 95 needs to set itself up to take over the operating system duties. Configuration is a multistep process as Windows:
- Replaces the Master Boot record with the Windows 95 version.
- Renames several system files: IO.SYS to IO.DOS; MSDOS.SYS to MSDOS.DOS; COMMAND.COM to COMMAND.DOS.
- Copies the Windows 95 operating system files: replaces IO.SYS and MSDOS.SYS with IO.SYS.
Now, the computer reboots, invoking a special routine used only when Windows 95 is run for the first time. This process:
- Combines all virtual device drivers into one file called VMM32.VXD.
- Loads the Run-Once module, which configures the hardware.
- Installs any network information (if required).
- Converts any Program Group files from Windows 3.x into Windows 95 shortcuts for the Start menu.
- Runs wizards for configuration of printers and other peripherals.
- Initializes the Windows 95 Help system.
- Enables MS-DOS program settings.
- Sets the date and time properties.
- Reboots to set final hardware configuration.
Performing a Clean Installation
A clean installation is perhaps the best way to install Window 95. Before undertaking a clean installation, make sure you have:
- A bootable floppy disk with all the necessary files (FORMAT.COM, FDISK.EXE, and so forth).
- A disk with all the files necessary to run any hardware such as the CD-ROM drive or SCSI controller.
- A startup disk. This disk should include an AUTOEXEC.BAT file with a MSCDEX.EXE line that points to the location of the MSCDEX.EXE file, and a CONFIG.SYS file that loads the CD driver. See the example at the end of this section.
- Disk #1 from your Windows 3.x disk set, if you are upgrading from Windows 3.x. SETUP will ask to see this disk to verify that this is an upgrade. When asked, insert the disk in the floppy drive and tell Windows 95 where to look for the information.
- Back up copies of all your programs and data because this type of installation requires that you wipe everything off the hard disk drive.
If you are going to complete a clean installation on an existing drive, you will need to remove all the files. You can simply erase (delete) them, or reformat the drive (the best choice because all hidden files will also be removed).
Whether you erase the drive or install a new drive, you need to follow the instructions for installation on a new computer or hard drive.
The following is an example of an AUTOEXEC.BAT file on a boot disk:
MSCDEX /D:MSCD001 /V |
The following is an example of a CONFIG.SYS file on a boot disk:
DEVICE=A:\CDPRO\VIDE-CDD.SYS /D:MSCD001 |
NOTE
This example disk also contains a folder (CDPRO) with the driver for the CD-ROM drive (VIDE-CDD.SYS).
Installing Windows 95 on a New Computer or Hard Drive
Windows 95 version B is an OEM product designed specifically for installation on new machines or new hard drives. It does not require an existing version of Windows 3.x to be present in order to install. It was replaced with the OSR2 (OEM Service Release 2) version. The primary difference between version B and OSR2 is that the latter uses a 32-bit FAT (versions A & B use 16 bit-FAT). Because this installation takes place on a new drive with no other installed software, potential software conflicts are avoided.
Windows 98
Today, new OEM computers come with Windows 98 preloaded. It is highly unlikely that you will be able to locate a copy of Windows 95 in any local computer store. Windows 98 can be installed on a new computer or as an upgrade to MS-DOS, Windows 3.1, or Windows 95. If you wish to retain your Windows 95 settings when upgrading, be sure to start the installation from Windows 95.
For your convenience, here is the complete process of installing a new hard disk drive and the Windows 95 operating system from scratch. You will need the following for the installation:
- A hard disk drive (preferably new) with the manufacturer's specifications (CHS values and jumper settings)
- Bootable floppy disk—aWin95 startup disk (can be made from any Windows 95 computer)
- Device drivers for the CD-ROM drive: MSCDEX.EXE and the driver that came with the CD-ROM drive
- Windows 95 OEM CD-ROM
Follow these steps to install the hard disk drive and put Windows 95 on it:
- Set up all the jumpers according to the manufacturer's specifications. Identify the drive as master or slave.
- Physically install the drive. (See Chapters 8 and 9 to refresh your memory on hard disk drives.)
- Connect the cables (power and data).
- Start the computer and open the CMOS setup.
- Set the CMOS either using the CHS values established by the manufacturer or using Auto-detect (the preferred method).
- Reboot the computer using the Win95 startup disk.
- Run FDISK from the floppy disk and partition the drive.
- Format the C partition by typing:
- Format any other partitions.
- Remove the floppy disk and reboot the computer.
- Install the CD-ROM drivers on the new C drive.
- Confirm operation of the CD-ROM.
- Install Windows 95 from the CD. Follow instructions with the documentation.
Format C: /S |
Optional Install
This optional install method will speed up the installation process and allow for easy addition of drives and Windows 95 programs not installed during the initial installation. However, it requires an additional 40 MB of hard disk drive space. The process is as follows:
- After installing the CD-ROM driver, make a directory (name it "Win95") on the C drive, and copy all the files in the Win95 directory on the CD into this folder.
- Install Windows 95 from the new folder on the C drive by typing the following command:
C:\win95\setup |
Installing a Dual-Boot System
You can install Windows 95 on a disk that already has Windows 3.1 or Windows NT. Let's look at both options.
Windows 3.1 and Windows 95
Windows 95 can be installed without removing the Windows 3.x system. The main advantages of this approach are that Windows 95 installs cleanly and the Windows 3.x files are left intact. You will still be able to run old programs that Windows 95 doesn't like.
There are two considerations to keep in mind when creating a dual-boot computer:
- Windows 3.x and Windows 95 must be installed in different directories (for instance, install Windows 95 in a Win95 directory).
- It requires lots of hard disk space. Not only must both operating systems be on the hard disk drive, many programs will have to be installed twice—once for Windows 3.x and once for Windows 95. This is because not all program configurations will migrate across two operating systems.
To run the old system, press F8 when you see the "Starting Windows 95" message during boot up. The menu you will see is shown in Figure 16.1.
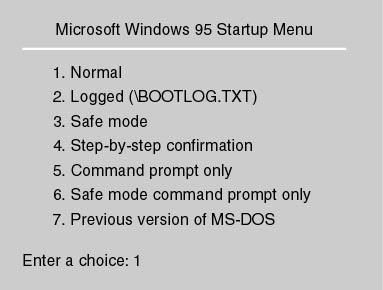
Figure 16.1 Windows 95 Startup menu
Select number 7 (8 if running a network), and the old version of MS-DOS will boot. You can then change to the Windows 3.x directory and start the earlier operating system.
NOTE
Another method for setting up a dual-boot computer is to create two partitions on the hard disk drive (or have two hard drives) and install one operating system in each. On startup, you can then select which partition to boot up. Using this method, you will keep both operating systems completely separate and reduce the chances of contamination.
Dual-Booting with Windows NT
Windows 95 and Windows NT share the same machine quite well and dual-booting is no problem. However, you must consider the following:
- The hard disk drive must have a Windows 95 FAT16 partition. NT will run in Windows FAT16, but Windows 95 will not run on NTFS (NT file system).
- Drive compression for Windows 95 and Windows NT differs and is incompatible. Therefore, you cannot install Windows NT on a Windows partition that uses drive compression.
To avoid reinstalling all the Windows 95 applications in Windows NT, do the following:
- In the Windows NT Control Panel, open the system icons.
- In the System dialog box, highlight the Path line in the System Environment Variables section. Move down to the Value text box and add the following string to the end of the existing value:
c:\windows;c:\windows\system |
The Boot Process from Power Up to Startup
There are twelve steps to a successful startup of Windows 95.
- Powering on: The system microprocessor executes the ROM BIOS code and initiates the POST (power on self-test). A single beep means success.
- Finding a boot sector: The BIOS checks the A drive for a boot sector; if there is no disk in the floppy disk drive, it checks the C drive.
- Running the boot program: BIOS runs IO.SYS (or IO.SYS and MSDOS.SYS), initializes some device drivers, and performs a few real-mode chores.
- Reading MSDOS.SYS: Remember, this is not the same as with MS-DOS (it is a text file with setup information). After collecting the information from MSDOS.SYS, you will see the "Starting Windows 95" message.
- Reading CONFIG.SYS: Commands are processed in CONFIG.SYS file and load real-mode devices.
- Reading AUTOEXEC.BAT: Commands are processed in AUTOEXEC.BAT.
- Reading the Registry: The Registry data is read and drivers and settings are loaded. The following table describes some of the drivers that can be specified by the Registry along with their functions. They could also be loaded using the CONFIG.SYS file.
| Setting | Function |
|---|---|
| BUFFERS=30 | Determines the number of file buffers to create—for backward compatibility. |
| DOS=HIGH | Loads MS-DOS into high memory. |
| DRVSPACE.BIN or DBLSPACE.BIN | Disk compression. |
| FCBS=4 | Determines the number of file control blocks that can be open at one time—for backward compatibility. |
| FILES=30 | Determines the number of file handles to create— for backward compatibility. |
| HIMEM.SYS | Loads real-mode extended memory manager. |
| IFSHLP.SYS | Installable file system helper—helps load VFAT and other Windows 95 installable file systems. |
| LASTDRIVE=Z | Determines the last drive letter that can be assigned to a disk drive—for backward compatibility. |
| SETVER.EXE | The operating system version. If an MS-DOS program needs a special version of MS-DOS, this setting can "lie" to MS-DOS so the program will run. |
| SHELL=COMMAND.COM /P | Determines the name of the command-line interpreter. |
| STACKS=9,256 | Determines the number of stack frames and the size of each frame—for backward compatibility. |
CAUTION
Don't use values less than these defaults.
- Switching to Protected Mode: The processor switches to protected mode and loads protected-mode drivers (VMM32.VXD).
- Configuring Plug and Play: Windows now loads new device drivers detected during the initial boot phase, resolves hardware conflicts, and performs other tasks.
- Loading Windows 95 GUI: The interface is loaded.
- Configuring Network: Prompts for network password if applicable (or user password if user profiles are enabled).
- Processing Startup Folder: Checks the startup folder and loads any programs found.
The Startup Menu—Modes of Starting
With early versions of Windows, startup problems could be resolved by booting up from a floppy disk and editing the appropriate file. With Windows 95, it's not as simple. Therefore, Windows 95 comes with a Startup menu, shown in Figure 16.2. Pressing the F8 key when the "Starting Windows 95" message appears on the screen evokes this menu.
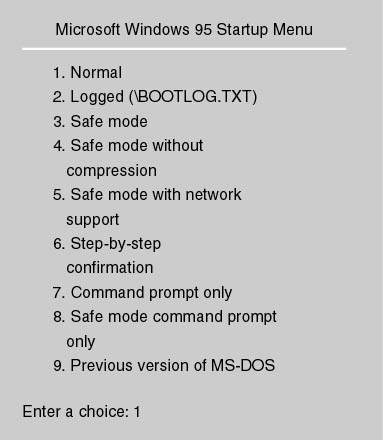
Figure 16.2 Startup menu (dual boot)
Let's look at the options presented by the Startup menu.
Normal
This option loads Windows 95 in the usual fashion.
Logged (BOOTLOG.TXT)
This choice loads Windows 95 in the same way as the normal option, but it creates a boot log file (BOOTLOG.TXT) and places it in the root directory of the boot drive. It can be read with any text editor and shows all steps of the boot process, noting whether or not they were successful.
Safe Mode
If it encounters difficulty starting up, Windows 95 can (and will) load in the safe mode. Most of the time, startup problems are caused by driver conflicts or problems. Safe mode starts Windows 95 with a minimum of drivers. This mode is considered the Windows 95 troubleshooting mode. When safe mode is enabled:
- CONFIG.SYS, AUTOEXEC.BAT, and the Registry are bypassed.
- HIMEM.SYS and IFSHLP.SYS are loaded.
- MSDOS.SYS is checked for the location of the Windows 95 files.
- The command win /d:m (enables a safe-mode boot) is executed and COMMAND.COM is bypassed.
- Windows loads only the virtual device drivers for the keyboard, mouse, and a standard VGA display.
- The SYSTEM.INI and WIN.INI files are partially loaded (reading the shell and drivers lines in the [Boot] sections of SYSTEM.INI).
- The desktop is resized for 640 x 480 resolution.
- A dialog box appears to notify the user that safe mode is in effect.
Safe Mode Without Compression
With this option selected, safe mode is loaded but Windows doesn't load any drivers to access a compressed drive.
Safe Mode with Network Support
With this option, safe mode is loaded along with any real-mode drivers for network support.
Step-by-Step Confirmation
Step-by-step confirmation allows Windows 95 to load normally, but each command in the IO.SYS, CONFIG.SYS, and AUTOEXEC.BAT is addressed one step at a time and the operator has the option to bypass or use each item.
The following table presents a four-combination matrix that can be used to troubleshoot startup problems using the step-by-step method. Each of the columns represents combinations you should try.
| Step-by-Step Prompt | A | B | C | D |
|---|---|---|---|---|
| Load DoubleSpace driver? | Yes | Yes | Yes | Yes |
| Process the system registry? | Yes | Yes | Yes | No |
| Create a startup log file (BOOTLOG.TXT)? | Yes | Yes | Yes | Yes |
| Process your startup device drivers (CONFIG.SYS)? | No | No | Yes | Yes |
| DEVICE=C:\WINDOWS\HIMEM.SYS? | Yes | Yes | Yes | Yes |
| DEVICE=C:\WINDOWS\IFSHLP.SYS? | Yes | Yes | Yes | Yes |
| DEVICE=C:\WINDOWS\SETVER.EXE? | Yes | Yes | Yes | Yes |
| Process your startup command file (AUTOEXEC.BAT)? | No | No | Yes | Yes |
| Load the Windows graphical user interface? | Yes | Yes | Yes | Yes |
| Load all Windows drivers? | No | Yes | No | Yes |
If Windows starts properly when using response A, you know you have a problem with a device driver or TSR. Successful startup with option B indicates a problem with a real-mode device driver or TSR in CONFIG.SYS or AUTOEXEC.BAT. Successful boot with option C means you have a problem with a protected-mode device. And if option D is successful, you have a problem with the Registry.
Command Prompt Only
This choice boots to MS-DOS without loading the Windows 95 GUI and protected-mode drivers. It will, however, load CONFIG.SYS and AUTOEXEC.BAT.
NOTE
The CD-ROM drive might not work in this mode.
Safe Mode Command Prompt Only
This operates in the same way as command prompt only, but does not process the CONFIG.SYS and AUTOEXEC.BAT.
Previous Version of MS-DOS
This option is used for dual-boot systems.
To save time, you can use shortcut keys to access Startup menu options.
| BootKey | Startup Menu Equivalent |
|---|---|
| F4 | Previous version of MS-DOS |
| F5 | Safe mode |
| SHIFT+F5 | Safe mode—command prompt only |
| CTRL+F5 | Safe mode without compression |
| F6 | Safe mode with network support |
| SHIFT+F8 | Step-by-step confirmation |
A New Desktop Environment
With Windows 95, Microsoft has replaced the Windows 3.x Program Manager with a new format. Program groups have been replaced with a Start menu, and program icons have been replaced by shortcuts and desktop items. A shortcut is a pointer (an icon) to an object such as an executable file or a document. The desktop now truly represents a virtual desktop.
NOTE
A common problem with a shortcut occurs when the object it is pointing to gets moved, is missing, or has become corrupted. In such cases, when a user double-clicks the shortcut, an error message pops up saying "The item (item named here) that this shortcut refers to has been changed or moved. The nearest match, based on size, date, and type is c:\pathname goes here. Do you want this shortcut to point to this item?"
Some of the features introduced in Windows 95 include:
| Feature | Description |
|---|---|
| Folders | Folders have replaced MS-DOS directories and subdirectories. A folder is used to hold data and system objects and can reside within another folder, on a disk, or on the desktop. |
| Plug and Play | Windows 95 supports Plug and Play hardware. In some cases, additional driver software (provided by the manufacturer) is required. Look for the Windows 95 symbol on the device to determine if it is Plug and Play-compliant. |
| Printers folder | The Printers folder has replaced the Print Manager. This folder allows access to all aspects of printing (from setup of printers to monitoring printing activity). |
| Properties | All items in the Windows 95 environment are treated as objects, and they have properties. All properties can be configured. An object's settings and properties are located on the Properties sheet. The long ignored, little used, right mouse button now has a major function in the Windows 95 environment (and on the Internet.) The secondary mouse button now accesses shortcut menus and the Properties dialog boxes. |
| Windows Explorer | The Windows 3.x File Manager has been replaced by Windows Explorer. Explorer provides a visual representation of the computer and its components, as well as providing enhanced file-management tools. |
Lesson Summary
The following points summarize the main elements of this lesson:
- Windows 95 comes in two versions: an upgrade 16-bit FAT version and an OEM 32-bit version for installation on new machines.
- Windows 95 can be dual-booted with Windows 3.x (DOS) or Windows NT. Special considerations must be taken to ensure compatibility when setting up a dual-boot system.
- Installing Windows 95 is a five-step process.
- Windows 95 has a startup menu that can be used for troubleshooting or starting with another operating system.
- Shortcut keys are provided to allow quick access to the various startup options.
- Windows 95 uses a new desktop environment for a more user-friendly operator interface.
EAN: N/A
Pages: 127