Exploring Views
The working space in Project is called a view. Project contains dozens of views, but you normally work with just one view (sometimes two) at a time. You use views to enter, edit, analyze, and display your project information. The default view-the one you see when Project starts-is the Gantt Chart view shown here.
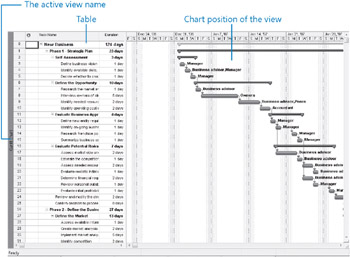
In general, views focus on either task or resource details. The Gantt Chart view, for example, lists task details in a table on the left side of the view and graphically represents each task as a bar in the chart on the right side of the view. The Gantt Chart view is a common way to represent a project plan, especially when presenting it to others. It is also useful for entering and fine-tuning task details and for analyzing your project.
In this exercise, you’ll start at the Gantt Chart view and then switch to other views that highlight different aspects of a project plan. Finally, you’ll explore combination views that let you focus on specific project details more easily.
1. On the View menu, click Resource Sheet.
The Resource Sheet view replaces the Gantt Chart view.
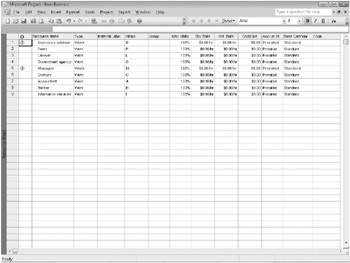
The Resource Sheet view displays details about resources in a row-and-column format (called a table), with one resource per row. This view is called a sheet view. Another sheet view, called the Task Sheet view, lists the task details. Note that the Resource Sheet view doesn’t tell you anything about the tasks to which resources might be assigned. To see that type of information, you’ll switch to a different view.
2. On the View menu, click Resource Usage.
The Resource Usage view replaces the Resource Sheet view.
This usage view groups the tasks to which each resource is assigned. Another usage view, the Task Usage view, flips this around to display all of the resources assigned to each task. Usage views also show you the work assignments per resource on a timescale, such as daily or weekly.
Next, you’ll switch to the Task Usage view.
3. On the View menu, click Task Usage.
The Task Usage view replaces the Resource Usage view.
4. In the table portion of the view on the left, click Define business vision, which is the name of task 3.
5. On the Standard toolbar, click the Scroll To Task button. ![]()
The timescale side of the view scrolls to show you the scheduled work values for this task.
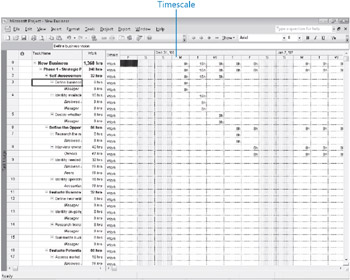
A usage view is a fairly sophisticated way of viewing project details. Next, you’ll switch to a simpler view.
6. On the View menu, click Calendar.
The Calendar view appears.
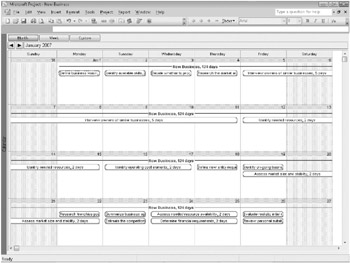
This simple month- or week-at-a-glance view lacks the table structure, timescale, or chart elements you’ve seen in previous views. Task bars appear on the days they’re scheduled to start; if a task’s duration is longer than one day, its bar will span multiple days.
Another common view used in project management is the Network Diagram.
7. On the View menu, click Network Diagram.
The Network Diagram view appears. Use the scroll bars to view different parts of the Network Diagram view.
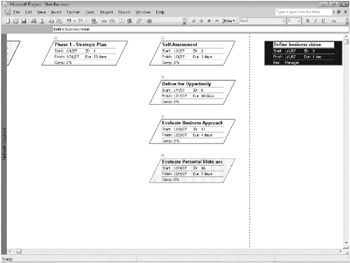
This view focuses on task relationships. Each box or node in the Network Diagram view displays details about a task, and lines between boxes indicate task relationships. Like the Calendar view, the Network Diagram view lacks a table structure; the entire view is a chart.
To conclude this exercise, you’ll look at combination views. These split the project plan window into two panes, with each pane containing a different view. The views are synchronized; therefore, selecting a specific task or resource in one view causes the other view to display details about that task or resource.
8. On the View menu, click More Views.
The More Views dialog box appears. This dialog box lists all of the predefined views available in Project.
9. In the Views box, click Task Entry, and then click the Apply button.
The Task Entry view appears.
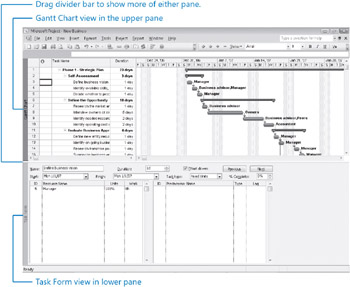
This view is a predefined split-screen or combination view, with the Gantt Chart in the upper pane and the Task Form in the lower pane. A form is the final element of a view that you will see in this chapter. A form displays details about the selected task or resource, much like a dialog box. You can enter, change, or review these details in the form.
10. If the selection in the Gantt Chart portion of the view is not on task 3, Define business vision, click that task’s name.
The details about task 3 appear in the Task Form portion of the view.
11. In the Gantt Chart portion of the view, click the name of task 4, Identify available skills, information, and support.
The details about task 4 appear in the Task Form.
| Tip | Besides using the predefined combination views, you can display two views of your choice by clicking Split on the Window menu. After the Project window is split into two panes, click in the upper or lower pane and then choose the view you want to appear there. To return to a single view, on the Window menu, click Remove Split. |
It is important to understand that, in all of these views as well as all of the other views in Project, you are looking at different aspects of the same set of details about a single project plan. Even a simple project plan can contain too much data to display at one time. You can use views to help you focus on the specific details you want.
In later exercises, you’ll do more work with views to further focus on the most relevant project details.
EAN: 2147483647
Pages: 247