Updating a Baseline
If you completed Chapter 6, you saved a baseline plan for a project plan. Recall that a baseline is a collection of important values in a project plan such as the planned start dates, finish dates, and costs of tasks, resources, and assignments. When you save (or set) a baseline, Project takes a “snapshot” of the existing values and saves it in the Project plan for future comparison.
Keep in mind that the purpose of the baseline is to record what you expected the project plan to look like at one point in time. As time passes, however, you might need to change your expectations. After saving an initial baseline plan, you might need to fine-tune the project plan by adding or removing tasks or assignments and so on. To keep an accurate baseline for later comparison, you have several options:
-
Update the baseline for the entire project. This simply replaces the original baseline values with the currently scheduled values.
-
Update the baseline for selected tasks. This does not affect the baseline values for other tasks or resource baseline values in the project plan.
-
Save a second or subsequent baseline. You can save up to 11 baselines in a single plan. The first one is called Baseline, and the rest are Baseline 1 through Baseline 10.
| Tip | To learn more about baselines in Project’s online Help, type Create a baseline into the Search box in the upper right corner of the Project window. The Search box initially contains the text Type a question for help. |
Since you completed the initial planning for the short film project and saved an initial baseline, the project plan has undergone some additional fine-tuning. This included some adjustments to assignments and task durations and a new task in the pre-production phase of the project. Because of these changes, the initial baseline does not quite match the project plan as it is currently scheduled. In this exercise, you compare the project plan as it is currently scheduled with the baseline plan and update the baseline for the project plan.
| Important | If you are running Project Professional, you may need to make a one-time adjustment to use the My Computer account and to work offline. This ensures that the practice files you work with in this chapter do not affect your Project Server data. For more information, see “Starting Project Professional,” on page 11. |
Open Short Film Project 13a from the \Documents\Microsoft Press\Project 2007 SBS\ Chapter 13 Advanced Tracking folder. You can also access the practice files for this book by clicking Start, All Programs, Microsoft Press, Project 2007 Step by Step, and then selecting the chapter folder of the file you want to open.
1. On the File menu, click Save As.
The Save As dialog box appears.
2. In the File name box, type Short Film Project 13 Baseline, and then click Save.
Next, you will switch to a different view to see baseline and scheduled values arranged for easy comparison.
3. On the View menu, click Tracking Gantt.
The Tracking Gantt view appears.

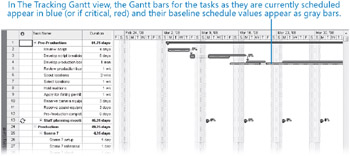
In the chart portion of this view, the tasks as they are currently scheduled appear as blue bars (if they are not critical tasks) or red bars (if they are critical). Below them, the baseline values of each task appear as gray bars.
| Tip | In Gantt Chart views, the colors, patterns, and shapes of the bars represent specific things. To see what any item on the Gantt chart represents, just point your mouse pointer at it and a description will appear in a ScreenTip. To see a complete legend of Gantt chart items and their formatting, on the Format menu, click Bar Styles. |
4. In the Task Name column, click the name of task 5, Review production boards.
5. On the Standard toolbar, click the Scroll To Task button. ![]()
The Tracking Gantt view scrolls to display the Gantt bars for task 5, Review production boards. This task was added to the plan after the initial baseline was saved.

As you can see in the Tracking Gantt view, this task has no baseline bar, indicating that it has no baseline values.
To conclude this exercise, you will resave the baseline for the project plan. Doing so will update all baseline information for tasks, resources, and assignments prior to tracking progress.
| Tip | This project plan includes a previously saved baseline that you will now overwrite. That’s fine at this stage of the short film project, where the planning is complete and you’d like to have the most up-to-date baseline before recording any actual work. However, after work has been recorded, you should be careful about overwriting any previously saved baseline values. Once you overwrite a baseline, the original values are replaced and cannot be retrieved. Saving additional baselines is usually a better strategy after work on the project has begun. |
6. On the Tools menu, point to Tracking, and then click Set Baseline.
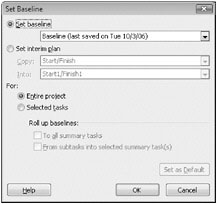
The Set Baseline dialog box appears.
7. Make sure that the Set Baseline option is selected. In the For area, make sure that the Entire project option is selected.

| Tip | To update a baseline just for selected tasks, click Selected Tasks in the For area. When you do this, the options under Roll Up Baselines become available. You can control how baseline updates should affect the baseline values for summary tasks. For example, you could resave a baseline for a subtask and update its related summary task baseline values if desired. To remove a baseline, on the Tools menu, point to Tracking, and then click Clear Baseline. |
8. Click OK to update the baseline.
Project alerts you that you are about to overwrite the previously saved baseline values.
9. Click the Yes button.
Project updates the baseline values for the project plan.

Task 5 now has a baseline, and all of the other tasks’ baseline values now match their scheduled values.
10. On the Standard toolbar, click Save. ![]()
11. On the File menu, click Close to close the project plan.
After you’ve started tracking actual values or any time you’ve adjusted your schedule, you might want to take another snapshot of the current start and finish dates. You can do this with an interim plan. Like a baseline, an interim plan is a set of current values from the project plan that Project saves with the file. Unlike the baseline, however, an interim plan saves only the start and finish dates of tasks, not resource or assignment values. You can save up to 10 different interim plans during a project. (If you find that you need multiple snapshots of scheduled values in addition to start and finish dates, you should instead save additional baselines.)
Depending on the scope and duration of your projects, you might want to save an interim plan at any of the following junctures:
-
At the conclusion of a major phase of work
-
At preset time intervals, such as weekly or monthly
-
Just before or after entering a large number of actual values
To save an interim plan, on the Tools menu, point to Tracking, and then click Set Baseline. In the Set Baseline dialog box, select the Set interim plan option. To learn more about interim plans, type Create an interim plan into the Search box in the upper right corner of the Project window.
EAN: 2147483647
Pages: 247