Photoshop Color Management
Every hardware device and software program handles color differently. Try opening an image using several different programs, and you may be surprised to discover that the image looks quite different every time. In fact, you can try scanning an image and opening the scan in all these different programs. I guarantee that none of the output will match the color of the original image.
Photoshop implements color management functions, called color spaces, to adjust color so that the same image appears the same no matter what kind of device or program (printer, Web browser, output bureau, and so on) is used for the output. Color management equalizes the colors used by different devices, making the colors appear the same no matter what kind of device is used for input or output.
Color space is just a fancy term for how a device creates color. For instance, a computer monitor uses red, green, and blue light to create color in its color space; a color inkjet printer uses black, red, blue, and yellow inks to create color in its color space; and a digital camera records the colors it sees using the daylight present (which has a yellowish cast) or a flash (which has a bluish cast).
These devices can’t create a color match without some type of color correction. That’s what color management is all about.
A good color management system solves most of these color problems by acting as a color interpreter. Fortunately, Photoshop comes with extensive color management controls that you can use.
I go into details about what you need do to set up color management for your computer in the following sections.
Calibrating your monitor
The first step in setting up your color management system is to calibrate your monitor. For Windows users, the Photoshop installation includes the Adobe Gamma utility program which is used to define the RGB color space on your monitor. For Mac users, you’ll need to calibrate your monitor using Apple’s Monitor Display Assistant.
| Tip | Before you calibrate your monitor, you should turn it on and let it warm up for 30 minutes. Also, you should make sure that your room lighting is set at a constant level. |
Calibrating your monitor in Windows
Follow these steps to calibrate your monitor on a Windows machine:
-
Choose Start→Control Panel.
The Windows Control Panel opens, displaying various system utilities.
-
Double-click the Adobe Gamma icon to open the utility.
-
In the Adobe Gamma dialog box, select Control Panel, and then click Next.
The Adobe Gamma dialog box opens, ready to help you set monitor calibration. As you can see in Figure 5-7, you can select monitor type, what kind of phosphors your monitor uses (phosphors are the substance that monitors use to emit light), set the red, green, and blue brightness values, and set the white point — the coordinates in your monitor’s color space where the red, green, and blue phosphors create white.
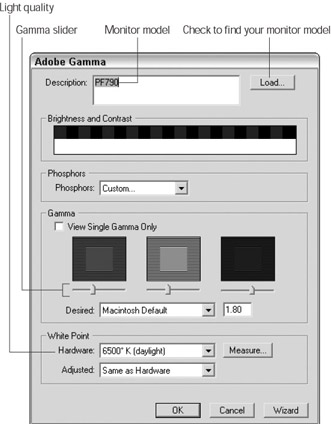
Figure 5-7: The Adobe Gamma dialog box lets you save monitor color space settings. -
Click the Load button to find your monitor model.
The Open Monitor Profile dialog box presents a list of monitor models and color profiles followed by an .icm file extension. For instance, to introduce a ViewSonic PF790 monitor the Adobe Gamma utility, you select PF790.icm from the list, and then click the Open button, as shown in Figure 5-8.
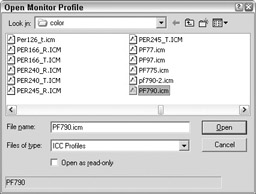
Figure 5-8: The Open Monitor Profile dialog box provides color space information for many monitor models and color spaces.If you can’t find your monitor model in the Open Monitor Profile dialog box, click Cancel to return to the Adobe Gamma dialog box, and use the default monitor profile provided by the Adobe Gamma utility.
-
If your monitor isn’t listed in Step 4, use the Phosphors drop-down list to select your monitor type.
If your monitor is not listed (Trinitron is the default and a good basic setting), choose Custom. Then, enter the Red, Green, and Blue phosphors settings. To find these settings, consult the manual that came with your monitor. (If you selected a monitor model in Step 4, these phosphors settings are automatically entered by the Adobe Gamma utility.)
-
In the Gamma area, uncheck View Single Gamma Only.
This selection allows you to separately adjust the red, green, and blue levels for your monitor. Use the slider bars to adjust each color. For each color, make the inner square match the outer color as closely as possible.
-
In the White Point area, choose the Hardware setting that the monitor manufacturer recommends, and then choose Same as Hardware using the Adjusted drop-down list.
-
Click OK.
The Adobe Gamma utility saves your monitor settings. Every time you use Photoshop, these settings will be transferred to Photoshop, so the program will know how to set your monitor’s color space.
Calibrating your monitor on a Mac
Follow these steps to calibrate your monitor on a Mac:
-
Choose Apple→System Preferences. Then click Displays, select the Color tab, and then click Calibrate.
Apple’s Display Calibrator Assistant opens, ready to step you through the monitor calibration process (see Figure 5-9).
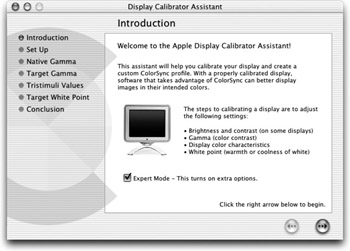
Figure 5-9: Use the Display Calibrator Assistant to calibrate your monitor. -
Put a check in the Expert Mode check box.
-
Click the right arrow button to move to the next Assistant pane.
-
Set your monitor’s gamma using the slider bars under the red, green, and blue squares.
Move the slider until the apple in the center matches the striped box as closely as possible.
When you are finished using the sliders, click the right arrow button to move to the next Assistant pane.
-
Use the radio buttons to select the gamma setting you want to use.
You can select from: 1.8 Standard Gamma, the standard setting for Mac OS; 2.2 PC Standard, choose this setting if you are creating images for display on PCs or televisions; or Linear Gamma.
When you are finished using the sliders, click the right arrow button to move to the next Assistant pane.
-
Select a white point that is appropriate for the type of work you do.
Use the slider bar to set the white point (color cast) of your monitor. You can move the slider bar through the various light qualities, from warm yellow lighting — which is good for graphics art work — through a cooler setting that is similar to daylight to cool blue lighting — which is similar to television display.
When you’re finished using the sliders, click the right arrow button to move to the next Assistant pane.
-
Name the calibration profile you just set, and then click the Create button to save the profile.
Your profile will be saved in Users/[Current User]/Library/ ColorSync or Library/ColorSync/Profiles/Profiles.
Choosing color settings
The next three steps in setting up color management — setting a color space, setting color profiles, and setting how images will be managed — are all handled in one dialog box in Photoshop.
-
Choose Edit→Color Settings (Photoshop→Color Settings on a Mac).
Using the Color Settings dialog box shown in Figure 5-10, you can set predefined color spaces, individual workspace settings, and how you want Photoshop to deal with images that don’t match your color settings.

Figure 5-10: The Color Settings dialog box handles all the color space settings necessary for Photoshop. -
Using the Settings drop-down list, choose a color setting default for the type of images you primarily create.
If you plan to create images both for print and for the Web (and you live in North America), choose North America General Purpose Defaults. This setting ensures consistent color handling across most software that uses color management.
Choose the Web Graphics defaults if you are a Web designer, primarily creating Web graphics.
If you are using Photoshop in Europe or Japan, select Europe General Purpose Defaults or Japan General Purpose Defaults, respectively. Both of these settings ensure consistent color handling across most software using color management.
Tip These default settings select the default options for the drop-down lists in both the Working Spaces area and the Color Management Policies area. If you don’t have any special color space needs (such as creating images for high-end printing), use these defaults. Skip down to Step 6 to continue.
-
In the Working Spaces area, choose RGB, CMYK, Gray, and Spot color settings.
For the RGB drop-down list: Use sRGB if you deal with Web graphics only; this setting represents a standard PC monitor display. (The s in sRGB represents standard.) If you are going to both print images and create images for the Web, use Adobe RGB (1998).
-
For the CMYK, Gray, and Spot drop-down lists: All of these settings are for creating color spaces for images that will be printed by a high-end printer (Gray stands for grayscale). If you are going to do some high-end printing, talk with the print shop for the best setting.
-
Set how you want Photoshop to deal with images that don’t match your color settings.
In the Color Management Policies area the RGB, CMYK, and Gray drop-down list boxes all offer the same three options:
-
Convert: This setting converts a newly opened image to the current profile if the image’s profile does not match the working space.
-
Preserve: This setting saves the color profile embedded in a newly opened image even if the color profile does not match the working space.
-
Off: This setting turns off color management for new images and newly opened images if their embedded color profiles don’t match the working space.
If you aren’t sure which settings to choose, good basic settings for these working spaces are:
-
RGB: Set to Convert
-
CMYK: Set to Preserve
-
Gray: Set to Convert
If you want Photoshop to ask you whether to convert an image when it’s opened or when it’s being pasted in from the Clipboard, put checks in the Profile Mismatches check boxes.
-
-
Click Save.
Use the Save dialog box to save your settings. That way, you will always have access to them even if someone makes changes to your computer.
-
Enter a name in the File name text box and click Save.
The Save dialog box closes, returning you to the Color Management dialog box. Notice that the name of your custom color management settings now appears selected in the Settings drop-down list.
-
Click OK.
The Color Management dialog box closes and Photoshop will save the color management settings.
EAN: 2147483647
Pages: 221