Lesson 2: Installing Windows 2000 Professional over the Network
In addition to being installed from a CD-ROM, Windows 2000 Professional can be installed over the network. This lesson demonstrates the similarities and differences between installing from a CD-ROM and installing over the network. The major difference is the location of the source files needed to install Windows 2000 Professional. This lesson also describes the requirements for a network installation.
After this lesson, you will be able to
- Identify the steps for completing a network installation of Windows 2000 Professional
Estimated lesson time: 10 minutes
Preparing for an Over-the-Network Installation
In a network installation, the Windows 2000 Professional installation files reside in a shared location on a network file server, which is called a distribution server. From the computer on which you want to install Windows 2000 Professional (the target computer), you connect to the distribution server and then run the Setup program.
The basic environment requirement for a network installation is shown in Figure 1.4. You need to prepare this environment before starting the installation.
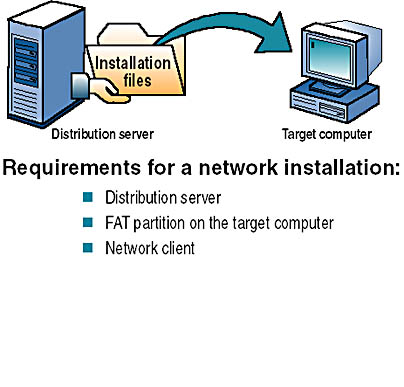
Figure 1.4 A network installation's basic environment
The following list describes what you need to do to prepare your environment for a successful network installation.
- Locate a distribution server. The distribution server contains the installation files from the i386 folder on the Windows 2000 Professional CD-ROM. These files must reside in a common network location in a shared folder. The computers on the network can gain access to the installation files because they are in a shared folder. Contact a network administrator to obtain the path to the installation files on the distribution server.
NOTE
Once you have created or located a distribution server, you can use the over-the-network installation method to concurrently install Windows 2000 Professional on multiple computers. - Create a FAT partition on the target computer. The target computer requires a formatted partition on which to copy the installation files. Create a 650-MB (1GB or larger recommended) partition and format it with the FAT file system.
- Install a network client. A network client is software that allows the target computer to connect to the distribution server. On a computer without an operating system, you must boot from a client disk that includes a network client that enables the target computer to connect to the distribution server.
Creating a Distribution Server
A distribution server stores the distribution folder structure. The distribution folder structure contains the files necessary to install Windows 2000 Professional over the network. If you have many computers on which to install Windows 2000 Professional, or if you will be doing multiple Windows 2000 Professional installations simultaneously, create more than one set of distribution folders. Having distribution folders set up on several computers will make the file copying during the Windows 2000 Setup faster. Even if you have several different types of hardware configurations on which to install Windows 2000 Professional, you need create only one set of distribution folders and use them with different answer files to install to all the different hardware types. Later in this chapter you will learn how to use scripts and answer files to automate installation.
NOTE
If you are installing Windows 2000 Professional on a computer running Windows 95, Windows 98, Windows NT, or an earlier version of Windows 2000, the Winnt32.exe program allows you to specify up to eight locations on which to store the distribution folders.
To create a distribution server, follow these steps:
- Log on to the server as Administrator or connect to the server on which you want to create a distribution file structure.
- Create a folder on the server named W2000P.
NOTE
The name W2000P is for a distribution folder structure containing the source files for Windows 2000 Professional. You can use W2000S for Windows 2000 Server and W2000AS for Windows 2000 Advanced Server. If you are creating distribution folder structures on more than one server, you can name them W2000P1, W2000P2, W2000P3, W2000P4, and so on. - Copy the contents of the i386 folder from the Windows 2000 Professional CD-ROM to the folder you created on the distribution server.
- In the W2000P folder you created, create an $OEM$ subfolder.
NOTE
The $OEM$ subfolder is used to hold applications, drivers, or utilities you want Setup to copy to the target computer.
If Setup finds the $OEM$ folder in the root of the distribution folder, it copies all of the files found in this directory to the temporary directory created during the text-mode portion of Setup.
NOTE
The OEMFILESPATH key in the answer file allows you to create the $OEM$ subfolder outside of the distribution folder.
Performing an Installation over the Network
The Windows 2000 Professional Setup program copies the installation files to the target computer. After copying the installation files, Setup restarts the target computer. From this point on, you install Windows 2000 Professional in the same way that you install from a CD-ROM.
The steps for installing Windows 2000 Professional over the network are as follows (see Figure 1.5):
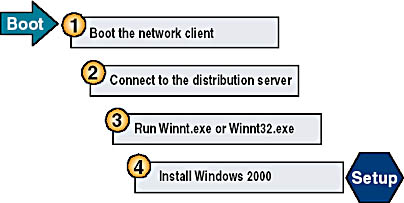
Figure 1.5 Installing Windows 2000 over the network
- On the target computer, boot from the network client.
- Connect to the distribution server. After you start the network client on the target computer, connect to the shared folder on the distribution server that contains the Windows 2000 Professional installation files.
- Run Winnt.exe or Winnt32.exe to start the Setup program. Use Winnet.exe for an installation using Windows 3.x on the source system, and use Winnet32.exe for an installation using Windows 95, 98, NT 4.0 (or NT 3.5), or 2000 on the source system. Winnt.exe and Winnt32.exe reside in the shared folder on the distribution server. When you run Winnt.exe from the shared folder, it does the following:
- Creates the $Win_nt$.~ls temporary folder on the target computer
- Copies the Windows 2000 Professional installation files from the shared folder on the distribution server to the $Win_nt$.~ls folder on the target computer
- Install Windows 2000 Professional. Setup restarts the target computer and begins installing Windows 2000 Professional.
Modifying the Setup Process
You can modify a server-based installation by changing how setup is executed using Winnt.exe. Table 1.1 describes the switches that you can use with Winnt.exe to control the setup process.
Table 1.1 Available Switches for Winnt.exe
| Switch | Description |
|---|---|
| /a | Enables accessibility options. |
| /e[:command] | Specifies a command to be executed at the end of Setup s GUI mode. |
| /r[:folder] | Specifies an optional folder to be installed. The folder is retained after installation. |
| /rx[:folder] | Specifies an optional folder to be copied. Setup deletes the folder after installation. |
| /s[:sourcepath] | Specifies the source location of Windows 2000 Professional files. The location must be a full path of the form x:\ [path] or \\server\share\ [path]. The default location is the current folder. |
| /t[:tempdrive] | Specifies a drive to contain temporary setup files. If not specified, Setup attempts to locate a drive for you. |
| /u[:answer file] | Performs an unattended setup using an answer file. The answer file provides answers to some or all of the prompts that you normally respond to during Setup. (This switch also requires the use of the /s switch.) |
| /udf:id[,UDF_file] | Establishes an identifier (ID) that Setup uses to specify how a Uniqueness Database File (UDF) modifies an answer file. This switch overrides answer file values, and the identifier determines the values in the UDB file that are used. If you don t specify a UDB file, Setup prompts for the disk containing the $Unique$.udb file. |
Modifying the Setup Process Using Winnt32.exe
You can modify a server-based installation by changing how setup is executed using Winnt32.exe. Table 1.2 describes the switches that you can use with Winnt32.exe to control the setup process.
Table 1.2 Available Switches for Winnt32.exe
| Switch | Description |
|---|---|
| /checkupgradeonly | Checks the computer for upgrade compatibility with Windows 2000 Professional; for upgrade installations, it creates a report. |
| /copydir:folder_name | Creates an additional folder within the systemroot folder (the folder that contains the Windows 2000 Professional system files). For example, if your source folder contains a folder called My_drivers, type /copydir:My_drivers to copy the My_drivers folder to your system folder. You can use the /copydir switch to create as many additional folders as you like. |
| /copysource:folder_name | Creates an additional folder within the systemroot folder. Setup deletes files created with /copysource after installation completes. |
| /cmd: command_line | Executes a command before the final phase of Setup. |
| /cmdcons | Adds a Recovery Console option to the operating system selection screen. |
| /debug[level] [:file_name] | Creates a debug log at the specified level. By default, it creates C:\Winnt32.log at level 2 (the warning level). |
| /m:folder_name | Forces Setup to copy replacement files from another location and to look in that location first. If files are present, this switch tells Setup to use those files instead of files from the default location. |
| /makelocalsource | Forces Setup to copy all installation files to the local hard disk. Use this switch when installing Windows 2000 Professional from a CD-ROM if you want to access installation files when the CD-ROM drive isn t available later in the installation. |
| /noreboot | Forces Setup to not restart the computer following the file copy phase, which enables a command to be entered by the user prior to completing setup. |
| /s:source_path | Specifies the source location of Windows 2000 Professional installation files. To simultaneously copy files from multiple paths, use a separate /s switch for each source path. |
| /syspart:drive_letter | Copies Setup startup files to a hard disk and marks the drive as active. You can then install the drive on another computer. When you start that computer, Setup starts at the next phase. Use of /syspart requires use of the /tempdrive switch. |
| /tempdrive:drive_letter | Places temporary files on the specified drive and installs Windows 2000 Professional on that drive. |
| /unattend [number] [:answer_file] | Performs an unattended installation. The answer file provides your custom specifications to Setup. If you don t specify an answer file, all user settings are taken from the previous installation. You can specify the number of seconds between the time that Setup finishes copying the files and when it restarts. You can specify the number of seconds only on a computer running Windows 2000 Professional that is upgrading to a later version of Windows 2000 Professional. |
| /udf:id[,udf_file] | Indicates an identifier (ID) that Setup uses to specify how a Uniqueness Database File (UDF) modifies an answer file. The .UDF file overrides values in the answer file, and the identifier determines which values in the .UDF file are used. For example, /udf:RAS_user, Our_company.udf overrides settings that are specified for the RAS_user identifier in the Our_company.udf file. If you don t specify a .UDF file, Setup prompts the user to insert a disk that contains the $Unique$.udf file. |
Lesson Summary
In this lesson, you learned that the main difference between an over-the-network installation and an installation from a CD-ROM is the location of the source files. Once you connect to the shared folder containing the source files and start Winnt.exe or Winnt32.exe, the installation proceeds like an installation from a CD-ROM. Several switches are available for Winnt.exe and for Winnt32.exe to modify the installation process.
EAN: N/A
Pages: 244