| As you've seen, each name displayed in the final Employee Results page is a link to a detail record the page we are about to build. The Employee Detail page has two functions: to display most of the information stored in the employee record, and to provide a link to a page where that information can be updated. Step 1: Implement Employee Detail Design Begin by creating the basic page. Create a basic dynamic page, either by hand or derived from a template.  In the EmployeeLookup folder, locate the folder for your server model and open the employee_detail page found there. In the EmployeeLookup folder, locate the folder for your server model and open the employee_detail page found there.
Add a table to the content region of your page to contain the interface elements for the application. From the Snippets panel, drag the Recipes > EmployeeLookup > Wireframes > Employee Detail - Wireframe snippet into the Content editable region. Within the table, nest another HTML table to display the detail data and the corresponding labels. This table generally has a row for each field and two columns, with the label in one column and room for the dynamic text in the other. Place your cursor in the row below the words EMPLOYEE SEARCH and insert the Recipes > EmployeeLookup > ContentTables > Employee Detail - Content Table snippet [r2-10].
Figure r2-10. 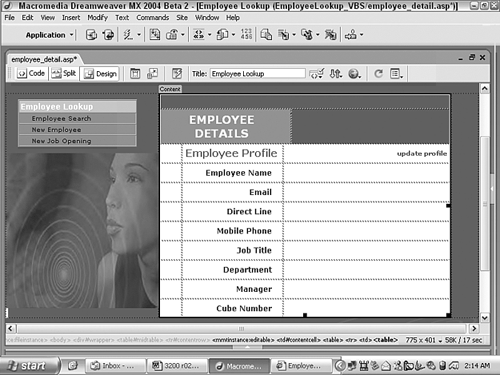
Step 2: Add Database Components The link to this page passes a URL parameter, ID. We'll now use the ID parameter to filter the recordset so that it contains only one record: that of the employee whose name was selected. The recordset in our example is based on an Access view, EmployeeLookup, which combines data from three tables: Employees, Jobs, and Departments. The SQL used to create this view for ASP and ColdFusion is quite complex and looks like this: [View full width] SELECT Employees_1.EmployeeID, Jobs.JobID, Jobs.JobTitle, Employees_1.EmployeeFirst,  Employees_1.EmployeeLast, Departments.DepartmentName, [Employees].[EmployeeFirst] & ' ' & [Employees].[EmployeeLast] AS ManagerName, Employees_1.EmployeeEmail, Employees_1 .EmployeePhone, Employees_1.EmployeeMobil, Employees_1.EmployeeCube FROM (Employees AS Employees_1 LEFT JOIN (Employees RIGHT JOIN (Jobs LEFT JOIN Jobs AS Jobs_1 ON Jobs.JobManager = Jobs_1.JobID) ON Employees.EmployeeJob = Jobs_1.JobID) ON Employees_1.EmployeeJob = Jobs.JobID) LEFT JOIN Departments ON Jobs.JobDept = Departments .DepartmentID; Employees_1.EmployeeLast, Departments.DepartmentName, [Employees].[EmployeeFirst] & ' ' & [Employees].[EmployeeLast] AS ManagerName, Employees_1.EmployeeEmail, Employees_1 .EmployeePhone, Employees_1.EmployeeMobil, Employees_1.EmployeeCube FROM (Employees AS Employees_1 LEFT JOIN (Employees RIGHT JOIN (Jobs LEFT JOIN Jobs AS Jobs_1 ON Jobs.JobManager = Jobs_1.JobID) ON Employees.EmployeeJob = Jobs_1.JobID) ON Employees_1.EmployeeJob = Jobs.JobID) LEFT JOIN Departments ON Jobs.JobDept = Departments .DepartmentID;
In PHP, the equivalent SQL is: [View full width] SELECT employees_1.EmployeeID, jobs.JobID, jobs.JobTitle, employees_1.EmployeeFirst, employees_1.EmployeeLast, departments.DepartmentName, CONCAT(employees.EmployeeFirst, ' ' ,employees.EmployeeLast) AS ManagerName, employees_1.EmployeeEmail, employees_1 .EmployeePhone, employees_1.EmployeeMobil, employees_1.EmployeeCube FROM employees, employees employees_1, jobs, jobs jobs_1, departments WHERE ((((jobs.JobTypeID = jobs_1 .JobID) AND (jobs.JobDepartment = departments.DepartmentID)) AND (employees.EmployeeJob = jobs_1.JobID)) AND (employees_1.EmployeeJob = jobs.JobID))
Dreamweaver incorporates available views along with the list of tables in the datasource, and all you need to do is choose the correct one for ASP and ColdFusion. An additional workaround step is required for PHP, similar to the one used in the Employee Results page, which temporarily stores data derived from this SQL statement. All server models should insert the following recordset. From the Bindings panel, choose Add (+) and select Recordset. Make sure the Simple Recordset dialog is displayed, and give the new recordset a meaningful name, such as Employees [r2-11].
Figure r2-11. 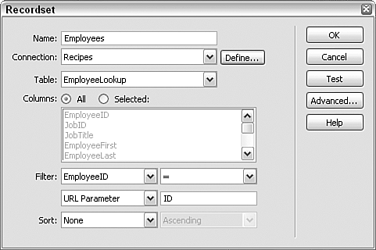
Select the connection to your data source. Choose Recipes from the Connections or Data Source list. Select the table containing the employee record details. Choose EmployeeLookup (employeelookup for PHP) from the Table list. Keep the Columns option set to All. In the Filter area of the Recordset dialog, set the four Filter list elements like this: 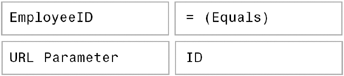
Leave the Sort option set to None and click OK to close the dialog.
For PHP As before, you create the Employees recordset first and then insert the code for the EmployeeLookup table. From the Server Behaviors panel, select the Employee recordset. Switch to Code view, and you'll see the Employee recordset code highlighted. Wrap the following around the selected code: From the Snippets panel, insert the EmployeeLookup > CustomCode_PHP > Temporary Query - EmployeeLookup snippet. Before: 
| [View full width] <?php mysql_select_db($database_Recipes, $Recipes); $query_EmployeeLookup = "INSERT INTO employeelookup SELECT employees_1.EmployeeID, jobs.JobID, jobs.JobTitle, employees_1.EmployeeFirst, employees_1.EmployeeLast, departments.DepartmentName, CONCAT(employees.EmployeeFirst, ' ',employees.EmployeeLast) AS ManagerName, employees_1 .EmployeeEmail, employees_1.EmployeePhone, employees_1 .EmployeeMobil, employees_1.EmployeeCube FROM employees, employees employees_1, jobs, jobs jobs_1, departments WHERE ((((jobs.JobTypeID = jobs_1.JobID) AND (jobs.JobDepartment = departments.DepartmentID)) AND (employees.EmployeeJob = jobs_1.JobID)) AND (employees_1.EmployeeJob = jobs.JobID))"; mysql_query($query_EmployeeLookup,$Recipes); ?> |
After: <?php $query_EmployeeLookup = "DELETE FROM employeelookup"; mysql_query($query_EmployeeLookup,$Recipes); ?>
Note Although the code that surrounds the recordset is the same for both this page and the Employee Results page, the recordset is different; therefore, you cannot copy and paste the code from one page to another.
Step 3: Data Binding Process All the data-driven elements on this page are in the form of dynamic text. Dynamic text is for display purposes only and cannot be edited. In the Bindings panel, expand the recordset entry so that all data columns are displayed. Drag each of the following data columns to the table and drop in the column to the right of the labels, in the corresponding row: As we did on the Employee Results page, we're going to concatenate the dynamic text for first and last names. Drag column EmployeeLast to the Employee Name row, right after the dynamic text element for first name; place your cursor between the two fields and add a space. Drag column EmployeeEmail to the Email row. Drag column EmployeePhone to the Direct Line row. Drag column EmployeeMobil to the Mobile row. Drag column EmployeeJob to the Job Title row. Drag column EmployeeDept (DepartmentName in PHP) to the Department row. Drag column EmployeeManager (ManagerName in PHP) to the Manager row. Drag column EmployeeCube to the Cube Number row.
Leave the default formatting for all dynamic text fields.
When you're done, every row should have both a label and a matching dynamic text element [r2-12].
Figure r2-12. 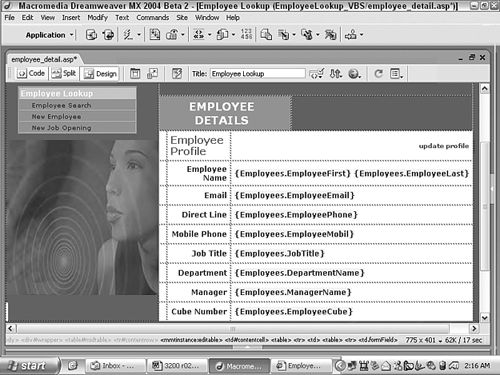
Step 4: Link to Employee Update Page The last task to accomplish on this page is to create a link to an update page. The update page filters the recordset based on the unique employee ID passed via the URL. Select the text or graphic you want to use as a link to the update page. Select the text update profile. From the Property inspector, select the Link Folder icon. In the Select File dialog, choose Parameters. In the Parameters dialog, enter the variable name. In the Name column, enter ID. Enter the dynamic value. Under the Value column, select the lightning bolt to open the Dynamic Data dialog and select EmployeeID from the Employees recordset. Click OK once to close the Dynamic Data dialog and again to close the Parameters dialog. Select the file you want to pass the parameter to. Select Browse and choose the update_employee file for your server model. Click OK to close the dialog. Save the page.
Note For ASP users, Dreamweaver includes two server behaviors that could also be used for this purpose: Go to Related Page and Go to Detail Page. The Go to Related Page server behavior automatically passes URL or form parameters it receives from the current page. The Go to Detail Page server behavior allows you to choose which parameters you're going to pass and gives the option of passing existing URL or form arguments.
Note Whether your organization allows its employees to update their own records is an internal decision. You could hide the Update link conditionally so that it is visible only to registered users who have certain clearances. For more on this technique, see Recipe 1, "User Login."
|