| The Employee Results page is the heart and the brains of this application. Here resides the functionality for accepting the search criteria and returning the matching records in an abbreviated list. Each record in the list is linked to a detail page. This results page is designed to handle input from both simple and advanced with special hand-coded functions. Step 1: Implement Design We'll first create the basic page to hold our dynamic content. Although there will be interactive elements for recordset and other navigation, no form is necessary for the results page. Create a basic dynamic page, either by hand or derived from a template.  In the EmployeeLookup folder, locate the folder for your server model and open the employee_results page found there. In the EmployeeLookup folder, locate the folder for your server model and open the employee_results page found there.
Add a table to the content region of your page to contain the interface elements for the application. From the Snippets panel, drag the Recipes > EmployeeLookup > Wireframes > Employee Results - Wireframe snippet into the Content editable region. Within the table, nest another HTML table to display the results from the employee search query. The result list should have a column for each field you want to display; our example table has room for four such fields. The nested table should also contain a row for recordset navigation links and status. Place your cursor in the row below the words EMPLOYEE RESULTS and insert the Recipes > EmployeeLookup > ContentTables > Employee Results - Content Table snippet [r2-5].
Figure r2-5. 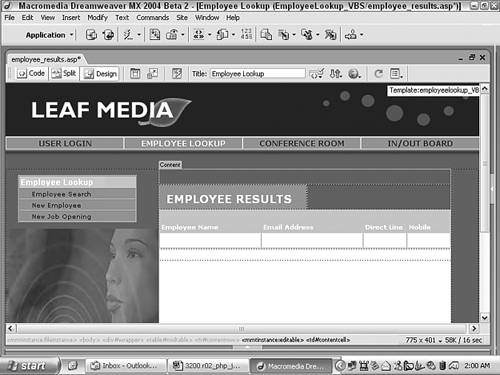
Step 2: Add Database Components Although there is only one recordset used in this page, it's a powerful one not so much from what it does by itself, but from the possibilities it engenders. In the recordset, the WHERE clause of the SQL statement is set to a run-time variable termed WhereParam. As you'll see later, the WhereParam variable enables the SQL filter to be dynamically generated, dependent on user input. For ASP From the Bindings panel, choose Add (+) and select Recordset from the list. If necessary, switch to the advanced Recordset dialog [r2-6].
Figure r2-6. 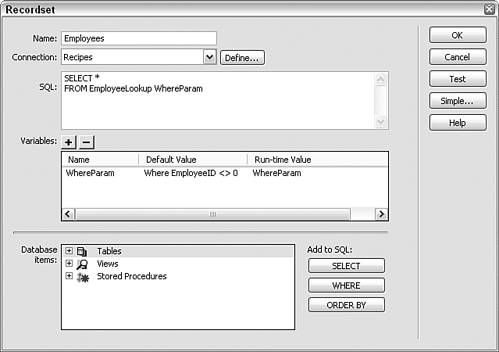
Enter an appropriate name for the recordset. Enter Employees in the Name field. Choose a proper connection from the list. Select Recipes from the Connections list. In the SQL field, insert the following code: SELECT * FROM EmployeeLookup WhereParam Note that a variable, WhereParam, is substituted for the entire WHERE clause, including the keyword. In the Variables section, choose Add (+) and enter WhereParam in the Name column. In the Default Value column, enter this: Where EmployeeID <> 0 Because no employee has an ID set to 0, by default if no search criteria are entered the recordset will return all the records. In the Run-Time Value column, enter WhereParam and click OK to close the dialog and insert the recordset. Save the page.
Note To accommodate the different dialogs for the various server models, the steps are presented separately here and when necessary throughout this recipe.
For ColdFusion From the Bindings panel, choose Add (+) and select Recordset. In the advanced Recordset dialog, enter an appropriate name for the recordset. Enter Employees in the Name field. Choose your data source from the drop-down list. Select Recipes from the Data Source list. If necessary, enter the username and password for the data source in the corresponding fields. In the SQL area, enter the following code:
| Select * FROM EmployeeLookup WhereParam |
Verify your code and click OK to close the dialog and insert the recordset. Save the page.
For PHP To compensate for MySQL's lack of support for views, the EmployeeLookup table is temporarily filled with pertinent data. The Employee recordset then retrieves the data from this table at run time. After the Employee recordset has been created, the temporary information is flushed from the EmployeeLookup table and the autonumber controls are reset. To build the proper application in Dreamweaver, you create the Employee recordset first and then insert the code for the EmployeeLookup table. From the Bindings panel, choose Add (+) and select Recordset from the list. If necessary, switch to the advanced Recordset dialog. Enter an appropriate name for the recordset. Enter Employees in the Name field. Choose a proper connection from the list. Select Recipes from the Connections list. In the SQL field, insert the following code:
| Select * FROM EmployeeLookup WhereParam |
Note that a variable, WhereParam, is substituted for the entire WHERE clause, including the keyword. In the Variables section, choose Add (+) and enter WhereParam in the Name column. In the Default Value column, enter:
| Where EmployeeID <> 0 |
Because no employee has an ID set to 0, by default if no search criteria are entered the recordset returns all the records. In the Run-Time Value column, enter $WhereParam and click OK to close the dialog and insert the recordset. Save the page. Now we're ready to insert the EmployeeLookup code. From the Server Behaviors panel, select the Employees recordset. Switch to Code view, and you'll see the Employees recordset code highlighted. Wrap the following around the selected code: From the Snippets panel, insert the EmployeeLookup > CustomCode_PHP > Temporary Query - EmployeeLookup snippet.  Before: Before:
[View full width] <?php mysql_select_db($database_Recipes, $Recipes); $query_EmployeeLookup = "INSERT INTO employeelookupSELECT employees_1.EmployeeID, jobs  .JobID, jobs.JobTitle,employees_1.EmployeeFirst, employees_1.EmployeeLast, departments .DepartmentName, CONCAT(employees.EmployeeFirst,' ',employees.EmployeeLast) AS ManagerName, employees_1.EmployeeEmail,employees_1.EmployeePhone, employees_1.EmployeeMobil, employees_1.EmployeeCube FROM employees, employees employees_1, jobs,jobs jobs_1, departments WHERE ((((jobs.JobTypeID = jobs_1.JobID)AND (jobs.JobDepartment = departments .DepartmentID)) AND (employees.EmployeeJob = jobs_1.JobID)) AND (employees_1.EmployeeJob = jobs.JobID))"; mysql_query($query_EmployeeLookup,$Recipes); ?> .JobID, jobs.JobTitle,employees_1.EmployeeFirst, employees_1.EmployeeLast, departments .DepartmentName, CONCAT(employees.EmployeeFirst,' ',employees.EmployeeLast) AS ManagerName, employees_1.EmployeeEmail,employees_1.EmployeePhone, employees_1.EmployeeMobil, employees_1.EmployeeCube FROM employees, employees employees_1, jobs,jobs jobs_1, departments WHERE ((((jobs.JobTypeID = jobs_1.JobID)AND (jobs.JobDepartment = departments .DepartmentID)) AND (employees.EmployeeJob = jobs_1.JobID)) AND (employees_1.EmployeeJob = jobs.JobID))"; mysql_query($query_EmployeeLookup,$Recipes); ?>
After:
| <?php $query_EmployeeLookup = "DELETE FROM employeelookup"; mysql_query($query_EmployeeLookup,$Recipes); ?> |
Save your page.
Step 3: Data Binding Process After you've defined the recordset, dynamic text is available to be inserted on the page. In our example, five data source fields will be placed under four table headers: Name, Email, Direct Line, and Mobile. Two of the data sources, EmployeeFirst and EmployeeLast, are combined under the Name heading. From the Bindings panel, expand the Employees recordset. Place the desired data source fields onto the page: Drag the EmployeeFirst field under the Name column. Drag the EmployeeLast field after the EmployeeFirst field and add a space between the two dynamic text elements. You might find it easier to place the cursor where you want the last name to go and use the Insert button on the Bindings panel. Drag the EmployeeEmail field under the Email column. Drag the EmployeePhone field under the Direct Line column. Drag the EmployeeMobile field under the Mobile column.
When completed, test the layout by selecting Live Data view from the Document toolbar. The first record's data appears [r2-7]. If necessary, adjust the column spacing on the table by dragging the cell borders.
Figure r2-7. 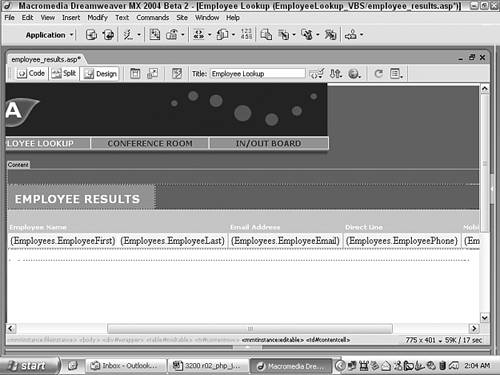
Note As you add the dynamic text to the table, the table widens to accommodate the field names. Dreamweaver displays dynamic text with this syntax: {recordset.datasourcefield}. Consequently, the dynamic text names can get quite lengthy and distort the table significantly. This distortion generally disappears, however, after you display the real data. If you would rather not see the full recordset and field name, open Preferences, and in the Invisible Elements category, change the Show Dynamic Text As option to {}.
Step 4: Apply Server Behaviors Although there's no user input on this page, there's a fair degree of interactivity. The recordset returned here could hold anywhere from one to all the employees in a firm, so we must be able to present those results in a manageable fashion. To this end, you can insert Dreamweaver's Repeat Region server behavior to show the results in groups of 10. Next, you can add links to a detail page for each listing. First, let's add the Repeat Region to show multiple records. Place the cursor in any of the table cells containing the dynamic data. From the Tag Selector, select the <tr> tag, located to the left of the current <td> tag. From the Server Behaviors panel, choose Add (+) and select Repeat Region from the list. In the Repeat Region dialog, make sure the Employees recordset is selected. Accepting the default of Showing 10 Records at a Time, click OK to close the dialog.
Switch to Live Data view to see the information from the first 10 employees in the data source [r2-8]. Because no search criteria has been passed to this page, the default value of the WhereParam variable is used to filter the recordset which, you'll remember, is set to receive all the employees.
Figure r2-8. 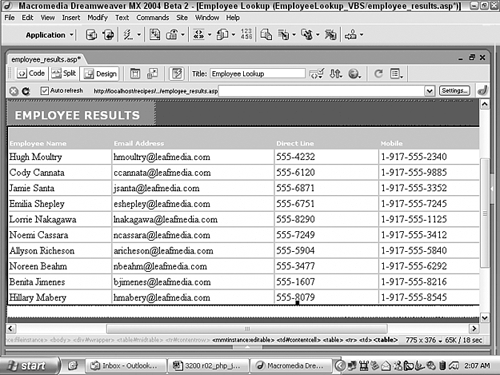
The final server behavior to be added to this page provides a way for users to see the full details of an employee record. Select the dynamic text elements you want to serve as a link to the detail page. Select both EmployeeFirst and EmployeeLast dynamic text fields. The surest method to do this is to select one (it doesn't matter which one) and then Shift-select the second; this highlights both fields and the space separating them. From the Property inspector, select the folder icon next to the Link field. In the Select File dialog, choose Parameters. In the Parameters dialog, enter the variable name. In the Name column, enter ID. Enter the dynamic value. Under the Value column, select the lightning bolt to open the Dynamic Data dialog and select EmployeeID from the Employees recordset. Click OK once to close the Dynamic Data dialog and again to close the Parameters dialog. Select the file you want to pass the parameter to. Select Browse and choose the employee_detail file for your server model. Save your page.
Note After a little testing, you might decide to adjust the table or its cells in some ways, such as choosing the No Wrap option for certain cells or modifying the cell padding. While you're working in Live Data view, any such formatting changes will not ripple through the entire repeat region until the Refresh icon on the Live Data toolbar is selected. Alternatively, you can refresh the display by exiting and re-entering Live Data view.
Step 5: Adding Application Objects To allow users to page through the records and see where they are you'll add recordset navigation tools next. Dreamweaver's Recordset Navigation Bar and Recordset Navigation Status application objects are used to page through and track the records. Place your cursor in the Employee Results table where you would like the navigation links to appear. Place the cursor in the row above the Direct Line cell. Choose the Recordset Navigation Bar object from the Application category of the Insert bar under the Recordset Paging memo. Alternatively, you could select Insert > Application Objects > Recordset Paging > Recordset Navigation Bar. In the Recordset Navigation Bar dialog, select the Employees recordset. Leave the Display Using option set to Text and click OK.
As you are paging through a recordset, it's helpful to have some feedback stating where you are in the data. Dreamweaver includes another Application object, called Recordset Navigation Status, to provide such feedback. Place your cursor in the Employee Results table where you would like the navigation status to be displayed. Again, be careful not to place your cursor within the Repeat Region. Place the cursor in the row above the Employee Name cell. Choose the Recordset Navigation Status object from the Display Record Count menu in the Insert bar's Application category. Alternatively, you could select Insert > Application Objects > Display Record Count > Recordset Navigation Status. In the Recordset Navigation Status dialog, select the Employees recordset and click OK.
To get the full effect of the recordset navigation controls, preview the page in a browser [r2-9].
Figure r2-9. 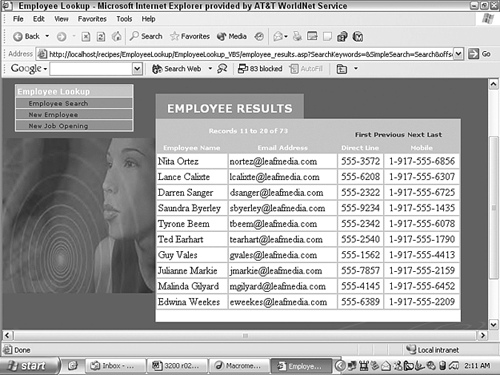
Step 6: Code Search Functions The infrastructure for the page has been completed, and now it's time to add the core functionality. As you've seen, this page's recordset employs a variable, WhereParam, to represent the entire WHERE clause of the SQL statement. We'll now insert the functions one for the simple search and one for the advanced search that are necessary to dynamically construct WhereParam. To simplify the coding, both functions use a third custom function, AddFieldToSearch() which, as the name implies, builds up the search filter one requested field at a time. Finally, to fully integrate the custom code into Dreamweaver's server behavior output, we'll add a couple of function calls. Note You might want to wrap the entire Recordset Navigation Status object in a conditional region by applying the Show Region If Recordset Is Not Empty server behavior. This technique hides the status text if no records are found to match the search criteria.
Note This step is only necessary for ASP and PHP; for ColdFusion, the functionality is inserted within the recordset.
To make sure our helper function, AddFieldToSearch(), is available, we'll add it first. In Code view, place your cursor at the top of the file, on a new line directly after the <!--#include> statement for ASP and <?php require_once...> for PHP. Insert the following code: From the Snippets panel, open the Recipes > EmployeeLookup > Custom Code folder for your server model insert the Add Field to Search snippet. 
| [View full width] <% AddFieldToSearch(CurrentWhere,ColumnName,ValString ,Comparison,Separator,OpenEncap,CloseEncap) if (ValString <> "") then if (CurrentWhere = "") then CurrentWhere = "WHERE " else CurrentWhere = CurrentWhere & " " & Separator & " " end if CurrentWhere = CurrentWhere & ColumnName & " " & Comparison & " " & OpenEncap & Replace(ValString, "'", "''") & CloseEncap end if AddFieldToSearch = CurrentWhere end function %> | 
| [View full width] <% function AddFieldToSearch(CurrentWhere,ColumnName,ValString ,Comparison,Separator,OpenEncap,CloseEncap) { if (ValString!="") { if (CurrentWhere == "") { CurrentWhere = "WHERE "; } else { CurrentWhere += " " + Separator + " "; } CurrentWhere += ColumnName + " " + Comparison + " " + OpenEncap + ValString.replace(/'/g, "''") + CloseEncap; } return CurrentWhere; } %> |
| [View full width] <?php function AddFieldToSearch($CurrentWhere,$ColumnName ,$ValString,$Comparison,$Separator,$OpenEncap,$CloseEncap) { if ($ValString!="") { if ($CurrentWhere == "") { $CurrentWhere = "WHERE "; } else { $CurrentWhere.= " ".$Separator." "; } $CurrentWhere.= $ColumnName." ".$Comparison." " .$OpenEncap.$ValString.$CloseEncap; } return $CurrentWhere; } ?> |
Essentially, this function accepts arguments from both the simple and advanced search functions and dynamically constructs a segment of the WHERE clause. The first time this function is called, the WHERE keyword is added; every time after that, the OR operator is appended instead. Next, the new segment is constructed and added to the existing WHERE clause. The ValString argument is either an array of keywords if the simple search is used or the values from specific form fields (Name, Department, and so on) for the advanced search. Next, we'll add the simple search function. In this function, the query string passed from the simple search page is put into an array so that it can compared one keyword at a time to each of the desired fields. The fields used in the comparison are set in the programming loop; you can add additional fields by following the syntax of the AddFieldToSearch() function call and adding the data field names. In Code view, place the cursor in the proper position for your server model. Place the cursor after the AddFieldToSearchFunction() just inserted. The final three lines of that function are as follows: AddFieldToSearch = CurrentWhere end function %> Place the cursor after the AddFieldToSearchFunction() just inserted. The final three lines of that function are as follows: return CurrentWhere; } %>  Place the cursor within the <cfquery> tag that defines the recordset after this line: Place the cursor within the <cfquery> tag that defines the recordset after this line:
SELECT * FROM EmployeeLookup Place the cursor after the AddFieldToSearchFunction() just inserted. The final three lines of that function are as follows: return $CurrentWhere; } ?> Insert the following code: From the Snippets panel, open the Recipes > EmployeeLookup > Custom Code folder for your server model and insert the Create Simple Keyword Search snippet.
| [View full width] <% dim WhereParam, Keywords, x if (cStr(Request.QueryString("SimpleSearch"))<>"") then WhereParam = "" KeyWords = cStr(Request.QueryString("SearchKeywords")) if (KeyWords <> "") then KeyWords = Split(Keywords, " ") for x=0 to Ubound(KeyWords) WhereParam = AddFieldToSearch(WhereParam ,"EmployeeFirst", KeyWords(x),"LIKE","OR","'%","%'") WhereParam = AddFieldToSearch(WhereParam ,"EmployeeLast", KeyWords(x),"LIKE","OR","'%","%'") WhereParam = AddFieldToSearch(WhereParam ,"EmployeeEmail", KeyWords(x),"LIKE","OR","'%","%'") WhereParam = AddFieldToSearch(WhereParam,"JobTitle", KeyWords(x),"LIKE","OR","'%","%'") next end if end if %> |
| [View full width] <% if (String(Request.QueryString("SimpleSearch"))!="undefined") { var WhereParam = ""; var KeyWords = String(Request.QueryString("SearchKeywords")); if (KeyWords != "") { KeyWords = KeyWords.split(" "); for (var x=0; x<KeyWords.length; x++) { WhereParam = AddFieldToSearch(WhereParam ,"EmployeeFirst", KeyWords[x],"LIKE","OR","'%","%'"); WhereParam = AddFieldToSearch(WhereParam ,"EmployeeLast", KeyWords[x],"LIKE","OR","'%","%'"); WhereParam = AddFieldToSearch(WhereParam ,"EmployeeEmail", KeyWords[x],"LIKE","OR","'%","%'"); WhereParam = AddFieldToSearch(WhereParam,"JobTitle", KeyWords[x],"LIKE","OR","'%","%'"); } } } %> |
| [View full width] <cfif isDefined("URL.SimpleSearch") AND URL.SimpleSearch NEQ ""> WHERE EmployeeID = 0 <cfloop index="kWord" list="#URL.SearchKeywords#" delimiters=" "> OR EmployeeFirst LIKE '%#kWord#%' OR EmployeeLast LIKE ' %#kWord#%' OR EmployeeEmail LIKE '%#kWord#%' OR JobTitle LIKE '%#kWord#%' </cfloop> </cfif> |
| [View full width] <?php if (isset($_GET['SimpleSearch'])) { $WhereParam = ""; if (isset($_GET['SearchKeywords'])) { $KeyWords = explode(" ",$_GET['SearchKeywords']); for($x=0; x < count($KeyWords); $x++) { $WhereParam = AddFieldToSearch($WhereParam, "EmployeeFirst",$KeyWords[$x],"LIKE", "OR","'%","%'"); $WhereParam = AddFieldToSearch($WhereParam, "EmployeeLast",$KeyWords[$x],"LIKE", "OR","'%","%'"); $WhereParam = AddFieldToSearch($WhereParam, "EmployeeEmail",$KeyWords[$x],"LIKE", "OR","'%","%'"); $WhereParam = AddFieldToSearch($WhereParam, "JobTitle",$KeyWords[$x],"LIKE", "OR","'%","%'"); } } } ?> |
The simple search function uses a server object (QueryString in ASP, URL in ColdFusion, and $_GET in PHP) to get information from the search page. This is possible because we set the <form> tag method attribute to GET instead of POST. This technique works fine here because the query argument is not likely to be very long. For complex forms, it is better to use the POST method. This section of code handles the case when the advanced search page is used to find employee results. The SQL variable WhereParam is built out pulling any text entered on the advanced search page into a single query string. The use of the AddFieldToSearch() function provides a simple mechanism to build up the query string. Note ColdFusion users should note that the insertion of this code block (and the one for the advanced search) within the <cfquery> tag disables Dreamweaver recognition of the recordset in the Bindings panel. Once implemented, you cannot expand the recordset, and a series of errors are reported. To reopen the recordset in the Bindings panel, temporarily cut the code added to the <cfquery> tag. Although this might seem awkward, it is the preferred way to write this function using CFML tags without using <cfscript>.
Next, we'll add the advanced search function. This code also uses the AddFieldToSearch() function to help build up the WHERE clause, but here unlike in the simple search you can combine keywords using AND or OR operators in any specified field. For example, the user could look for all Smiths OR Jones in the Sales OR Marketing departments. In Code view, place the cursor after the simple search code block just inserted. The final three lines of that code block are as follows:
| end if end if %> |
| } } %> |
| LIKE '%#kWord#%' OR JobTitle LIKE '%#kWord#%' </cfloop> </cfif> |
| } } ?> |
Insert the following code: From the Snippets panel, open the Recipes > EmployeeLookup > Custom Code folder for your server model and insert the Advanced Keyword Search snippet.
| [View full width] <% if (cStr(Request.QueryString("AdvancedSearch"))<>"") then WhereParam = "" WhereParam = AddFieldToSearch(WhereParam,"EmployeeFirst", cStr(Request.QueryString("FirstName")),"LIKE","AND","'","%'") WhereParam = AddFieldToSearch(WhereParam,"EmployeeLast", cStr(Request.QueryString("LastName")),"LIKE","AND","'","%'") WhereParam = AddFieldToSearch(WhereParam,"EmployeeEmail", cStr(Request.QueryString("Email")),"LIKE","AND","'%","%'") WhereParam = AddFieldToSearch(WhereParam,"JobTitle", cStr (Request.QueryString("JobTitle")),"LIKE","AND","'%","%'") WhereParam = AddFieldToSearch(WhereParam,"DepartmentName", cStr(Request.QueryString("Department")),"LIKE","AND","'","%'") WhereParam = AddFieldToSearch(WhereParam,"ManagerName", cStr(Request.QueryString("Manager")),"LIKE","AND","'%","%'") WhereParam = AddFieldToSearch(WhereParam,"EmployeeCube", cStr(Request.QueryString("CubeNumber")),"=","AND","","") end if %> |
| [View full width] <% if (String(Request.QueryString ("AdvancedSearch"))!="undefined") { var WhereParam = ""; WhereParam = AddFieldToSearch(WhereParam,"EmployeeFirst", String(Request.QueryString("FirstName")),"LIKE","AND","'","%'"); WhereParam = AddFieldToSearch(WhereParam,"EmployeeLast", String(Request.QueryString("LastName")),"LIKE","AND","'","%'"); WhereParam = AddFieldToSearch(WhereParam,"EmployeeEmail", String(Request.QueryString("Email")),"LIKE","AND","'%","%'"); WhereParam = AddFieldToSearch(WhereParam,"JobTitle", String(Request.QueryString("JobTitle")),"LIKE", "AND","'%"," %'"); WhereParam = AddFieldToSearch(WhereParam,"DepartmentName", String(Request.QueryString("Department")),"LIKE", "AND","'" ,"%'"); WhereParam = AddFieldToSearch(WhereParam,"ManagerName", String(Request.QueryString("Manager")),"LIKE", "AND","'%","%'"); WhereParam = AddFieldToSearch(WhereParam,"EmployeeCube", String(Request.QueryString("CubeNumber")),"=", "AND","",""); } %> |
| <cfif isDefined("URL.AdvancedSearch")> WHERE 1 = 1 <cfif URL.FirstName NEQ ""> AND EmployeeFirst LIKE '#URL.FirstName#%' </cfif> <cfif form.LastName NEQ ""> AND EmployeeLast LIKE '#URL.LastName#%' </cfif> <cfif form.Email NEQ ""> AND EmployeeEmail LIKE '%#URL.Email#%' </cfif> <cfif form.JobTitle NEQ ""> AND JobTitle LIKE '%#URL.JobTitle#%' </cfif> <cfif form.Department NEQ ""> AND DepartmentName LIKE '#URL.Department#%' </cfif> <cfif form.Manager NEQ ""> AND ManagerName LIKE '%#URL.Manager#%' </cfif> <cfif form.CubeNumber NEQ ""> AND EmployeeCube = #URL.CubeNumber# </cfif> </cfif> |
| [View full width] <?php if (isset($_GET['AdvancedSearch'])) { $WhereParam = ""; $WhereParam = AddFieldToSearch($WhereParam ,"EmployeeFirst", $_GET['FirstName'],"LIKE","AND","'","%'"); $WhereParam = AddFieldToSearch($WhereParam ,"EmployeeLast", $_GET['LastName'],"LIKE","AND","'","%'"); $WhereParam = AddFieldToSearch($WhereParam ,"EmployeeEmail", $_GET['Email'],"LIKE","AND","'%","%'"); $WhereParam = AddFieldToSearch($WhereParam,"JobTitle" , $_GET['JobTitle'],"LIKE","AND","'%","%'"); $WhereParam = AddFieldToSearch($WhereParam ,"DepartmentName", $_GET['Department'],"LIKE","AND","'","%'"); $WhereParam = AddFieldToSearch($WhereParam ,"ManagerName", $_GET['Manager'],"LIKE","AND","'%","%'"); $WhereParam = AddFieldToSearch($WhereParam ,"EmployeeCube", $_GET['CubeNumber'],"=","AND","",""); } ?> |
The advanced search code block goes through each of the fields possibly used as criteria on the advanced search page. To customize the function, add your own statement following the code syntax and substitute the custom field names. For example, if my search page included a text field for telephone extension, I would add the following code:
| WhereParam = AddFieldToSearch(WhereParam,"EmployeeExtension", cStr(Request.QueryString("Extension")),"LIKE","AND","'","%'") |
| [View full width] WhereParam = AddFieldToSearch(WhereParam,"EmployeeExtension", String(Request.QueryString("Extension")),"LIKE","AND","'%"," %'"); |
| <cfif form.Extension NEQ ""> AND EmployeeExtension = #URL.Extension# </cfif> |
| $WhereParam = AddFieldToSearch($WhereParam,"EmployeeExtension", $_GET['Extension'],"LIKE","AND","'%","%'"); |
For ASP The remaining code functions are necessary in ASP only. To handle single quotes in the SQL statements for ASP, Dreamweaver escapes them by replacing each one that has two single quotes with code like this:
| Replace(Employees__WhereParam, "'", "''") |
| Employees__WhereParam.replace(/'/g, "''") |
For the dynamically generated WhereParam variable to work properly, we need to temporarily replace any single quotes in the search criteria with a character unlikely to be used in data in our example, an exclamation mark. The replacement takes place before the SQL statement reads the WhereParam and, because all the single quotes have been substituted, there is nothing for Dreamweaver's replace function to do. Then, as a final step, Dreamweaver replaces all exclamation marks with single quotes, thus restoring the correct strings before the SQL statement is evaluated. Three custom code blocks hold our needed functionality. The first code block contains two functions: RemoveQuotes(), which replaces single quotes with an exclamation mark, and ReturnQuotes(), which does the reverse. Each of the two other codes calls one of these functions. We'll insert the code block with the two functions first. Place your cursor below the advanced search code block. Insert this code: From the Snippets panel, open the Recipes > EmployeeLookup > Custom Code folder for your server model and insert the Quote Handler Function snippet.
| <% function RemoveQuotes(theString) RemoveQuotes = Replace(theString, "'", "|!|") end function function ReturnQuotes(theString) ReturnQuotes = Replace(theString, "|!|", "'") end function %> |
| <% function RemoveQuotes(theString) { return theString.replace(/'/g, "|!|"); } function ReturnQuotes(theString) { return theString.replace(/\|!\|/g, "'"); } %> |
To insert the first function caller, place your cursor below the just inserted code block. Insert the following code: From the Snippets panel, open the Recipes > EmployeeLookup > Custom Code folder for your server model and insert the Replace Quotes Function snippet.
| <% Employees__WhereParam = RemoveQuotes(Employees__WhereParam) %> |
| <% Employees__WhereParam = RemoveQuotes(Employees__WhereParam) %> |
To insert the second function caller, place your cursor within the Dreamweaver coded SQL function after the line that starts Employees.Source = "SELECT..., and add a paragraph return. Use Dreamweaver's Find and Replace function to look for this code entry. Insert the following code: From the Snippets panel, open the Recipes > EmployeeLookup > Custom Code folder for your server model and insert the Replace Quotes Function snippet.
| Employees.Source = ReturnQuotes(Employees.Source) |
| Employees.Source = ReturnQuotes(Employees.Source); |
Save the file.
The advantage to this subroutine function is that the Dreamweaver visual interface still recognizes and protects the code for the hand-editing recordset definition. Searching for Users with Multiple Criteria Without Handcoding As you can see from this recipe, creating complex search functionality is no easy task. Dreamweaver's basic master detail page set is adequate for simple searches, but cannot handle more complex criteria like date ranges or keyword combinations. If you'd prefer not or don't have time to delve as deeply into handcoding as needed, but still want more searching power, there is another route you can take. WebAssist's QueryBuilder creates the SQL necessary for sophisticated searches, much like our recipe but without the handcoding. Moreover, it works hand-in-glove with Dreamweaver's Application Objects to construct basic search, result, and detail pages, all in one operation. WA QueryBuilder helps reduce your implementation time, maintenance costs, and improves the user experience. To learn more about WA QueryBuilder, visit http://www.webassist.com/Products/Recipes/WAQueryBuilder.asp |
|