Introducing the New TreeView Control
Unlike what you probably thought at first, the new TreeView control has nothing to do with the IE Web Control. It does not use the related IE behavior. The control has been newly developed and is especially targeted at the new data source concept.
Here is a list of the most important features of this control:
-
Allows connection to any data source that supports the IHierarchicalDataSource interface (already included: XmlDataSource and SiteMapDataSource)
-
Enables site navigation similar to MSDN Online
-
Displays the nodes as text or hyperlinks
-
Provides access to the object model at run time
-
Allows node population at client side, if supported by the browser (currently Internet Explorer version 5.0 or higher and Netscape version 6.0 or higher)
-
Displays CheckBox controls
-
Includes adjustable visualization via templates, styles, pictures, and Themes
-
Allows adaptive rendering to different target systems and browsers
Using Static Data
The easiest way to populate a TreeView control is to assign the tree items statically. Drag a new control to your page and choose the Edit Nodes command in the Task List. The dialog box that appears, which should look like the one you see in Figure 3-17, allows you to create tree nodes and add them to the hierarchy of the tree. Use the Properties grid to specify the properties of the elements. This includes the text label, an internal value, an optional navigation URL, the display status, and much more.
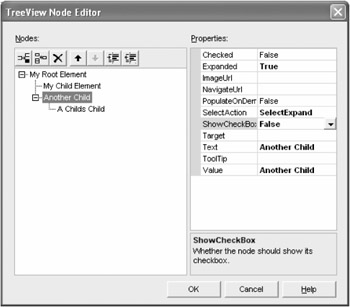
Figure 3-17: You can create, edit, and move your static tree nodes.
The created items are added to the HTML source code as separate subcontrols:
<asp:treeview runat="server"> <nodes> <asp:treenode value="My Root Element" expanded="True" text="My Root Element"> <asp:treenode value="My Child Element" text="My Child Element"> </asp:treenode> <asp:treenode checked="True" value="Another Child" expanded="True" showcheckbox="False" selectaction="SelectExpand" selected="True" text="Another Child"> <asp:treenode value="A Childs Child" selectaction="None" text="A Childs Child"> </asp:treenode> </asp:treenode> </asp:treenode> </nodes> </asp:treeview>
Hold on, before running this example in the browser by hitting F5, you should take care of an appropriate visualization. Select Auto Format in the Task List of the control and choose your favorite standard format. I chose MSDN. Figure 3-18 shows the result.
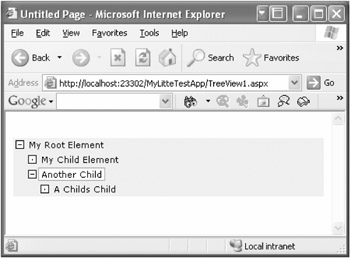
Figure 3-18: The newly created tree nodes are displayed in an MSDN-like style.
Using XmlDataSource
You can use the XmlDataSource control to display flat or hierarchical XML data. Either assign a XML block to it or—as you'll probably want to do more often—a local XML file. The TreeView control allows you to present any hierarchically structured data.
In Listing 3-6, the books.xml XML file, which serves as the data source, contains a catalogue of a few books.
Listing 3-6: books.xml
<?xml version="1.0" standalone="yes"?> <bookstore> <genre name="fiction"> <book ISBN="10-000000-001"> <title>The Iliad and The Odyssey</title> <price>12.95</price> <comments> <userComment rating="4"> Best translation I've read. </userComment> <userComment rating="2"> I like other versions better. </userComment> </comments> </book> <book ISBN="10-000000-999"> <title>Anthology of World Literature</title> <price>24.95</price> <comments> <userComment rating="3"> Needs more modern literature. </userComment> <userComment rating="4"> Excellent overview of world literature. </userComment> </comments> </book> </genre> <genre name="nonfiction"> <book ISBN="11-000000-002"> <title>Computer Dictionary</title> <price>24.95</price> <comments> <userComment rating="3">A valuable resource.</userComment> </comments> </book> <book ISBN="11-000000-003"> <title>Cooking on a Budget</title> <price>23.95</price> <comments> <userComment rating="4">Delicious!</userComment> </comments> </book> </genre> </bookstore>
After creating the file, you can place a new TreeView control on your page. Now choose the Connect To DataSource command in the Task List. Select the books.xml file as the new XmlDataSource. If desired, you can apply one of the built-in format templates I explained previously. Then hit F5 and see what's happening in your browser window.
Figure 3-19 shows the result, which looks pretty professional, but I guess you may have expected the data in a different shape.
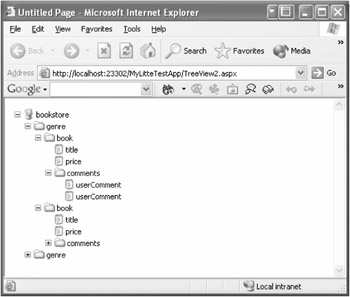
Figure 3-19: Looks like the Explorer, but what about the actual data?
To achieve the right visualization (see Figure 3-20), you'll have to tell the control how it should look. Use the Edit Bindings dialog box for this purpose. The structure of the XML file is already given.
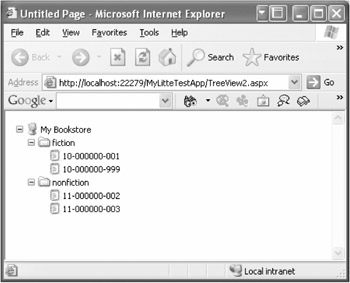
Figure 3-20: Oh, that's really better, I think.
-
Select the option Auto-Generate Bindings.
-
Add an empty binding and set the Text property to My Bookstore.
-
Select genre, add it, and set its TextField property to name.
-
Repeat this for book and set the TextField property to isbn here.
-
Run the example by pressing F5.
You can find the generated HTML source code in Listing 3-7. As you see, there is no programming code at all—again a zero-code scenario.
Listing 3-7: Displaying Trees Without Any Coding
<%@ page language="VB" %> <html> <head runat="server"> <title>Untitled Page</title> </head> <body> <form runat="server"> <asp:treeview runat="server" datasource imageset="XP_Explorer" autogeneratebindings="False"> <bindings> <asp:treenodebinding value="My Bookstore" depth="0" text="My Bookstore"> </asp:treenodebinding> <asp:treenodebinding datamember="genre" textfield="name" depth="1"> </asp:treenodebinding> <asp:treenodebinding datamember="book" textfield="isbn" depth="2"> </asp:treenodebinding> </bindings> </asp:treeview> <asp:xmldatasource runat="server" datafile="Books.xml"> </asp:xmldatasource> </form> </body> </html>
And of course, the XmlDataSource control offers many more features than you've seen so far. For example, you have the option to assign a schema file (XSD file), a transformation file (XSL file) or an XPath expression to the corresponding properties. If the XML file is displayed without transformation, you even have write access. Caching also belongs to the functions set.
Using Client-Side Population—You'll Love It!
I'm sure that you know MSDN Online. The navigation of this web site is based on a tree. Because the tree has a lot of subentries, the subtrees are loaded on demand without causing a postback for the whole page. This feature is called client-side population and is being offered by the new ASP.NET TreeView control. Another nice example of this is the visualization of the structure of the local file system on the server. Come on, I'll show you how it works:
-
Create a new page and place a TreeView control on it.
-
Use the Auto Format command in the Task List to select the standard formatting template XP File Explorer.
-
Open the Edit Nodes dialog box and create a new root node. Call it Drive C:\. Set the Value property to c:\. Now set the SelectAction property to SelectExpand and enable PopulateOnDemand.
-
Create a method to handle the TreeNodePopulate event and append the following source code to it:
void TreeView1_TreeNodePopulate(object sender, System.Web.UI.WebControls.TreeNodeEventArgs e) { if (e.Node.ChildNodes.Count == 0) { this.LoadChildNodes(e.Node); } } private void LoadChildNodes(TreeNode node) { DirectoryInfo directory; if (node.ValuePath.Length == 0) { directory = new DirectoryInfo(node.Value); } else { directory = new DirectoryInfo(node.ValuePath); } foreach(DirectoryInfo subDirectory in directory.GetDirectories()) { TreeNode subNode = new TreeNode(subDirectory.Name); subNode.PopulateOnDemand = true; subNode.SelectAction = TreeNodeSelectAction.SelectExpand; node.ChildNodes.Add(subNode); } }
That's it! Use F5 to run the page and experience the directory explorer in action. Every time you open a folder, the contained subfolders are loaded, as shown in Figure 3-21.
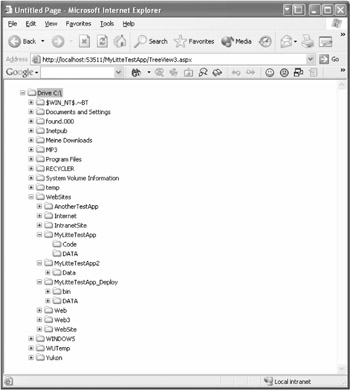
Figure 3-21: Nested directories are populated dynamically if you click the parent.
Actually this isn't a zero-code scenario, but it's just a tiny and understandable piece of code that is needed for this example. Within the TreeNodePopulate event the current node is checked as to whether it already contains subnodes. If not, those are loaded using the LoadChildNodes method.
This method queries the value of the selected node or, if available, of the ValuePath property. The latter returns a list of all values from the current node up to the root. In this case, the result is the current path. By using the DirectoryInfo class in the System.IO namespace, you can read the subfolders and pass them as subnodes to the TreeView control.
You'll better understand this example by using the debugger; just place a breakpoint in the LoadChildNodes method.
| Note | The dynamical loading of the TreeView control is based on the new Client Callback feature, which I'll explain later in the book. It's supported by Internet Explorer version 5.0 (or higher) and Netscape version 6.0 (or higher) and uses XmlHttp. |
EAN: 2147483647
Pages: 133