Introducing the New DetailsView Control
With the DetailsView control, the ASP.NET team introduces another data-bound control to developers. And this one comes with a lot of built-in features to display and edit data, too. In contrast to GridView, DetailsView is designed to show only one data record at a time. Usually this will be a vertical list of all available fields.
Displaying, Editing, and Deleting Records
To prepare the DetailsView for use isn't a big deal. Take the previous examples and replace the GridView control with a DetailsView control and that's it. Thanks to paging, you can find and select the data record you want as shown in Figure 3-12, and then edit or even delete it.
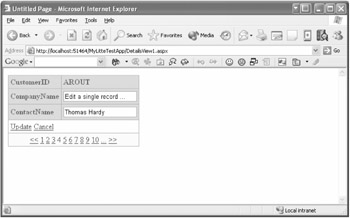
Figure 3-12: The DetailsView control displays a single record at once.
Most of the auto-generated source code is easy to understand (see Listing 3-3). For your convenience, I have removed all style formatting.
Listing 3-3: Displaying Data with the DetailsView Control
<%@ page language="VB" %> <html> <head runat="server"> <title>Untitled Page</title> </head> <body> <form runat="server"> <asp:detailsview runat="server" allowpaging="True" datasource datakeynames="CustomerID"> <rowfields> <asp:commandfield showdeletebutton="True" showinsertbutton="True" showeditbutton="True"> </asp:commandfield> </rowfields> </asp:detailsview> <asp:sqldatasource runat="server" connectionstring="..." providername="System.Data.OleDb" selectcommand="SELECT CustomerID, CompanyName, ContactName FROM dbo.[Customers]" updatecommand="UPDATE Customers SET CompanyName = ?, ContactName = ? WHERE (Customers.CustomerID = ?)"> deletecommand="DELETE FROM Customers WHERE (Customers.CustomerID = ?)" insertcommand="INSERT INTO Customers(CustomerID, CompanyName, ContactName) VALUES (?, ?, ?)" </asp:sqldatasource> </form> </body> </html>
In this case, the fields to display are auto-generated because the AutoGenerateRows property is enabled by default. It's also possible to define these fields manually, thereby enabling you to specify which ones the user is allowed to edit and which ones the user can't change. The Edit Fields dialog box, shown in Figure 3-13, is all you need to make this type of modification. This dialog box provides the same field types as GridView.
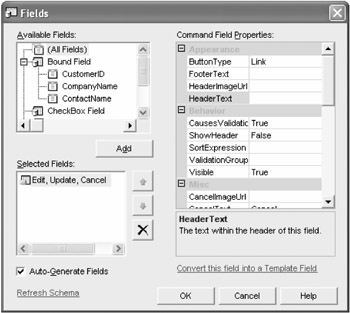
Figure 3-13: You can define what users should see and what they shouldn't.
Inserting New Records
A characteristic of the DetailsView control is the possibility to create a new data record and store it in the assigned data source. The example that you've seen previously already offers this feature. Click the New button, enter the required values, and confirm by clicking the Insert link button—the new record will be inserted as shown in Figure 3-14.

Figure 3-14: The DetailsView control supports insertion of new records.
And again, the SqlDataSource control provides an appropriate query to which the parameters of the new record have to be passed in the order of the input fields:
<asp:sqldatasource runat="server" ... insertcommand="INSERT INTO Customers(CustomerID, CompanyName, ContactName) VALUES (?, ?, ?)" </asp:sqldatasource>
If the database itself takes care of the ID—which will often be the case—that particular field can be deactivated so you can edit the user data.
<asp:detailsview runat="server" allowpaging="True" datasource datakeynames="CustomerID" gridlines="Both" autogeneraterows="False"> <rowfields> <asp:boundfield insertvisible="False" sortexpression="CustomerID" datafield="CustomerID" headertext="CustomerID"> </asp:boundfield> <asp:boundfield sortexpression="CompanyName" datafield="CompanyName" headertext="CompanyName"> </asp:boundfield> <asp:boundfield sortexpression="ContactName" datafield="ContactName" headertext="ContactName"> </asp:boundfield> <asp:commandfield showdeletebutton="True" showinsertbutton="True" showeditbutton="True"> </asp:commandfield> </rowfields> </asp:detailsview>
Working with Templates—Yes, You Can!
The DetailsView control offers two possibilities for using templates. The first is to include one or more elements of type TemplateField analogous to those in the GridView control. The alternative is to use a template to freely design the whole display range. This approach is almost equivalent to the familiar Repeater and DataList controls.
The following template types are provided by the control. These can be modified visually by using the new design-time support of VS .NET:
-
ItemTemplate
-
AlternatingItemTemplate
-
EditItemTemplate
-
InsertItemTemplate
-
HeaderTemplate
-
NullTemplate
-
PagerTemplate
What I really like is the fact that the templates and the fields, which are automatically generated, can be used together. For instance, the control in Listing 3-4 provides an individually designed view of the data, whereas edit mode is completely generated by the control itself, as you can see in Figure 3-15.
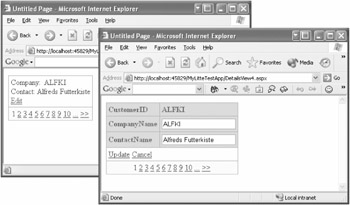
Figure 3-15: You even can mix a custom template with auto-generated fields.
Listing 3-4: Defining an ItemTemplate
<asp:detailsview runat="server" ...> <itemtemplate> Company: <asp:label runat="server" text='<%# Eval("CompanyName") %>'></asp:label> <br /> Contact: <asp:label runat="server" text='<%# Eval("ContactName") %>'></asp:label> <br /> <asp:linkbutton runat="server" commandname="Edit">Edit</asp:linkbutton> </itemtemplate> ... </asp:detailsview>
Combining GridView and DetailsView
Both of the new Data Controls, GridView and the DetailsView, complement one another very well. So it's a great idea to use them together. In Chapter 2, I presented an appropriate example. By now you surely can imagine what is under the hood:
-
One GridView control
-
One DetailsView control
-
Two SqlDataSource controls
-
And a little bit of source code (hey, it's the first time!)
The GridView control is responsible for the visualization of the Customers table. The currently selected item is also displayed in the DetailsView control below the GridView control. Within the DetailsView control, the data record can be modified or deleted. And it allows you to create new customers, of course.
The connection between the two controls is defined by the SqlDataSource parameters, which I've explained before. Editing, deleting, and inserting new data records is realized by known mechanisms, as you can see in Listing 3-5.
Listing 3-5: GridView and DetailsView Working Hand in Hand
<%@ page language="C#" %> <html> <head runat="server"> <title>Untitled Page</title> </head> <body> <form runat="server"> <asp:gridview runat="server" allowpaging="True" datasource allowsorting="True" autogeneratecolumns="False" datakeynames="CustomerID"> <columnfields> <asp:boundfield sortexpression="CustomerID" datafield="CustomerID" readonly="True" headertext="CustomerID"> </asp:boundfield> <asp:boundfield sortexpression="CompanyName" datafield="CompanyName" headertext="CompanyName"> </asp:boundfield> <asp:boundfield sortexpression="ContactName" datafield="ContactName" headertext="ContactName"> </asp:boundfield> <asp:commandfield showselectbutton="True"> </asp:commandfield> </columnfields> </asp:gridview> <asp:sqldatasource runat="server" ... </asp:sqldatasource> <asp:sqldatasource runat="server" ... <selectparameters> <asp:controlparameter propertyname="SelectedValue" control> </asp:controlparameter> </selectparameters> </asp:sqldatasource> <asp:detailsview runat="server" datasource autogeneraterows="False" datakeynames="CustomerID"> <rowfields> <asp:boundfield sortexpression="CustomerID" datafield="CustomerID" readonly="True" headertext="CustomerID"> </asp:boundfield> <asp:boundfield sortexpression="CompanyName" datafield="CompanyName" headertext="CompanyName"> </asp:boundfield> <asp:boundfield sortexpression="ContactName" datafield="ContactName" headertext="ContactName"> </asp:boundfield> <asp:commandfield showdeletebutton="True" showinsertbutton="True" showeditbutton="True"> </asp:commandfield> </rowfields> </asp:detailsview> </form> </body> </html>
To get this example running, a little piece of source code is necessary (my apologies for that). After modifying the data pool in the DetailsView control, you have to inform GridView to reload the data. Calling the DataBind() method in the ItemInserted, ItemUpdated, and ItemDeleted event is all you have to do. Within the Page_Load event you may want to use the new anonymous methods of C# for that. Figure 3-16 shows the sample in the browser window.
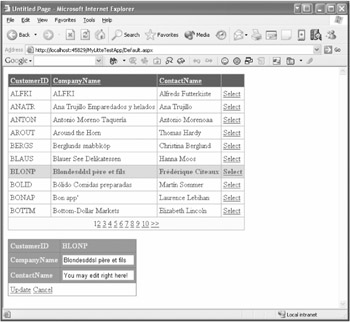
Figure 3-16: Edit and update the selected record or add a new one.
void Page_Load(object sender, System.EventArgs e) { DetailsViewStatusEventHandler handler = delegate { this.GridView1.DataBind(); }; this.DetailsView1.ItemInserted += handler; this.DetailsView1.ItemUpdated += handler; this.DetailsView1.ItemDeleted += handler; } EAN: 2147483647
Pages: 133