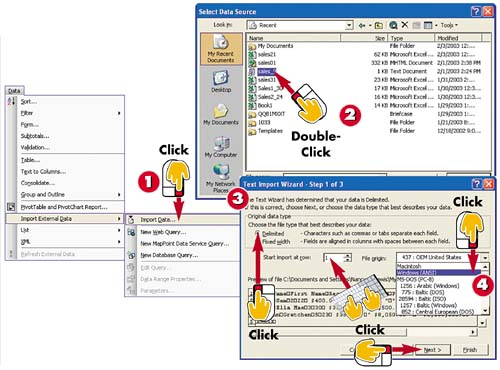
Open the Data menu and select Import External Data, Import Data to open the Select Data Source dialog box.
Locate and double-click the text file you want to import; Office launches the Text Import Wizard.
Click the Delimited option button (it describes the data in the file you are importing), and type 1 in Start Import at Row 1 spin box (to import the entire file).
Click the down arrow next to the File Origin field and select Windows (ANSI) (the file originated on a Windows operating system platform). Then, click Next.
INTRODUCTION
Another way to transfer data from one application to another is to import it. For example, you could import data from a Word document into an Excel spreadsheet; before you do, however, that Word data must be in a form that Excel can accept (namely, in a tab-delimited text file). In this task, you use the file you exported from Excel to Word in the preceding task to learn how to import data.
TIP
Delimiters and Qualifiers
Delimiters are the items that separate one field of data from the next; they can be tabs, semicolons, commas, spaces, or other types. Qualifiers are the items that qualify data as text; they can be double, single, or no quotes.
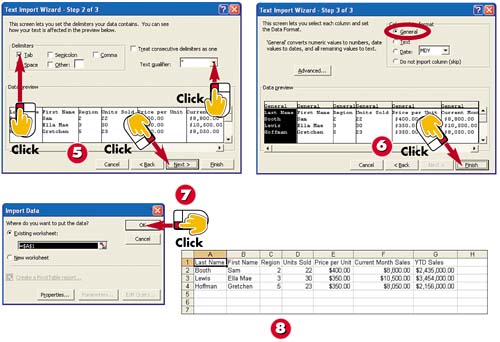
Under Delimiters, mark the Tab check box. Then, click the Text Qualifier field and select ". Preview the file in the Data Preview area; click Next.
Depending on your data type, select General (chosen here), Text, Date, or Do Not Import Column (Skip) in the Column Data Format area and click Finish.
Click the OK button in the Import Data dialog box to place the data in the existing worksheet beginning with cell A1.
The data is inserted.
TIP
Alternative File Locations
If necessary, click the down arrow next to the Look In field in the Select Data Source dialog box and select the folder that contains the file from the list that appears. To move up a folder level, click the Up One Level button on the toolbar. If you double-click a subfolder, its contents appear in the list of files and folders.
TIP
External Data Toolbar
The External Data toolbar opens automatically when you import data in this fashion. You can use the buttons on the toolbar or close the toolbar and work with the new data in your worksheet.