Enhancing Appearances with Live Effects
| Illustrator has two entire menus dedicated to manipulating art and applying cool effects (like 3D and warp distortions): the Filter menu and the Effect menu. The Effect menu differs from the Filter menu in several ways (see the sidebar "Featured Match-Up: Filters vs. Effects"), but one of the most important is how effects are used in concert with the Appearance palette. Illustrator refers to effects as Live Effects. There are several reasons for this. First of alland most importantlyany effect that you apply from the Effect menu is added as an attribute in the Appearance palette. Secondly, all effects can be edited at any time, even after the file has been closed and reopened at another date. Finally, when an object's path is edited, any effects that are applied to that object are updated as well. Because these effects are non-destructive, they are considered as "live" and are always editable. The way that Illustrator accomplishes this live behavior is by keeping the underlying vector object intact, while changing just the appearance of the object by adding the effect. Think of those 3D glasses that you get at a movie theater. Without the glasses, the movie appears like any other, but once you don the glasses, the movie appears to be 3D. You can think of the Appearance palette as a pair of 3D glasses in this senseonce you add an effect, the object changes in appearance, but the original untouched vector paths remain beneath the hood (Figure 3.11). Figure 3.11. After a Warp effect has been applied, a vector shape appears distorted (left). When viewed in Outline mode, you can see the underlying vector shape still exists, unscathed (right). You can choose from many different Live Effects in Illustrator, including those that are vector-based (like Scribble) as well as those that are raster-based (like Gaussian Blur). For the purposes of understanding how these effects work and how they interact with the Appearance palette, we'll discuss what is arguably the most commonly used live effectDrop Shadowin this chapter. The remainder of the Live Effects are covered in Chapter 7, 3D and Other Live Effects.
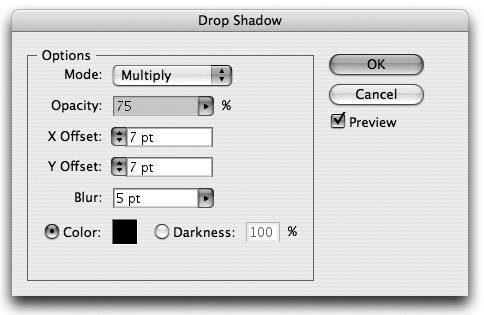
Applying a Live EffectApplying a Live Effect is easy. To apply a soft drop shadow, select an object and choose Effect > Stylize > Drop Shadow. The Drop Shadow dialog appears, where you can specify the exact settings for your drop shadow including blend mode, opacity, offset (the distance between the object and its shadow), and the blur amount, which is the softness of the shadow. Additionally, you can choose a color or darkness value for your drop shadow (Figure 3.12, next page). Figure 3.12. The Drop Shadow live effect gives you the ability to control all of the specifics to create a soft drop shadow. Note that the dialog has a Preview option, which, when checked, allows you to see your shadow update as you make changes to the settings. This is a useful feature and you'll find that nearly all Live Effects have a Preview option (yet another difference between filters and effects). Once you're happy with the appearance of your drop shadow, click OK to apply it.
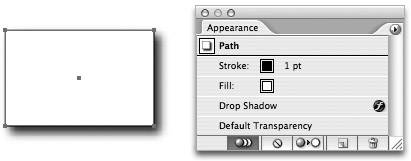
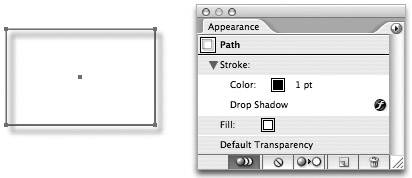
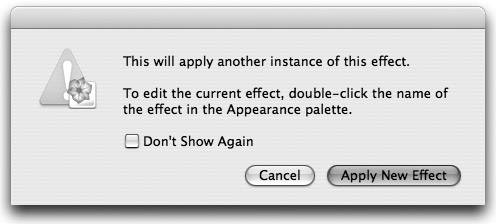
Now, let's take a look at the Appearance palette. Note that the path is listed as the target and then examine the attributes in the object itself. Reading from the bottom up (the order in which the attributes are drawn), you have default transparency, the drop shadow effect that you've just applied, the fill, and then finally, the stroke of the object (Figure 3.13). The drop shadow appears beneath the fill and the stroke of the object because it wouldn't be much of a drop shadow if it were painted above the fill and stroke, would it? Figure 3.13. Live Effects, once they are applied, appear listed in the Appearance palette. The truth is, you can use the Appearance palette to control exactly how and where your drop shadowand any live effectis painted. Using the method we discussed earlier to apply opacity settings to fills and strokes independently, you can click the Fill or Stroke attribute in the Appearance palette and then add the drop shadow. In this way, you can add a live effect to just the fill or just the stroke of an object (Figure 3.14). If your object contains multiple fills or strokes, you can apply Live Effects to each of them individually. Once you've already applied a live effect, you can drag it within the Appearance palette to change its place in the painting order and to have it applied to a specific Fill or Stroke attribute. Figure 3.14. Live Effects can be applied to fills or strokes of objects individually. Here, the drop shadow is applied just to the stroke of an object. Editing a Live EffectOne of the important benefits of Live Effects is that you can edit them at any time. Double-clicking an effect that is listed in the Appearance palette opens the dialog for that effect, where you can view the current settings and change them at will. Many people make the mistake of going to the Effect menu to edit an effect. For example, if an object has a drop shadow applied to it, some might select the object and choose Effect > Stylize > Drop Shadow in order to change the settings of the effect. Doing so actually adds a second drop shadow effect to the selected object (Figure 3.15). Illustrator allows you to apply an effect to an object as many times as you'd like, and in Chapter 7 we will explore when that might be beneficial. The important thing to remember is that when you want to add a new effect to an object, you choose it from the Effect menu. To edit an effect that already exists, you double-click it in the Appearance palette. Figure 3.15. If you try to edit an existing effect by choosing it from the Effect menu, Illustrator informs you that you must edit existing effects though the Appearance palette. To duplicate an effect that you've applied, highlight it in the Appearance palette and click the Duplicate icon in the palette. You can also drag effects to the Duplicate icon. To delete an effect from an object, highlight it in the Appearance palette and click the trash icon in the palette. You can drag effects directly to the trash icon as well. |

EAN: 2147483647
Pages: 147