Understanding Appearances
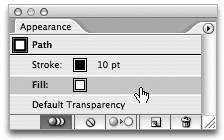
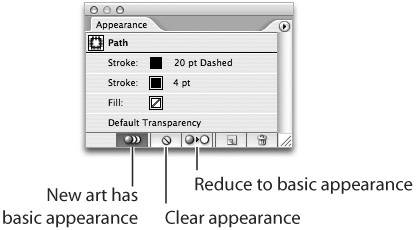
| As we discussed in the previous chapter, a vector path can have certain attributes applied, which can define the appearance of that path. When you print a file, you aren't seeing the vector path, you're seeing the appearance that was specified for that path. An example of an attribute might be a particular fill or stroke setting. As we'll learn later in this chapter, attributes can also be effects like drop shadows or 3D effects. Smart TargetingThe target is simply the chosen entity to which attributes are applied. For the most part, targeting happens by itself. Illustrator employs a feature called Smart Targeting, which anticipates your actions and targets everything automatically. Although it may sound scary to know that Illustrator is trying to stay one step ahead of you, Illustrator actually does a great job of targeting for you. When you select a path, that path is automatically targeted. When you select a group, Illustrator assumes you want any attributes that you apply to be applied at the group level, rather than at the object level, and so Illustrator targets the group. See the Featured Match-Up sidebar "Selecting vs. Targeting" on the next page for more on targeting. Of course, it's possible to manually target things on your own, and we'll discuss how to do that when we talk about layers, later in this chapter. The Appearance PaletteWhen you specify attributes, they appear listed in the Appearance palette. We know this sounds like an advertisement for a movie, but if you keep only one Illustrator palette open on your screen while you're working, make it the Appearance palette. In fact, the Appearance palette is probably the most important palette in Illustratorever. Like X-ray vision, the Appearance palette enables you to look at the underlying objects in your file and see how they were built or created. This palette also gives you access to every attribute of an object. But before we get ahead of ourselves, let's start with the basics. Basic AppearancesDraw a rectangle with the default white fill and a 10-point black stroke and take a look at the Appearance palette. When the rectangle is selected, the Appearance palette displays a thumbnail icon and the word "Path," which is the targeted item. (When we discuss Groups later in the chapter, we'll discuss what the target is.) The palette also lists the target's stroke (with the weight beside it), the fill, and the transparency (Figure 3.2). The order in which the listed items appear is important, because they define the final appearance of the object.
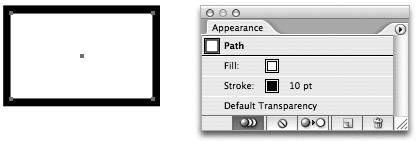
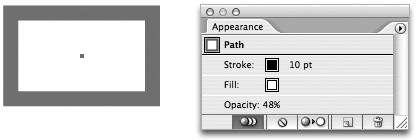
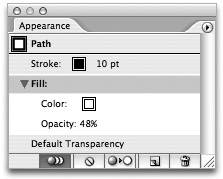
Figure 3.2. The Appearance palette displays the attributes for the targeted item.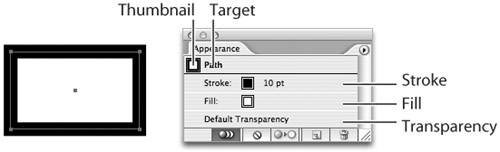 Let's expand on what you learned in the previous chapter about fills and strokes. By default, a fill is painted first; the stroke is then painted on top of the fill. This is why you can see the entire weight of a stroke that is painted on the centerline of a path. However, you can click the Stroke attribute that is listed in the Appearance palette and drag it so that it appears listed beneath the Fill attribute (Figure 3.3). This ability to change the stacking order of attributes in an object's painting order becomes even more important when we talk about groups and layers later in the chapter. Figure 3.3. The Appearance palette gives you the ability to change the stacking order of attributes. Here, the stroke attribute appears beneath the path's fill. You can also use the Appearance palette to target individual attributes by simply clicking them to highlight them. For example, when you click an object to select it, you can apply an opacity setting to that object via the Transparency palette. This opacity setting is applied to both the Fill and the Stroke attribute of the selected object (Figure 3.4). However, if you first target the fill by clicking it in the Appearance palette (Figure 3.5) and then changing the opacity setting, you'll notice that the setting is applied to the fill only and not to the stroke. This is indicated in the Appearance palette by a disclosure triangle just to the left of the Fill entry: The Opacity setting appears indented immediately underneath the fill's Color setting (Figure 3.6). Figure 3.4. The Appearance palette displays the object's transparency setting. Here, an Opacity value of 48 percent is applied to the entire object. Figure 3.5. Clicking the Fill or Stroke setting in the Appearance palette targets the attribute, allowing it to be adjusted independently of other attributes in the object. Figure 3.6. When a setting is applied to an attribute individually, it appears indented beneath the attribute. Complex AppearancesObjects that have a Fill and a Stroke attribute are referred to as having a basic appearance. However, vector objects aren't limited to just one fill and one stroke and can contain multiple attributes. An object with more than just one fill or stroke is referred to as having a complex appearance.
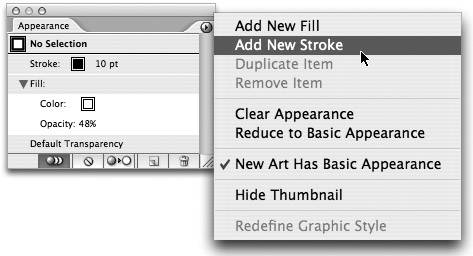
To add an attribute to an object, choose Add New Fill or Add New Stroke from the Appearance palette menu (Figure 3.7). You'll see the new attribute appear in the Appearance palette, where you can change its place in the stacking order. Alternatively, you can drag a Fill or a Stroke attribute to the duplicate icon at the bottom of the Appearance palette. Dragging an attribute to the trash icon removes the attribute from the object. Figure 3.7. Choosing to add a new stroke from the Appearance palette menu. There's no limit to how many fills or strokes you can add to a single object.
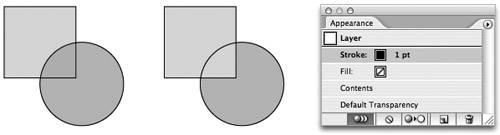
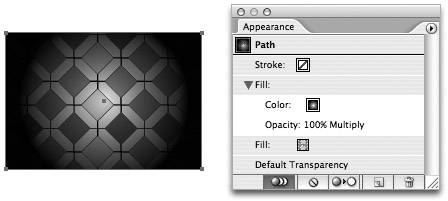
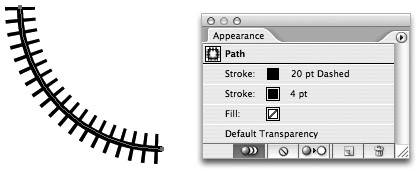
You may be wondering what good two fills or two strokes do in an object, because one always covers the one beneath it. Earlier, we discussed the ability to target a specific attribute so that you can apply settings to each individually. By first targeting the lower fill and specifying one color and then targeting the second fill, choosing a different color, and setting that fill to overprint, or by giving it an opacity setting or a blend mode, you've combined two inks in a single object (Figure 3.8, next page). Adding multiple strokes, each with different widths, colors, and dash patterns, can result in useful borders or even stitch lines (Figure 3.9). There are numerous reasons for adding multiple attributes, and there's no limit to how many fills or strokes you can add to an object. Another benefit of numerous fills and strokes is that you can create a complex appearance yet edit just a single path. We'll discuss more ways in which this feature can be useful when we talk about Live Effects, later in this chapter. Figure 3.8. Combining two fills in a single object allows you to create interesting effects. Here, a pattern fill and a gradient fill are combined using a transparency blend mode. Figure 3.9. Combining two strokes in a single path gives you the ability to create complex strokes and still edit a single path. The Appearance palette also gives you control over the behavior of appearances. At the bottom of the palette are several buttons (Figure 3.10):
Figure 3.10. The Appearance palette contains several functions to control the appearances of objects. Expanding AppearancesYou'll notice that you can't select a specific attribute of an object from the artboardthe only place to access this functionality is via the Appearance palette. This makes the Appearance palette infinitely important, but it may make you wonder how an object with a complex appearance will print. After all, how does the printer or export format know to draw these multiple attributes on a single path? The answer is that Illustrator breaks these complex appearances down into multiple overlapping pathseach path contains a basic appearance. This process, called expanding, doesn't happen on your artboardit happens in the print stream or the export stream. There are times when you may want to manually expand your appearances to access the multiple attributes on the artboard. To do so, choose Object > Expand Appearance. Remember that once you've expanded an appearance, you are dealing with a group of multiple objects, not a single object anymore. Each of those individual objects has a basic appearance, and unless you've created a graphic style (covered later in this chapter), you have no way to return to the original complex appearance.
|
EAN: 2147483647
Pages: 147