Using Windows 2000 Backup
Many Windows 2000 backup products are Exchange-aware, allowing you to perform online backups. The standard Windows 2000 Backup utility included with Windows 2000 lets you perform only offline backups of Exchange Server. When you install Exchange 2000 Server, an enhanced version of Windows 2000 Backup is installed; this version supports online server backups. This section briefly explains how to use Windows 2000 Backup to perform an online backup of an Exchange server.
REAL WORLD Online and Offline BackupsAn online backup is performed while the Exchange services that are being backed up are still running. In contrast, an offline backup is performed while the related Exchange services are not running. The online method has the obvious advantage of allowing users to send and receive messages while the backup is being performed. Current databases and transactions are included in a full online backup. During an incremental or differential online backup, only transaction logs are backed up. The databases don't need to be backed up because all changes are recorded in the transaction logs. You may be wondering how an online backup can safely back up all transactions, especially since the core Exchange services are still online and users are still sending and receiving messages. Consider how transactions occurring during an online backup are handled. If a transaction occurs for an .EDB file that has not been backed up yet, it is processed just as it always is. However, if a transaction occurs for an .EDB file that has already been backed up, it is stored in a patch file (.PAT). The patch file is used only during an online backup/restore situation, and there is one patch file for each store that is actively being backed up. The names of the patch files follow the naming convention of their respective .EDB files. For example, if you created a mailbox store and named it PrivateStore1.EDB, the patch file would have the same name with a .PAT extension. When the online backup starts, the patch file is created in the same directory as the database. As the backup is taking place, entries are placed in the patch file as necessary. When the backup is complete, the .patch files are written to tape and then deleted from the Mdbdata directory. Since all stores within the same storage group maintain the same set of transaction logs, Exchange 2000 Server creates a temporary transaction log called E00tmp.log for the other active stores. Once the backup process is complete, the temporary log is renamed to match the log numbering scheme used by Exchange 2000 Server.
MORE INFO
For more information on performing offline backups, see Knowledge Base article Q237767. Although it is based on Exchange Server 5.5, the information is also relevant to Exchange 2000 Server.
Selecting Components to Back Up
You can find Windows 2000 Backup in the System Tools program group, assuming that it was included in the Windows 2000 installation. When the program starts, you can choose to run the Backup Wizard or to go right to the Backup tab and set up the backup yourself. This section describes how to use the Backup tab. If you choose to use the Backup Wizard, you will make all of the same selections described in this section—you'll just do so in a different fashion. The Backup tab is shown in Figure 24-3.
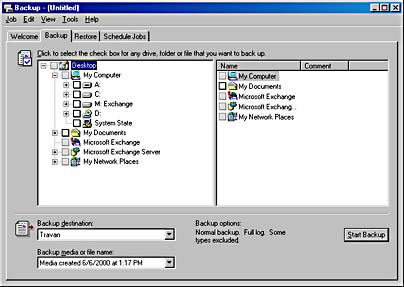
Figure 24-3. Backup tab in Windows Backup.
As you can see, the Backup tab shows a hierarchical directory of your entire system. You can back up anything on your server that you like, including Microsoft Exchange Server. To see the Exchange Server items, expand the Microsoft Exchange Server container, as shown in Figure 24-4. You can choose to back up as much or as little of your Exchange organization as you like. As the figure shows in the right-hand pane, you can back up a single database within a storage group, you can back up an entire storage group by selecting the check box next to the storage group in the left pane, or you can back up all of the stores residing on a given server by selecting the Microsoft Information Store check box under the server name in the left pane. You can even back up one database on one server and one on another, should you choose. This provides for a very flexible backup strategy.
Once you have selected all of the components you want to back up, you must specify the destination for the backup. Use the Backup Destination drop-down list to specify whether you want to back up to tape or file. Then, in the Backup Media Or Filename box, specify the tape drive or the drive and filename to which you want to back up. When you're satisfied with your choices, click Start Backup.
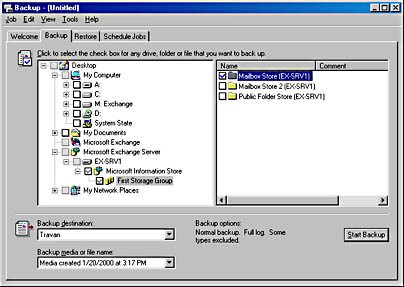
Figure 24-4. Selecting the Exchange components to back up.
Setting Backup Information
Once you've selected the components to back up and clicked the Start Backup button, the Backup Job Information dialog box opens (Figure 24-5). Here you need to supply the name of the backup set and indicate whether the backup you are creating should overwrite or append any backup files already existing on the medium.
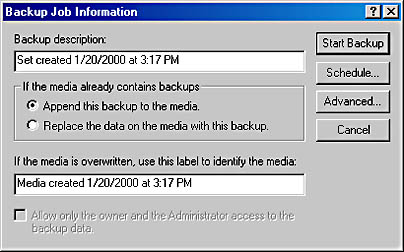
Figure 24-5. Specifying backup information.
If you want to perform something other than a normal backup, click the Advanced button to open the Advanced Backup Options dialog box (Figure 24-6). From the Backup Type drop-down list, you can choose to perform a normal, copy, incremental, differential, or daily backup. You can also use this dialog box to set additional options, such as verifying and compressing data. Click OK to return to the Backup Job Information dialog box. When you are ready to go, click Start Backup and the backup will begin. You are shown the backup progress and, when the backup is finished, a summary.
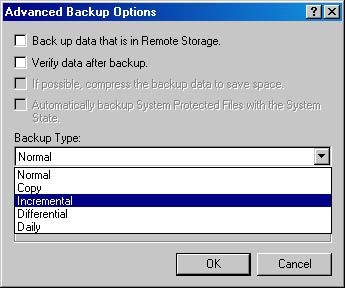
Figure 24-6. Setting advanced backup options.
MORE INFO
Obviously, you can do a lot more with the Windows 2000 Backup utility than is presented in this chapter. For more information on using the Windows 2000 Backup utility, refer to your system documentation.
REAL WORLD Automating BackupsRunning a backup routine manually can be tedious, especially when you have a large number of servers to back up on a regular basis. Fortunately, Windows 2000 Backup provides a way to schedule backup jobs. Click the Schedule Jobs tab of the Backup dialog box to select a date and create a new backup job. A Backup Wizard walks you through setting up the files you want to back up and any backup options and then lets you schedule a job to run once or at specified intervals.
There is also a command-line alternative to Windows NT Backup: Ntbackup.exe. This command supports several command-line switches that allow you to specify the components you want to back up and the backup settings you want to use. To use the Ntbackup command, you must have previously selected, from within the Backup utility, the items to be backed up and saved those selections into a .BKS file, better known as a selection script. You will need to reference this file on the Ntbackup.exe command line.
After you create a command that performs the desired backup, save it as a batch (.BAT) file, and run it when you need to perform the backup. You can also use the Windows 2000 command-line utility At, shown in Figure 24-7, to schedule the .BAT file to run at specific times. The At utility works in conjunction with the Scheduler service, so this service must be running in order for At to function. You can find more information on using Ntbackup.exe in your Windows 2000 product documentation.
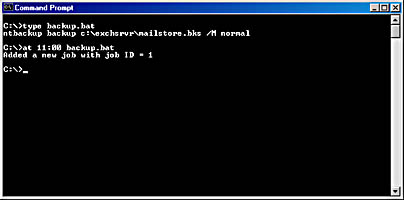
Figure 24-7. Using a .BAT file and the At command-line utility to schedule a backup job.
EAN: N/A
Pages: 193