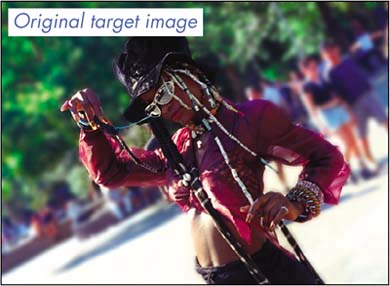
| Whether you're toning several images for a single layout or color correcting one image, Photoshop CS's Match Color command can make this process quick and painless. Using this command you can make broad adjustments to multiple images based on a source image's color makeup or adjust tonal values within an image by adjusting its luminance and color intensity. Let's take a closer look. Color correcting You can use the Match Color command to remove color casts and to adjust tonal values within an image. To see how it works: 1. | Open an RGB image in Photoshop that's in need of color correcting (this feature isn't available when working in CMYK mode). For our example, we'll color correct the image shown in Figure A. As you can see, the image has a red color cast to it that needs to be eliminated.
Figure A. 
| 2. | Choose Image  Adjustments Adjustments  Match Color to display the Match Color dialog box shown in Figure B. Match Color to display the Match Color dialog box shown in Figure B. 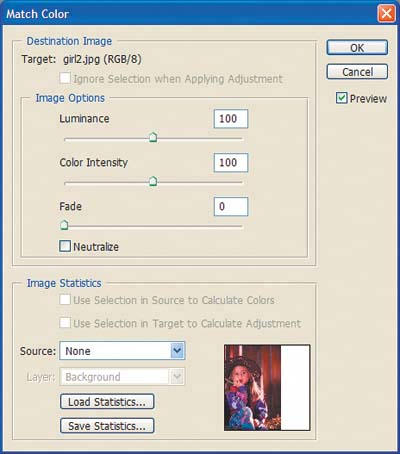
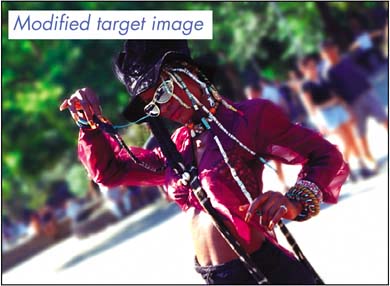
| 3. | Select the Neutralize check box to begin removing any unwanted color casts. Photoshop automatically balances out the over-abundant color with its counterpart. Figure C shows how our image went from red to more of a cyan hue. If your image is overly neutralized, you can tone it down a bit using the Fade slider. Just drag the slider to the right to lower the applied color.
Figure C. 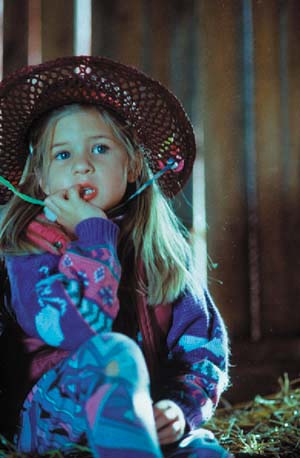
| 4. | Experiment with the Luminance and Color Intensity sliders to fine-tune the colors within your image. The Luminance slider increases and decreases the brightness of your image, while the Color Intensity slider increases and decreases the color range of your image.
| 5. | Click OK when you're happy with your results. Our color-corrected image is much more appealing than the original, as shown in Figure D.
Figure D. 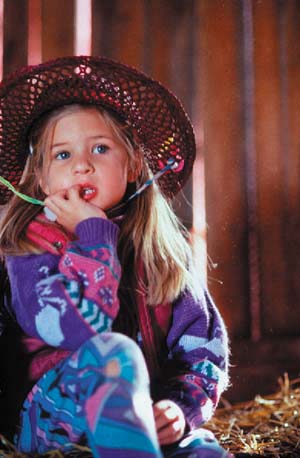
|
Color matching The Match Color command isn't just for color correcting; you can also use it to make the tonal values of multiple images consistent. This is great when you're fine-tuning a series of product shots or multiple images for one layout. When matching colors from one image to another, you first have to open a source image along with the image or images you want to adjust. Adjust an entire image 1. | Open two RGB images to work with.
| 2. | Select the image you want to adjust, otherwise known as the target image.
| 3. | Choose Image Adjustments Match Color.
| 4. | Select your source (your second image) from the Source dropdown list in the resulting dialog box, in the Image Statistics section, as shown in Figure E.
Figure E. 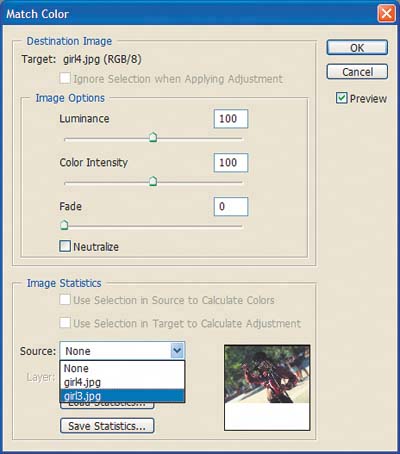
| 5. | Click OK. As you can see in Figure F on the next page, Photoshop then automatically adjusts the colors of your image based on the image you chose as the source.
Figure F. 
|
Depending on the images you select, you may not be satisfied with the final results. Because the command is making such a sweeping change, some areas of your image may become oversaturated. To have more control over the results, you can select specific areas within your image to change. Let's take a look at how to do so. Adjust selected areas within an image For controlled color manipulation, you can select areas within both your source image and the image you want to modify. To do so: 1. | Use the selection tool of your choice to make a feathered selection in the images you want to match. For example, we want to make the background colors of our images the same. It's important that you feather your selection in the target image for a gradual color adjustment. If you leave the selection with hard edges, the change will be very apparent and won't blend in with the unchanged portions. You can feather a selection by first creating your selection and then choosing Select Feather. Entering higher values in the Feather Radius produces a softer edge.
| 2. | Choose Image Adjustments Match Color. Choose the Source Image from the Source dropdown list in the resulting dialog box. Select both the Use Selection In Source To Calculate Colors and Use Selection In Target To Calculate Adjustment check boxes if they arent already selected.
| 3. | Click OK to apply the change. As you can see in Figure G, the final results are much better than when we adjusted the colors of the entire image.
Figure G. 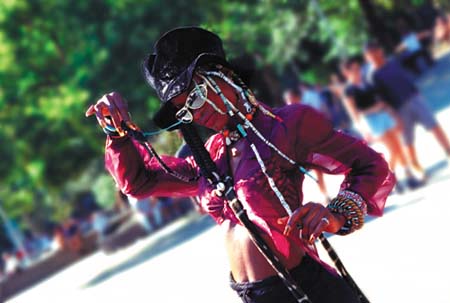
|
A matchmaker you can't live without The Match Color command is definitely an added bonus for Photoshop users. You can make quick color adjustments without a lot of fuss and it's easier than trying to make an action for color adjustments when you want multiple images to look consistent. With that said, take some time to get to know this useful command. |