| One of the most common tasks Photoshop users are asked to perform involves changing the color of a specific object or item in a photograph to a completely different color. For some reason, it's assumed that this process is quick and easy. In reality, though, the difficulty level can range from easy to complex, depending on what you have to modify. However, Photoshop's Color Replacement tool can aid in the color-replacement process. This tool is located on the Healing Brush tool's flyout menu in the Toolbox, as shown in Figure A. With it, you can paint over an image to replace one color with another color of your choosing more easily than ever before. Let's take a closer look at how this tool works.
Figure A. 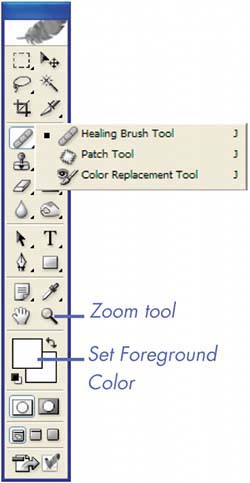
Know thy tool options Unlike Photoshop's alternative color replacement options, the Color Replacement tool provides you with a highly controllable way of modifying color in your images. Using this tool, you can paint over sampled pixels, altering them to specified values. Not only that, but you can also adjust the size and hardness of the brush for optimal results. Let's take a closer look at the options this tool offers. They're found on the tool options bar. Blending modes. When working with the Color Replacement tool, you can choose from four different modes: Hue, Saturation, Color, and Luminosity. This allows you to change the color entirely or make more subtle changes. Each mode works the same as the blending modes found in the Layers palette. Sampling. You can choose how the selected brush samples the target color from the Sampling dropdown list on the tool options bar. Your choices are Continuous, Once, and Background Swatch. Limits. Besides choosing how to sample a target color, you can also set limits. Your choices are Discontiguous, Contiguous, and Find Edges. Tolerance. You can adjust the tolerance of the Color Replacement tool. A lower tolerance allows you more control by limiting the number of pixels that are altered. A higher tolerance enables you to replace a broader range of colors at once.
Testing, testing To get a feel for the Color Replacement tool, let's go through a quick technique for changing eye color. This is also a great way to eliminate red eye and, in a way, we'll be doing that as well! To follow along: 1. | Open an image in RGB mode. (Although the Color Replacement tool doesn't work on images in Bitmap, Indexed Color, or Multichannel mode, it works wonders on images in RGB Color and CMYK Color modes.) Our original image is shown in Figure B.
Figure B. 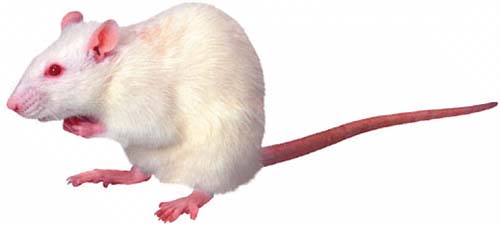
| 2. | Magnify the area you want to change, so you can see it clearly. To do so, click on the Zoom tool  in the Toolbox or press Z on your keyboard to select it, and then click and drag your mouse pointer over the subject's eye(s) to zoom in on the area. in the Toolbox or press Z on your keyboard to select it, and then click and drag your mouse pointer over the subject's eye(s) to zoom in on the area.
| 3. | Click on the Color Replacement tool  in the Toolbox or press J (if it's hidden, press [Shift]J as many times as it takes to cycle through the tools) to select it. When the Color Replacement tool is selected, its options appear in the tool options bar, as shown in Figure C. in the Toolbox or press J (if it's hidden, press [Shift]J as many times as it takes to cycle through the tools) to select it. When the Color Replacement tool is selected, its options appear in the tool options bar, as shown in Figure C.
Figure C. 
| 4. | Click on the Brush icon in the tool options bar and set your brush size so it's smaller than the area you want to edit. For example, we set our brush tip to 10 px (pixels) in diameter. We also set the Hardness value of our brush to 50% to create a mid-weight stroke. Set the remaining Brush options as shown in Figure D.
Figure D. 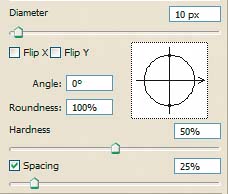
Note If you're using a graphics tablet, set the Size and Tolerance options accordingly. | 5. | Select Color from the Mode dropdown list, Once from the Sampling dropdown list, Discontiguous from the Limits dropdown list, and enter 30% in the Tolerance text box.
| 6. | Select the Anti-aliased check box to create a soft edge.
| 7. | Click on the Set Foreground Color swatch in the Toolbox to open the Color Picker dialog box, and specify a color for the eyes (or eye, in our case). We set our foreground color to black. If you're changing the eye color of a human, choose a shade of blue, green, or brown. Click OK.
| 8. | Click and drag your mouse pointer over the area you want to modify. Photoshop samples the color you first click on and replaces it with the foreground color you selected. Be careful not to let the crosshairs of your mouse pointer go past the actual eye area, as shown in Figure E. In our image, there's a lot of red around the eye that might be replaced if we paint over it.
Figure E. 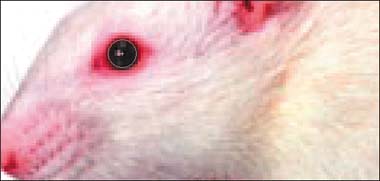
|
Let them see the whites 1. | Choose a small brush size, such as 1 pixel, and set the foreground color to white. We've managed to get most of the red out, but there's still a tad left in our whiskered friend's eye. This is because our tool settings tell Photoshop that this lighter shade of red isn't similar enough to be replaced. This is exactly what we want to happen. Now, we can replace this small selection of pinkish pixels with white, which makes the eye look more realistic.
| 2. | Click and drag your mouse pointer over the few pinkish-colored pixels to complete the successful transformation, as shown in Figure F.
Figure F. 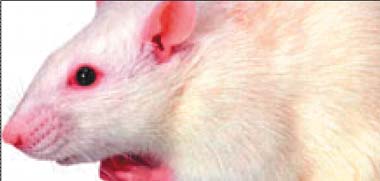
|
Did you color your hair? The Color Replacement tool is useful for more than just fixing red eye. You can also use it to replace large areas of color. For example, you can use the same technique that you used to change his eye color to whiten our little friend's yellowed hair. Simply change your brush size to 35 pixels and set your foreground color to a cold gray. Then, paint over the entire image. As shown in Figure G on the next page, this technique is a great way to remove a yellow cast from an image!
Figure G. 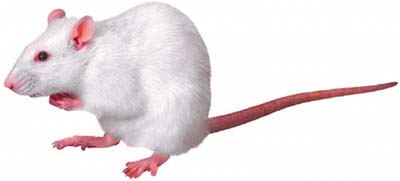
Remove color from the edges of dark objects Fringing occurs when image sensors are presented with the task of interpreting light against dark. A typical example is dark tree leaves against a bright sky, as shown in Figure H. In fact, in this case, you'll see both purple and green fringing. If the amount of color fringing is moderate, the Color Replacement tool is a good choice for quickly restoring realistic color to the area. For more extensive color replacement, you may find that the Replace Color feature (discussed later in this chapter) provides an even faster solution to the problem.
Figure H. 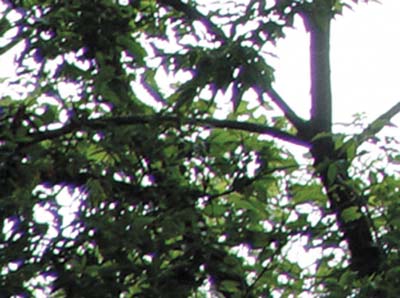
For our example, we used the Color Replacement tool to make corrections to a photo of trees that appear to have colored jelly hanging from their leaves. To use the Color Replacement tool to correct fringing: 1. | Open the file you wish to correct.
| 2. | Zoom in on the area of the image that needs to be fixed.
| 3. | Select the Color Replacement tool and then change the Sampling dropdown list to Continuous.
| 4. | Select a brush size that will cover just a few of the offending pixels at a time.
| 5. | Click and drag along an area where fringing is present and then [Alt]-click ([option]-click on the Mac) on a portion of the image to capture the color you'll use to replace the fringe color.
| 6. | Position the Color Replacement pointer over an area where fringing is present and begin to drag back and forth as you watch the purple pixels change color.
|
Eliminate subtle color shifts Chromatic aberration is caused by a processing error in the digital camera where one or more of the three color channels don't align properly. The result is a cyan, yellow, red, blue, or green edge. We've exaggerated that phenomenon in the sample shown on the left in Figure I, but the problem and the correction are essentially the same for a less obvious case of chromatic aberration.
Figure I. 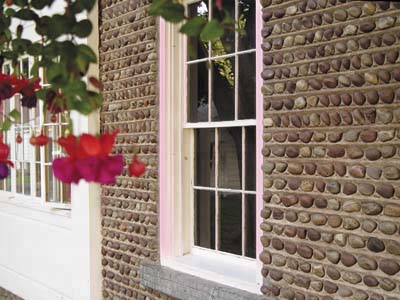

You'll see red bands on vertical surfaces of the white trim of the house. Resembling a glow, you might mistake them for reflections of surrounding surfaces or as the color spill of an evening sunset. In most cases, they're color aberrations that don't belong. To correct chromatic aberrations: 1. | Open the file you wish to correct.
| 2. | Select the Color Replacement tool and use the following settings: Mode=Color, Sampling=Once, Limits=Discontiguous, Tolerance=50%, and the Anti-alias check box selected.
| 3. | Sample the errant color with the Color Replacement tool and [Alt]-click ([option]-click on the Mac) on a similar surface that doesn't suffer from a color tint. In our example, we sampled red and then [Alt]-clicked ([option]-clicked on the Mac) on a horizontal portion of the white trim, as indicated on the right in Figure I.
| 4. | Select a brush size that's appropriate to the area you need to correct and gradually click and drag over the color to replace it. You'll see that, even if you brush over the boundary of the color tint, the Color Replacement tool leaves surrounding pixels untouched because they aren't the target color.
|
Fast and easy restoration Photoshop's Color Replacement tool is one that will get plenty of use. It's fast, easy to use, versatile, and reliably effective in taking care of digital camera defects that occur day in and day out. Once you become familiar with its controls and limitations, you'll find that the Color Replacement tool deserves a favored position in your box of retouching tricks. |