Adding More Mailbox Storage
A common way to improve the scalability of mailbox servers is to add additional storage groups and mailbox databases. While this might not improve overall server performance or a user's perceived response time, it allows you to break up the amount of data you are storing and place it across multiple smaller mailbox databases. In turn, this allows you to support larger mailboxes. Keep in mind as you increase the number of mailboxes that each Mailbox server supports, increasing the amount of RAM will help improve performance and reduce the disk I/O profile.
When creating additional mailbox databases, you should plan to place each storage group's transaction logs on separate disk spindles from the database files. This can help improve performance as well as recoverability.
In the following section, we will show you how first create a new storage group and then create a database in that storage group.
Managing Storage Groups
Creating a new storage group is a simple process in either the Exchange Management Console (EMC) or the Exchange Management Shell (EMS). Storage groups for each Mailbox server role are created and managed from within the EMC within the Mailbox subcontainer of the Server Configuration work center. Figure 6.5 shows the Mailbox subcontainer of the Server Configuration work center along with the Database Management work pane.
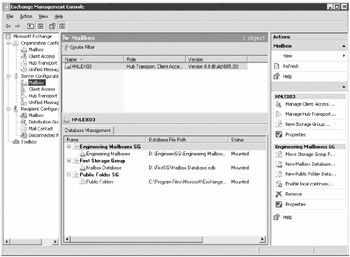
Figure 6.5: Managing storage groups and mailbox databases using the Exchange Management Console
All EMC-based storage group, mailbox database, and public folder database management is performed through the Database Management pane. However, the Database Management pane is shown below the Results pane only if you have selected the Mailbox subcontainer. The EMC Actions pane is the on the right side of the EMC interface and gives you access to the following storage group management tasks:
-
Creating a new storage group
-
Moving existing storage group files
-
Creating a database (mailbox or public folder) within the storage group
-
Enabling local continuous replication
You can also retrieve a list of storage groups using the Get-StorageGroup EMS cmdlet. Here is an example:
[PS] C:\>Get-StorageGroup Name Server Replicated Recovery ---- ------ ---------- -------- First Storage Group HNLEX03 None False Public Folder SG HNLEX03 None False Engineering Mailboxes SG HNLEX03 None False Executives SG HNLEX03 None False
We could have narrowed the scope of that query using the Where cmdlet so that only the storage groups from a specific server are listed. Here is an example that lists only the storage groups on server HNLEX03:
Get-StorageGroup | where {$_.Server -eq "HNLEX03"} To create a new storage group, chose the New Storage Group task from the Actions pane to run the New Storage Group Wizard. The wizard is quite simple and has only two pages; the New Storage Group page (shown in Figure 6.6) prompts for the name of the storage group, the path to the transaction log files, and the path to the system files.
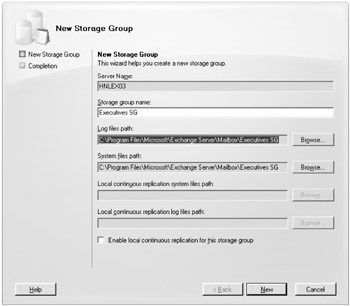
Figure 6.6: Creating a new storage group using the Exchange Management Console
You can also enable local continuous replication when you create the storage group, but we will come back and do that later. Notice also in Figure 6.6 that we are selecting the default location for the transaction logs and system files. We will come back and move them later.
When you click the New button on the New Storage Group Wizard, the task is executed and the new storage group is created; the EMS cmdlet that is executed is the New-StorageGroup cmdlet. The Completion page shows the EMS command that was executed to create this storage group:
New-StorageGroup -Server 'HNLEX03' -Name 'Executives SG' -LogFolderPath 'C:\Program Files\Microsoft\Exchange Server\Mailbox\Executives SG' -SystemFolderPath 'C:\Program Files\Microsoft\Exchange Server\Mailbox\Executives SG'
Now that the storage group is created, the first thing you should do is move the transaction log and system files to an alternate path. This can also be accomplished via the EMC or the EMS. In the EMC, you just need to select the storage group you want to move and then choose the Move Storage Group Path task from the Actions pane. The Introduction page of the Move Storage Group Path task is shown in Figure 6.7.
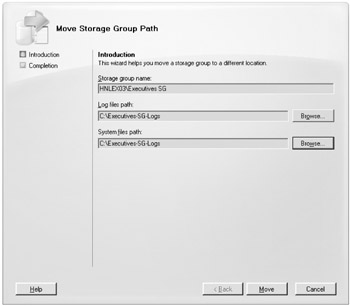
Figure 6.7: Moving a storage group's transaction logs and system files
The only information that is required to move the storage group is the new location of the log files path and/or the system files path. When you click the Move button, the task is executed. The EMS cmdlet Move-StorageGroupPath sets the storage group's path and moves the existing system and/or log files. The following command was executed:
move-StorageGroupPath -Identity 'HNLEX03\Executives SG' -LogFolderPath 'C:\Executives-SG-Logs' -SystemFolderPath 'C:\Executives-SG-Logs'
However, if no mailbox stores have been created and mounted in the storage group, then there will be no system or transaction log files. The wizard will actually tell you this if it does not find any files. Therefore, you would need to run a slightly modified version of the cmdlet since the files do not need to be moved. You would need to include the -ConfigurationOnly switch in the command line:
Move-StorageGroupPath 'HNLEX03\Executives SG' -LogFolderPath 'C:\Executives-SG-Logs' -SystemFolderPath 'C:\Executives-SG-Logs' -ConfigurationOnly -Confirm:$False
You can view the properties of the storage group by selecting it in the Database Management work pane and then selecting the Properties task on the Actions pane. In this case there are two Properties tasks on the Actions pane, so select the one in the storage group portion of the pane.
The storage group properties are shown in Figure 6.8. From here you can change the storage group's display name or enable circular logging. Circular logging tells the Exchange database engine not to keep more than a few of the previous transaction log files. Enabling circular logging will prevent up-to-the minute recoverability of databases from a restore since there will not be enough transaction logs available after the most recent backup.
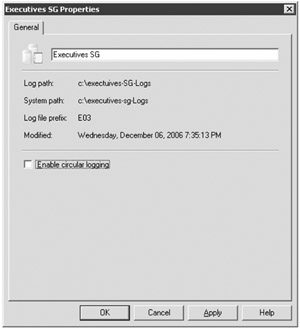
Figure 6.8: Viewing a storage group's properties
The storage group's properties also include the transaction log path, the system files path, the log file prefix, and the date on which the storage group was last modified. The log file prefix is used when creating log files for this storage group; this is a system-assigned value and cannot be changed. In the case of the storage group shown in Figure 6.8, the log file prefix is E03; a sample log filename would look like this: E03000011A0.log.
You can also retrieve the storage group's properties using the Get-StorageGroup cmdlet. The following example shows all of the properties of the Executives SG storage group:
[PS] C:\>Get-StorageGroup "Executives SG" | FL LogFolderPath : c:\executives-SG-Logs SystemFolderPath : c:\executives-sg-Logs CircularLoggingEnabled : False ZeroDatabasePages : False LogFilePrefix : E03 LogFileSize : 1024 RecoveryEnabled : True OnlineDefragEnabled : True IndexCheckingEnabled : True EventLogSourceID : MSExchangeIS LogCheckpointDepth : 20971520 CommitDefault : False DatabaseExtensionSize : 256 PageFragment : 8 PageTempDBMinimum : 0 Server : HNLEX03 ServerName : HNLEX03 CopyLogFolderPath : CopySystemFolderPath : Recovery : False Name : Executives SG Replicated : None HasLocalCopy : False MinAdminVersion : -2147453113 AdminDisplayName : ExchangeVersion : 0.1 (8.0.535.0) DistinguishedName : CN=Executives SG,CN=InformationStore,CN=HNLEX03,CN=Servers, CN=Exchange Administrative Group (FYDIBOHF23SPDLT), CN=Administrative Groups,CN=Volcano Surfboards, CN=Microsoft Exchange,CN=Services,CN=Configuration, DC=volcanosurfboards,DC=com Identity : HNLEX03\Executives SG Guid : ObjectCategory : volcanosurfboards.com/Configuration/ Schema/ms-Exch-Storage-Group ObjectClass : {top, container, msExchStorageGroup} WhenChanged : 12/6/2006 7:35:13 PM WhenCreated : 12/6/2006 7:13:46 PM OriginatingServer : HNLDC01.volcanosurfboards.com IsValid : True Many of these values can be changed by the Set-StorageGroup cmdlet. If you want to enable circular logging, you would type this command:
Set-StorageGroup "Executives SG" -CircularLoggingEnabled:$True
Managing Mailbox Databases
Now that we have created a storage group, we can create a new database in it. While both Exchange Server 2007 Standard Edition and Enterprise Edition allow up to five mailbox databases in a storage group, we are going to limit our examples to a single mailbox database per storage group. This is the Microsoft recommendation, and one mailbox database per storage group is also a requirement of local continuous replication.
You can view the current mailbox database for each server using the EMC, or you can use the Get-MailboxDatabase cmdlet to list all of the mailbox databases in the entire organization:
Get-MailboxDatabase Name Server StorageGroup Recovery ---- ------ ------------ -------- Mailbox Database HNLEX03 First Storage Group False Engineering Mailb... HNLEX03 Engineering Mailb... False Executives HNLEX03 Executives SG False
Of course, you can narrow the scope of this output to just a specific server or a specific storage group using the Where cmdlet. Here are two examples:
Get-MailboxDatabase | Where {$_.Server -eq "HNLEX03"} Get-MailboxDatabase | Where {$_.StorageGroupName -eq "Executives SG"} | Tip | When creating a new mailbox database, name the database something that is standardized and descriptive. Making sure the filename matches the display name of the database will ensure that it is easier to manage. |
To create a new mailbox database, highlight the storage group in which you want the mailbox database to be created and select the New Mailbox Database task from the Actions pane. This launches the New Mailbox Database Wizard that is shown in Figure 6.9. All that is required to create a new mailbox database is to provide the name; the path will automatically be completed and the database's EDB file will be put in the same path as the transaction logs.
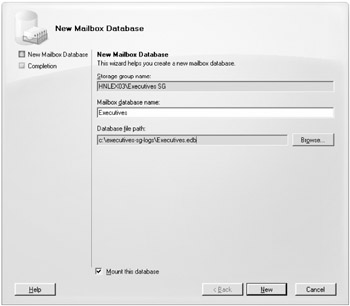
Figure 6.9: Creating a new mailbox database using the Exchange Management Console
Ideally, you should click the Browse button and select a correct location for the mailbox database now, but we will show you how to move the mailbox database here shortly.
| Note | Exchange 2000/2003 administrators may notice that the database has only an EDB file. Exchange 2007 does not have an STM file; each Exchange 2007 database consists of a single EDB file. |
The wizard will also mount the database once the wizard creates the configuration for the database. This will initialize a new empty database file. The resulting commands are as follows; the New-MailboxDatabase cmdlet is used in the command to create the database and the Mount-Database cmdlet is used in the command to mount the database:
New-MailboxDatabase -StorageGroup 'CN=Executives SG,CN=InformationStore,CN=HNLEX03,CN=Servers, CN=Exchange Administrative Group (FYDIBOHF23SPDLT), CN=Administrative Groups,CN=Volcano Surfboards, CN=Microsoft Exchange,CN=Services,CN=Configuration, DC=volcanosurfboards,DC=com' -Name 'Executives' -EdbFilePath 'c:\executives-sg-logs\Executives.edb' Mount-Database -Identity 'CN=Executives,CN=Executives SG,CN=InformationStore,CN=HNLEX03,CN=Servers, CN=Exchange Administrative Group (FYDIBOHF23SPDLT), CN=Administrative Groups,CN=Volcano Surfboards,CN=Microsoft Exchange,CN=Services,CN=Configuration,DC=volcanosurfboards,DC=com'
Notice that when the database was created, the distinguished name of the storage group was used. However, if the storage group and database names were unique, you could also specify these commands:
New-MailboxDatabase -StorageGroup 'Executives SG' -Name 'Executives' -EdbFilePath 'c:\executives-sg-logs\Executives.edb' Mount-Database 'Executives'
We created the database in the default path so we could illustrate the process of moving it. Using the EMC, we can move the database by choosing the Move Database Path task in the Actions pane. The only thing that needs to be provided in the Move Database Path Wizard is the new location of the database file.
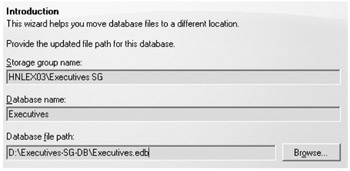
When you specify that you are about to move the database, you are warned that the database will be dismounted while the files are being copied and that it will be inaccessible.

The amount of time that it takes to move the database file will depend both on the size of the database file and the speed of the disk subsystem. Once the file is moved, the Completion page of the Move Database Path Wizard will show the EMS command that was used to move the database file. Here is an example:
Move-DatabasePath -Identity 'HNLEX03\Executives SG\Executives' -EdbFilePath 'D:\Executives-SG-DB\Executives.edb'
Now let's look at some of the properties of a mailbox database. Figure 6.10 shows the General property tab of the mailbox database property page. At the top is the display name of the mailbox database. From here, you can rename the database if you need to conform to a new database naming standard. The path to the database is shown, but you cannot change the path here; you must use the Move-MailboxDatabase cmdlet or the Move Database Path task. The database copy path is set when you configure local continuous replication.
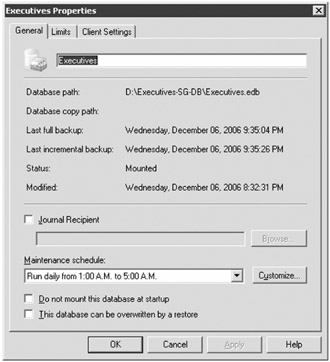
Figure 6.10: General property page of a mailbox database
There is a lot of dynamic information on the General property page of a mailbox database as well. This includes:
-
The last full backup indicates the last time a full or normal backup was run using an Exchange API-based backup solution. Transaction logs would have also been purged at that time.
-
The last incremental backup indicates the last time an incremental backup was run. This backup type will back up the storage group's transaction logs and then it purges them.
-
The status indicates if the database is mounted or dismounted.
-
The Modified field shows the date and time the database properties in Active Directory were last changed.
The Journal Recipient option allows you to specify a journaling recipient for all mailboxes located on this mailbox database. If this is enabled, a copy of any message or delivery receipt sent or received by a mailbox on this system will be sent to the journal mailbox.
The Maintenance Schedule drop-down list (or Customize button) allows you to specify when online maintenance is scheduled for this particular database. Online maintenance includes purging deleted items permanently from the mailbox database, purging deleted mailboxes permanently from the database, verifying that mailboxes on the database are all connected to an Active Directory account, cleaning up unused folder views, and rearranging white space. Online maintenance must complete periodically, otherwise the database will be come less and less efficient and the database file will continue to grow since the deleted items and mailboxes will never be completely purged.
The Do Not Mount This Database at Startup check box allows the administrator to prevent the database from being mounted after the information store service is restarted. This might be useful when the administrator wants to make the mailbox databases available one or two at a time rather than all at once.
The This Database Can Be Overwritten by a Restore check box is used when you must restore a database file from an offline backup. An offline backup occurs when the database file itself is backed up, such as making a file copy of the database file. This has no effect when restoring a database backup that was made from an online backup.
The next tab on a mailbox database property page is the Limits property page. We will look at different ways to establish limits on mailbox database in Chapter 9, "Imposing Limits and Why," but let's do a quick review here (see Figure 6.11).
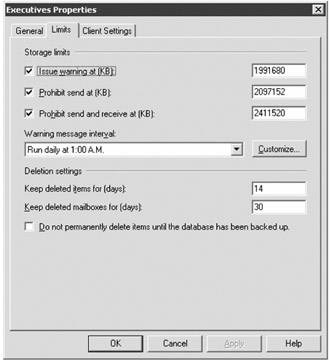
Figure 6.11: Setting limits on a mailbox database
The Storage Limits section allows you to specify the amount of storage that the mailbox is allowed to have. What you see in Figure 6.11 are the storage limit defaults; administrators of previous versions will be surprised to learn that newly created mailbox databases have defaults. Everyone will be surprised to see the actual default values:
-
Issue Warning at (KB) is set to 1,991,680KB. When a mailbox reaches this limit, the user will be sent an e-mail message that informs them that they have reached a limit on their mailbox and they should clean up some data in it.
-
Prohibit Send at (KB) is set to 2,097,152KB. Once the mailbox hits this limit, user will be unable to send new messages or reply to existing messages. Both Outlook and Outlook Web Access will inform the user if they try to send a message and they are over this limit.
-
Prohibit Send and Receive at (KB) is set to 2,411,520KB. When a mailbox exceeds this limit, the mailbox is closed or disabled. Even though the user can access the mailbox, the server will not allow the user to send new messages or reply to existing messages. In addition, the mailbox will not receive any incoming mail from other Exchange users or from outside of the organization.
Outlook Web Access has a neat new feature that will inform the user of how close they are to their limit or if they are over their limit. Simply move your mouse pointer over the top of the mailbox in the folder listing pane of Outlook Web Access and you will see a pop-up box similar to one of the ones shown here.
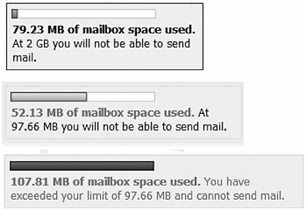
The limit that you see in this message is the Prohibit Send at (KB) limit, not the Prohibit Send and Receive at (KB) limit.
The Warning Message Interval drop-down list is the interval at which Exchange generates a warning message informing users that they are over their Issue Warning limit. By default, this is sent once daily at 1:00 a.m. local time. You can customize this to another time, but be careful. The Schedule dialog box (shown in Figure 6.12) has a detail view option of either 1 hour or 15 minutes.
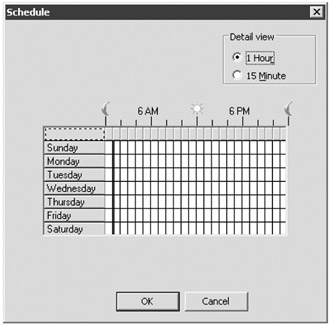
Figure 6.12: Using the Customize Schedule dialog box
When using any schedule box that has a 1 hour and a 15 minute view, switch to the 15 minute view to set a schedule. If you select an entire hour, then whatever process you are scheduling will run four times per hour. In this case, if you select an entire hour, a warning message will be sent to all mailboxes over their warning limit four times per hour. The users would not be amused. An example of the warning message is shown in Figure 6.13.
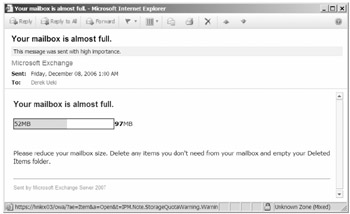
Figure 6.13: Warning message a user receives when their mailbox exceeds the Prohibit Send at (KB) limit
The Deletion Settings section of the Limits tab allows you to configure how long the server will retain deleted items for this mailbox and how long the server will retain a mailbox once it is deleted. The Keep Deleted Items for (Days) options specifies how many days the Exchange server will keep items that have been deleted either from the Deleted Items folder or via a hard delete (Shift+Delete) from another folder. Once a message has been in the deleted item cache for longer than this period (14 days by default for Exchange 2007), the user will no longer be able to retrieve the message using the Outlook Recover Deleted Items feature.
The Keep Deleted Mailboxes for (Days) option specifies how long the mailbox database will keep a deleted mailbox before it is permanently purged. The default is 30 days and that is reasonable for most organizations. A mailbox can be recovered using the EMC's Disconnected Mailbox feature or via the EMS Connect-Mailbox cmdlet.
The Do Not Permanently Delete Items Until the Database Has Been Backed Up check box tells the server that it should not permanently purge an item or a mailbox until the mailbox database has been backed up. This ensures that a copy of the deleted item or deleted mailbox could be recovered from backup media if necessary.
The Client Settings tab of a mailbox store (shown in Figure 6.14) allows the administrator to specify two configuration settings that affect the mailboxes on this store. The first is the Default Public Folder Database setting; this field contains the name of the public folder database that MAPI clients should connect to first when retrieving information about public folder hierarchy or content.
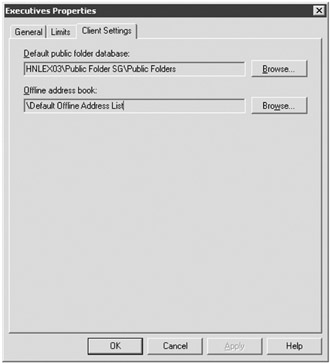
Figure 6.14: Client Settings properties of a mailbox database
The other setting affects clients that work in offline mode or local cache mode. This is the Offline Address Book setting; here you specify which offline address book (OAB) a MAPI client should download. The default is the default offline address book; this OAB contains the default global address list and is sufficient for most small and medium-sized businesses.
The properties we have just examined using the graphical user interface can also be examined using the Get-MailboxDatabase cmdlet. The following is an example of retrieving mailbox database properties and sending them to a formatted list:
Get-MailboxDatabase "Executives" | FL JournalRecipient : MailboxRetention : 30.00:00:00 OfflineAddressBook : \Default Offline Address List OriginalDatabase : PublicFolderDatabase : HNLEX03\Public Folder SG\Public Folders ProhibitSendReceiveQuota : 2355MB Recovery : False ProhibitSendQuota : 2GB IndexEnabled : True AdministrativeGroup : Exchange Administrative Group (FYDIBOHF23SPDLT) AllowFileRestore : False BackupInProgress : CopyEdbFilePath : DatabaseCreated : True Description : EdbFilePath : D:\Executives-SG-DB\Executives.edb ExchangeLegacyDN : /o=Volcano Surfboards/ou=Exchange Administrative Group (FYDIBOHF23SPDLT)/cn=Configuration/cn=Servers /cn=HNLEX03/cn=Microsoft Private MDB HasLocalCopy : False DeletedItemRetention : 14.00:00:00 LastFullBackup : LastIncrementalBackup : MaintenanceSchedule : {Sun.1:00 AM-Sun.5:00 AM, Mon.1:00 AM-Mon.5:00AM, Tue.1:00 AM-Tue.5:00 AM, Wed.1:00 AM-Wed.5:00 AM, Thu.1:00 AM-Thu.5:00 AM, Fri.1:00 AM-Fri.5:00 AM, Sat.1:00 AM-Sat.5:00 AM} MountAtStartup : True Mounted : Organization : Volcano Surfboards QuotaNotificationSchedule : {Sun.1:00 AM-Sun.1:15 AM, Mon.1:00 AM-Mon.1:15AM, Tue.1:00 AM-Tue.1:15 AM, Wed.1:00 AM-Wed.1:15 AM, Thu.1:00 AM-Thu.1:15 AM, Fri.1:00 AM-Fri.1:15 AM, Sat.1:00 AM-Sat.1:15 AM} RetainDeletedItemsUntilBackup : False Server : HNLEX03 ServerName : HNLEX03 StorageGroup : HNLEX03\Executives SG StorageGroupName : Executives SG IssueWarningQuota : 1945MB EventHistoryRetentionPeriod : 7.00:00:00 Name : Executives MinAdminVersion : -2147453113 AdminDisplayName : Executives ExchangeVersion : 0.1 (8.0.535.0) DistinguishedName : CN=Executives,CN=Executives SG, CN=InformationStore,CN=HNLEX03,CN=Servers,CN=Exchange Administrative Group (FYDIBOHF23SPDLT),CN=Administrative Groups, CN=Volcano Surfboards,CN=Microsoft Exchange,CN=Services, CN=Configuration,DC=volcanosurfboards,DC=com Identity : HNLEX03\Executives SG\Executives Guid : ObjectCategory : volcanosurfboards.com/Configuration/Schema/ ms-Exch-Private-MDB ObjectClass : {top, msExchMDB, msExchPrivateMDB} WhenChanged : 12/6/2006 8:32:31 PM WhenCreated : 12/6/2006 8:27:15 PM OriginatingServer : HNLDC01.volcanosurfboards.com IsValid : True Not all of these properties that you see in the output of the Get-MailboxDatabase cmdlet can be changed, of course. The mailbox database location must be changed using the Move-MailboxDatabase cmdlet and some of these are system properties.
The properties that you are able to change can be changed through the EMS using the Set-MailboxDatabase cmdlet. For example, to change the Prohibit Send At (KB) quota to 100MB, you would type this:
Set-MailboxDatabase "Executives" -ProhibitSendQuota:100MB
EAN: 2147483647
Pages: 198