Viewing Appointments and Events
| Now thatyou know how to create and manipulate appointments and events, how can you use your calendar to best view and track these appointments and events? Outlook 2003 includes some changes to the default Calendar view that make it easier to navigate and manipulate your calendar to increase productivity.
NOTE By default, the TaskPad is no longer visible in the Calendar view. To display the TaskPad, click View, TaskPad. This moves the Date Navigator to the right side of the screen and displays the TaskPad below it. All other aspects of the Navigation Pane remain unchanged.
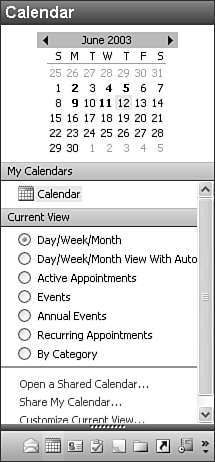
Figure 12.18. You can display your Calendar views in the Navigation Pane.
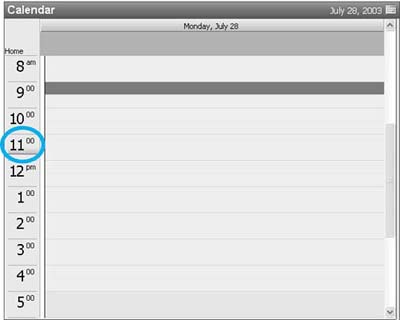
Outlook provides seven default Calendar views, each with their own options. Each will be listed in the Navigation Pane. In addition, any custom views you've created for the Calendar folder will also appear in the Navigation Pane, in alphabetical order. To select one of these views, click the radio button next to the view name in the Navigation Pane or select View, Arrange By, Current View, and select your view from the list. These built-in views represent two main types of views: Day/Week/Month views and Table views. Using the Day/Week/Month ViewOutlook's Day/Week/Month views offer four different options for displaying items. You can select to view one day, a work week (usually Monday Friday), a full week, or a month. To manipulate Day/Week/Month views, use the toolbar buttons for Day, Work Week, Week, and Month. In all views, Outlook offers some new features to help you keep track of where you are on your schedule. On the time bar next to the appointment area is an orange bar that moves down the time bar as the minutes tick by, as shown in Figure 12.19. When viewing multiple days, the current day is highlighted in orange. Figure 12.19. Outlook displays the current time using a moving orange highlight. Currently this figure shows Outlook at 11:45 a.m.
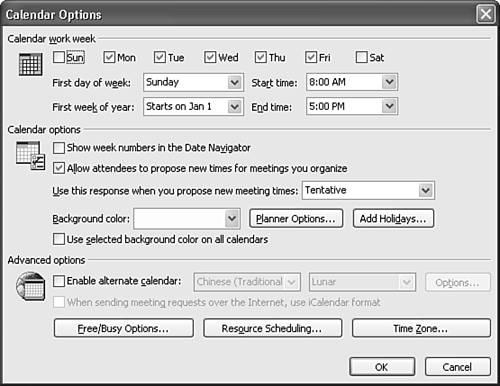
The Day view shows appointments for a single day. The default calendar background color is a pale orange with the time between 8 o'clock and 5 o'clock displayed in a slightly lighter shade of orange to signify working hours. To change your working hours, select Tools, Options, Calendar Options to display Figure 12.20. Figure 12.20. The Calendar Options dialog box enables you to specify working days and hours as well as background color.
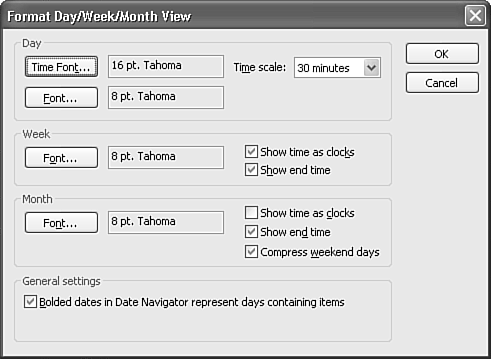
Check the days of the week you want to mark as working days in the Calendar Work Week section of the Calendar Options dialog box. Use the Start time and End time drop-down boxes to specify the beginning and end of the workday. You can also specify the first day of the week and the first week of the year. Some companies choose the first full week or the first four-day week as the first week of the year for accounting purposes. You can also change your calendar's background color. Use the Background color drop-down box to select your preferred background color. Click OK twice to return to the Calendar Day view and see your changes applied. NOTE There's one other option available on the Calendar Options dialog box. You can choose to display all calendars with the same background color by checking the box marked Use Selected Background Color on All Calendars. When viewing multiple calendars, Outlook normally displays each one in its own color to help differentiate between them. If you want all the calendars you display to be the same color, check this box. Changing the Time Bar OptionsWhen you display fewer than seven days at a time in your calendar, the time bar is displayed to the left of the appointment area. The default time unit on Outlook's time bar is 30 minutes. That's also the default duration for appointments. To change the default time unit, select View, Arrange By, Current View, Customize Current View, Other Settings to display the Format Day/Week/Month View dialog box (see Figure 12.21). Figure 12.21. Use the Format Day/Week/Month View dialog box to control font settings, time scale, and the appearance of the Date Navigator.
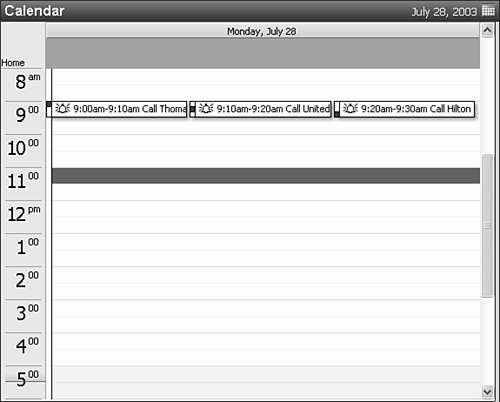
TIP You can also access Figure 12.21 by right-clicking on the appointment area and selecting Customize Current View or clicking Customize Current View in the Navigation Pane if you choose to display your views there. TIP You can also change the time scale by right-clicking on the time bar and choosing another time scale. You can choose a time scale as small as 5 minutes or as long as 60 minutes. You must use one of Outlook's built-in time scales you cannot define your own. The time scale you choose will affect the number of hours displayed in the appointment area at one time. Instead of displaying over 14 hours at once with a 30-minute time scale, you're limited to less than 5 full hours with a 10-minute time scale. Choosing a short time interval for the time bar can be helpful if you schedule short appointments back to back. For example, Figure 12.22 shows the result of scheduling three 10-minute appointments back to back with a time scale of 30 minutes. Figure 12.22. Scheduling multiple appointments back to back in a short time span can produce unreadable results in your calendar.
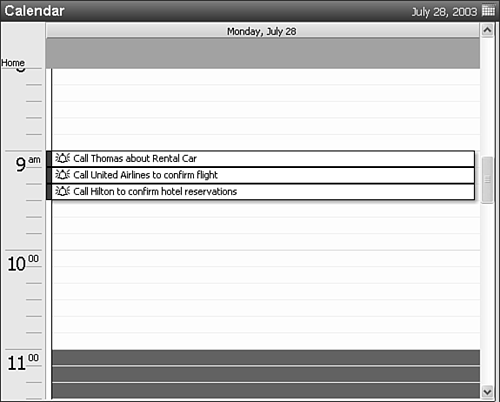
If you enter subjects containing more than one word for your appointments, you might not be able to tell which appointment is which. Changing your time scale to 10 minutes can produce significantly more readable results, as shown in Figure 12.23. Figure 12.23. Choosing a shorter time scale can provide greater visibility of short, back-to-back appointments.
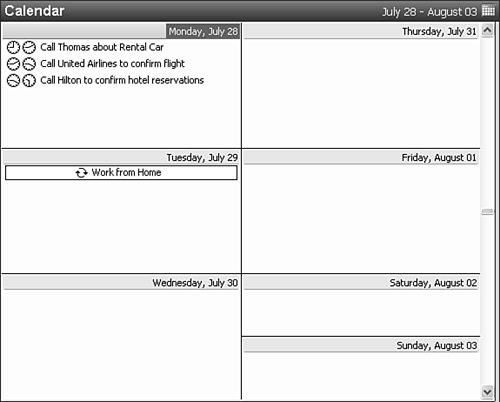
Working with the Date NavigatorThe Date Navigator is displayed on the Navigation Pane in all Day/Week/Month calendar views. By default, the current month is displayed in the Date Navigator. If you want to display more than one month on the Date Navigator, position your mouse on the thin blue line that separates the date navigator from the appointment area. When your mouse cursor changes to two vertical bars with opposite-facing arrows, click and drag to make the Navigation Pane larger. When the Navigation Pane is wide enough to accommodate two months in the Date Navigator, a second calendar will appear. You can make the Navigation Pane even larger and display three months of calendars in the Date Navigator area. The Date Navigator lists the current month with forward and back arrows on either side of the month's name. To change the month displayed in the Date Navigator, use the arrows to move one month ahead or behind. To choose another month without scrolling, click and hold the mouse on the month name in the Date Navigator to display a list of seven months: the three prior months, the current month, and three future months. To jump directly to any of these months, click the month's name. Each row in the Date Navigator displays one week. The start day of the week is determined in Tools, Options, Calendar Options (shown previously in Figure 12.20). The current day is denoted with a red box around the date. The currently selected date is shown with a filled gray box. The Date Navigator displays any date with an appointment or meeting in bold. Events do not cause the Date Navigator to display a date in bold unless the event is marked as Busy, Tentative, or Out of the Office. To turn this behavior off, right-click in the appointment area and select Customize Current View. Select Other Settings and uncheck Bolded Dates in Date Navigator Represent Days Containing Items. Displaying Multiple Days in Day ViewYou can display up to six days in Day view. Simplyhighlight more than one day in the Date Navigator. To display two consecutive days, click the first day and without releasing the mouse, drag over to the second day. You can display up to six consecutive days while remaining in Day view. Selecting seven consecutive days changes your view to Week view and selecting fourteen consecutive days changes your view to Month view. You can also display nonconsecutive days by pressing the Ctrl key while clicking nonconsecutive days. You can display up to fourteen nonconsecutive days in this manner. Using the Work Week and Week ViewsTo display an entire week in the appointment area, position your mouse to the left of the desired week in the Date Navigator. When the mouse changes from a left-facing arrow to a right-facing arrow, click to highlight an entire week in the Date Navigator. You can then drag up and down to display multiple weeks. The other method of displaying a full week in the appointment area is to click the Week button on the Calendar toolbar. This automatically displays the current week in the appointment area as shown in Figure 12.24. Saturday and Sunday are shown compressed so that two days fit into the space normally occupied by one day. You cannot turn this option off in Week view. Figure 12.24. A typical Week view displays all seven days with Saturday and Sunday compressed.
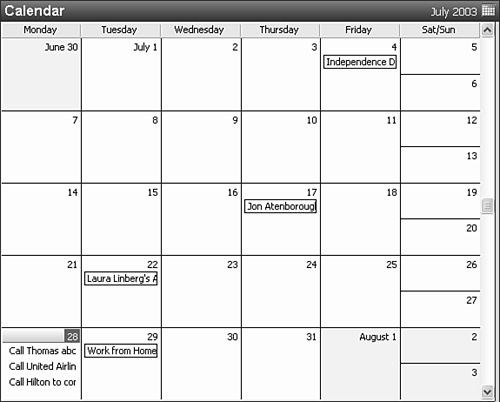
TIP To uncompress Saturday and Sunday, select View, Arrange By, Current View, Customize Current View. Choose the Other Settings button and uncheck the box marked Compress Weekend Days. Work Week view can display up to seven days of the week. By default, five days (Monday Friday) are shown. You can access the Calendar Options dialog (Tools, Options, Calendar Options) to change your workdays from the standard Monday-Friday to any days you need. However, if you select nonconsecutive workdays, the Work Week view will display five days at a time, regardless of whether those days are workdays. For example, if you work Sunday, Monday, Wednesday, Friday, and Saturday, Outlook will display Sunday through Thursday in the Work Week view. However, Tuesday and Thursday are displayed in a darker color indicating that they are not workdays. If you choose all seven days as workdays, Outlook will display them all in the Work Week view. Using the Month ViewThe Month view displays five weeks at a time, as shown in Figure 12.25. Dates in the previous and next months are shown with a gray background. Dates in the current month are shown with a white background. By default, weekend days are shown compressed. To turn off this feature, right-click anywhere in the appointment area and select Customize Current View. Select Other Settings and uncheck Compress Weekend Days. Click OK twice to save your changes. Figure 12.25. The Month view displays five weeks at a time. Unlike previous versions of Outlook, the Date Navigator is still shown in Month view.
Using a Table ViewAlthough the Day/Week/Month views are generally the most seen in Outlook, there are a variety of Table views that can give you a different view of your appointments and events. Outlook installs with five standard Table views:
You can modify any of these default views by selecting View, Arrange By, Current View, Customize Current View.
Creating a Custom ViewAs with any Outlook folder, you can create your own custom views to more accurately display only the information you need. You might want to create some custom views in your Calendar folder if you have different types of events or appointments you want to display. For example, if you keep both personal and professional appointments, meetings, and events in your calendar, chances are certain days are quite cluttered with information. You can create two custom views, a Personal Calendar view and a Professional Calendar view. Each view can be the same style (Day/Week/Month), but each can have a filter on the Category field. By entering a category of Personal or Professional for each item, you can effectively create two calendars in one by simply changing your view. Because reminders only fire in your default Calendar folder, you can have all the benefits of two Calendars (ease of viewing and printing, less clutter) with the benefit of having all of your appointments in one place.
|
 For more information about creating and manipulating views,
 EAN: 2147483647
Pages: 426