Appendix A -- Installing Visio 2002
3 4
Appendix A - Installing Visio 2002
This appendix tells you how to install and customize setup options for Visio 2002 on an individual computer. If you are a network administrator or information technology specialist for an organization, you will want to investigate a great new resource that Microsoft makes available: the Visio Resource Kit. This 190-page document is available from the Microsoft Web site and is a must for organizations that require in-depth information about network installation issues. (See the sidebar "About the Visio Resource Kit.") However, if you're installing Visio for yourself, you'll probably find what you need in this appendix, which tells you how to customize options during Visio setup and describes known installation issues.
New Installation Features
The big news about Microsoft Visio 2002 installation is that you can deploy and maintain Visio 2002 with considerably less hassle than previous versions. Table A-1 lays out the new and improved installation features, most of which are primarily of interest to IT/IS professionals who are responsible for installing software for organizations.
Table A-1. New Installation Features
| Feature | Description |
|---|---|
Systems Manager Server (SMS) deployment | New support for SMS simplifies installation. You can deploy Visio 2002 to selected personal computers on the local network and at remote sites. |
Improvements to Windows Terminal Server installation | Windows Terminal Server is an extension to the Windows NT and Windows 2000 Server product line that allows multiple, concurrent users to access Visio 2002 in a secure Windows environment through terminal emulation. Among the improvements: faster performance time for users of Visio. |
Install on demand | You can defer installing features until you need them. Later, if Visio detects that a particular feature is needed, it displays a message so that you can install the feature immediately— without restarting the product. |
Self-repair | If Visio encounters a missing, corrupted, or unreadable file, it can repair the defect. Visio reinstalls the failed component automatically from the original source of the installation. |
Group Policy support | Through group policy support, you can now secure registry settings for Visio 2002 so that users cannot change Visio behavior. |
Visio Resource Kit | For large-scale or network installations, this kit tells you what you need to know to deploy Visio throughout an organization See the sidebar "About the Visio Resource Kit." |
InsideOut
If you struggled with the Visio 2000 Setup program—remember how many times it had to restart your computer?—you'll welcome the improvements to the Setup program for this version. Visio 2002 is deployed and managed using the same Setup code used by all Microsoft Office XP applications and is based on a complete Microsoft Installer (MSI) implementation. MSI was only partially implemented in Visio 2000, which accounts for the installation complexities of that version.
About the Visio Resource Kit
The Visio Resource Kit (VRK) is a Word document available for download from the Microsoft Web site. It contains details about how the Setup program works and what you can customize. It also provides detailed instructions for the following:
- Installing on Windows 2000.
- Installing on Windows NT 4.
- Deploying on Windows Terminal Server.
- Configuring installation for a Web server, laptop, or roaming user.
- Using SMS.
- Running Visio in a secure environment.
- Customizing user help files.
The VRK is available only from the Microsoft Web site. At the time this book was being written, the exact URL wasn't available. However, look for more information at http://www.microsoft.com/office/visio/ or at the Microsoft TechNet site (http://technet.microsoft.com).
Installing Visio 2002
Microsoft recommends that you first uninstall any previous versions of Visio before installing Visio 2002 to prevent potential conflicts between the programs. This step is not entirely necessary—the Setup program can uninstall previous versions, or you can choose to retain a previous version of Visio.
Step 1: Start Setup
To install Visio on an individual computer, first exit all other programs, including e-mail and virus detection programs. Insert the Visio 2002 CD-ROM into the computer's CD-ROM drive, and then wait for the Setup program to start and display the first screen, as Figure A-1 shows. If the Setup program does not start automatically, click the Start button, choose Run, and then in the Run dialog box, type d:\Setup and click OK. (Or type the drive letter for your CD-ROM drive.)
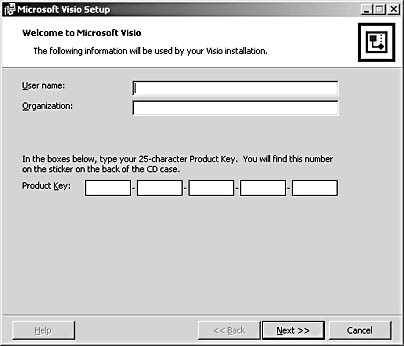
Figure A-1. To proceed with the Setup program, you must type the 25-character product key into the boxes of this screen.
If you provide the correct product key and click Next, the Setup program displays the license agreement, which you must agree to before you can proceed. Select the I Accept The Terms In The License Agreement check box at the bottom of the screen, and then click Next.
Step 2: Installing with a Previous Version of Visio
What happens next depends on whether or not you have a pre-existing version of Visio on your computer. If the Setup program detects a previous version of Visio, the screen shown in Figure A-2 appears.
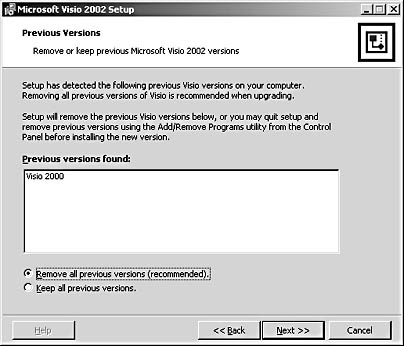
Figure A-2. If an earlier version of Visio is installed on your computer, you can choose to keep it or replace it with Visio 2002.
To remove the earlier version and install Visio 2002, choose Remove All Previous Versions, and then click Next.
If you want to keep other versions of Visio, select Keep All Previous Versions. You'll need to specify a different installation path in the Setup wizard on the next screen. Visio 2002 is supposed to be compatible with earlier versions of Visio, but problems can occur when you run different versions of Visio on the same computer. Visio 2002 will start its self-repair program any time a previous version of Visio is run on the same machine. In itself, this is not a problem. However, if you don't have your installation CD handy when Visio prompts you to perform a self-repair, you might not be able to complete the repair process, and you won't be able to run Visio 2002 until it has repaired itself.
Troubleshooting
After running an earlier version of Visio, running Visio 2002 on the same machine causes an error.
Microsoft specifically notes that running Visio 2000 SR-1 and then running Visio 2002 will cause Visio 2002 to enter reduced functionality mode. To correct the problem, you must manually start Visio's self-repair program.
Note
You might be required to insert the Visio 2002 Setup CD during this procedure.
Follow these steps to manually start the self-repair program:
- On the Windows Start menu, point to Settings, choose Control Panel, and then double-click Add/Remove Programs.
- In the list of currently installed programs, select Microsoft Visio 2002.
- Click Change to start the Visio 2002 Setup program in maintenance mode.
- Click Repair – Restore To Original State, and then click Next to reinstall necessary files.
- Follow any further instructions on the screen.
Step 3: Using the Microsoft Windows Installer
The next screen in the wizard gives you the option of installing Visio using the typical settings or customizing the setup. If you're installing over a previous version of Visio, the Setup program includes the Upgrade Now! button, as Figure A-3 shows. If you uninstalled any earlier versions of Visio before starting the Setup program, or if this is the first time you've installed Visio, the button label is Install Now!.
Your options are as follows:
- Upgrade Now! or Install Now!. Choose this option to install every |template, stencil, and shape on your computer to the default location (C:\Program Files\Microsoft Office\Visio 10). The Developer Reference, an online Help file with information for programmers, is not installed until you use it (an option called Install On First Use).
- Customize. Choose this option if you want to install Visio to a different location than the one shown, a requirement if the default drive lacks sufficient space or if you want to keep an existing version of Visio on your computer. With the Customize option, you can choose which sets of templates and other components to install.

Figure A-3. If you click Upgrade Now! (or Install Now!), the Setup program starts installing Visio. To control what is installed where, click Customize.
Choosing the Default Installation Options
If you click the Upgrade Now! or Install Now! button, the following steps occur automatically:
- The Setup program installs all program files in the default location; you can't specify a different location.
- Any previous version of Visio is overwritten.
- The default feature set is installed. If you're upgrading, all previously installed components are replaced with new versions.
Customizing the Installation Path
To choose an alternative location for Visio 2002, click the Customize button and select a new location when you see the dialog box shown in Figure A-4.
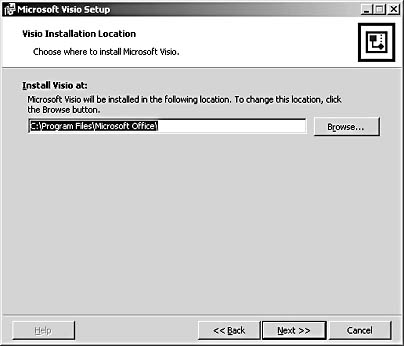
Figure A-4. When you choose a custom installation, you can specify where to install Visio 2002.
Note
If the file path you specify in the Install Visio At box is longer than 120 characters, the Setup program displays an internal error message. If this happens, click OK, and then type a path name that contains fewer characters. For example, the default installation location (C:\Program Files\Microsoft Office\Visio10) contains 41 characters (including the space characters).
Step 4: Choosing Visio Features
If you choose the Customize option, the Setup program displays the Customize Visio Configuration dialog box, as Figure A-5 shows.
The Setup program uses icons that are meant to look like computer drives to show you what's being installed as follows:
- A white box with the drive icon means that the feature and all its options are installed using the method you've specified.
- A gray box with the drive icon means that some of the options for that feature will not be installed.
- A white box with a red X means that the feature and its options won't be installed.
- A white box with a drive icon and the number one (1) means that the feature will be installed the first time you try to use it—at which time you'll need the Setup CD. (This is the default option for the Developer Reference online Help.)
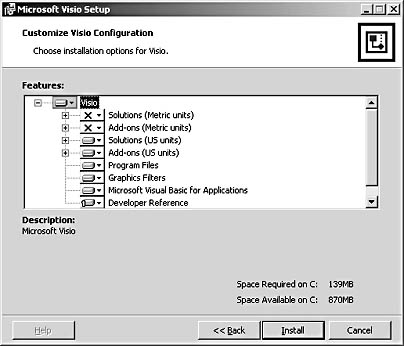
Figure A-5. You can choose sets of features to install on the Customize Visio Configuration screen.
To see all the options that are available for a feature, click the plus (+) sign next to a feature. To display installation options, click a feature, as Figure A-6 shows.
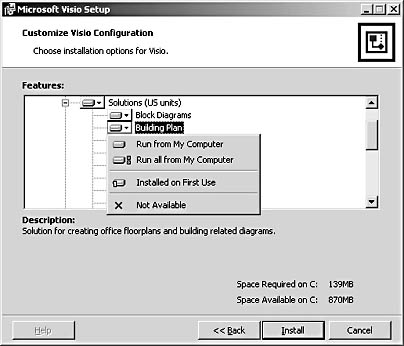
Figure A-6. Click a feature to display installation options.
For any particular feature, you can specify the following installation method:
- Run From My Computer. Choose this option to install the selected feature.
- Run All From My Computer. Choose this option to install the feature and all its options.
- Installed On First Use. Choose this option when you might want a feature later but don't want to install it now. Visio will prompt you when you perform an action that requires the feature so that you can install it on the spot from the Setup CD. If you never require the feature, it's never installed.
Note
If you're installing Visio from a network location rather than from the Setup CD, the Installed On First Use option is a great way to hedge your bets about features you're not certain you'll need. It's quick to install the feature later. However, if you install from the Setup CD, you will be prompted for the CD if that feature ever becomes necessary, which could be inconvenient if your CD doesn't happen to be near your computer at that moment. For details about network installation options, refer to the Visio Resource Kit, available for download from http://www.microsoft.com/office/visio/. - Not Available. Choose this option when you don't want to install a feature.
InsideOut
Visio includes two versions of each template and add-in: one that uses US (imperial) measurement units and one that uses metric units. The Setup program analyzes your system configuration to determine which set of templates and add-ins to install given your locale and makes that set the default. The templates and add-ins are identical in every way except for the measurement units. If you want to include both versions, you can specify that you want to install all the Solutions (Metric Units), Add-Ons (Metric Units), Solutions (US Units), and Add-Ons (US Units).
One thing you can't customize is exactly which template or stencil to install. You can choose only sets of templates (and their associated stencils) based on the folder that Visio installs. For example, you can install all of the templates in the Block Diagrams folder or none of them, but you can't selectively install the Block Diagram template but not the Block Diagram With Perspective template. You do have the choice of installing certain annotation, border, background, callout, pattern, and symbol shapes, most of which are installed in the Visio Extras folders. These options appear under the Add-Ons feature.
For details about the templates included in each solution folder, see Appendix B, "Template and Stencil Reference."
Step 5: Installing Visio
When you click the Install button, the Setup program proceeds to copy all the program files to the selected location. Before you click Install, you can click Back to go over your choices and make changes if necessary. After you click Install, you can still stop the proceedings by clicking Cancel, but then you'll have to restart the Setup program when you want to install Visio.
Activating a New Installation of Visio
After you install Visio, you must activate it within the first 10 starts of the program. Activation is a strong-arm tactic for ensuring that you've installed a certified Microsoft product, and not an illegal copy, in accordance with the software license. When you activate Visio, you can also register the product, but you don't have to. Microsoft prefers that you register your copy of Visio, but in fact, the only information you need to provide when you activate Visio is your country or region.
The Microsoft Office Activation Wizard starts automatically the first time you run Visio. To activate Visio, follow the instructions in the wizard, as Figure A-7 shows.
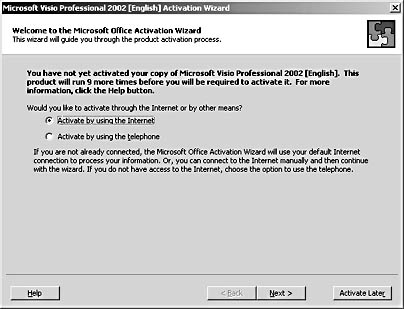
Figure A-7. The Office Activation Wizard ensures that you're not running a pirated version of Visio.
The wizard generates a hardware identification number that becomes the unique fingerprint for your configuration. You only have to activate Visio once (unless you rebuild your computer), but you must activate it to continue using the full functionality of the product.
Tip
If the Microsoft Office Activation Wizard is not running, you can start it by choosing Help, Activate Product.
Failing to Activate Visio
If you don't activate the product, the 11th time you start Visio, it enters what Microsoft calls "reduced functionality mode," a highly inconvenient phase during which you can open and close existing drawing files, but you can't edit or save them or create new drawings. The following key features are shut down during reduced functionality mode:
- Open and Save. You cannot use the Save command to save changes to an existing drawing. You cannot use the Open, Insert, or Save commands to import or export files.
- New. You cannot create a new drawing.
- Stencils. You cannot open stencils or drag shapes from a stencil.
- Editing. You cannot use the Cut, Copy, Paste, or Paste Special commands, which also disables linking and embedding features.
- Custom Properties. You cannot use the Properties command.
- Windows. You cannot open any anchored windows (Pan & Zoom, Custom Properties, Size & Position, and Drawing Explorer).
In addition, the following advanced features are disabled:
- Macros. You cannot use the Macros command to run or create macros and add-ins.
- Visual Basic for Applications (VBA). You cannot launch VBA.
- Show ShapeSheet. You cannot use the Show ShapeSheet command.
- Automation. The Visio automation model is disabled.
- Doc Watson. Visio disables Doc Watson so that activation-related errors are not automatically submitted to Microsoft.
- Event handling. No Visio object will call an event-handling procedure provided by client code.
- Application object registration. An unlicensed instance of Visio won't register itself as the active Visio.Application object.
- CreateObject. The class factory of an unlicensed Visio program won't provide an Application object in response to the CreateObject("Visio.Application") function.
- Add-ins. An unlicensed instance of Visio won't load or run add-ins (or "add-ons," as Visio refers to them).
No existing Visio drawing files are changed as a result of the reduction in product functionality; you just can't make changes.
To restore full functionality, run the Microsoft Office Activation Wizard, which appears automatically each time you start Visio when reduced functionality is in effect. Or choose Help, Activate Product to start the wizard.
InsideOut
The Activation Wizard in Visio is part of a larger set of features associated with the Mandatory Office Activation Wizard (MOAW). Together with some other activation features, this technology is aimed mainly at supporting alternative methods of licensing of Office XP. However, in Visio, only the anti-piracy features are implemented. MOAW technology helps prevent product piracy by recording the unique combination of a hardware ID and product ID. The same product ID cannot be used to activate more than two hardware IDs—which means that you can't activate Visio on more than two machines at once.
Activating Visio on Terminal Server
If you log onto Windows NT with administrator privileges and install Visio on Terminal Server, you must activate Visio before any clients can run it. If users attempt to run Visio before you have activated it, the users will see a general failure message and Visio shuts down.
Installing Visio in the Presence of Other Programs
Microsoft documents a number of compatibility issues between Visio 2002, Office XP, and earlier versions of Visio.
Caution
Before installing Visio 2002, uninstall any beta versions of Visio and Office XP beta versions on your computer.
Visio 2002 will not function correctly if it's installed on the same computer as a beta version of Visio 2002. In addition, if you were enrolled in the Office XP beta program, Visio 2002 might not function correctly when installed on the same computer as a Microsoft Office XP beta, or Visio might cause the Office beta to stop functioning.
On Windows 98 and Windows NT 4, both the Visio and Office beta programs install a package of system upgrades to your computer. These upgrades must be uninstalled before you can install Visio 2002.
Follow these steps to remove previous system upgrades:
- On the Windows Start menu, point to Settings, choose Control Panel, and then double-click Add/Remove Programs.
- In the list of currently installed programs, look for one of the following entries:
- Microsoft Office System Files Update Beta 1
- Microsoft Office System Files Update Beta 2
- Microsoft Office 2002 System Files Update
- If you find any of these items, select it, and then click Remove.
Visio 10 Marketing Beta and Outlook 2000
If you uninstall the Visio 10 Marketing beta on a computer that includes Outlook 2000, Outlook might not run the next time you try to open it. To prevent the problem from occurring, after you uninstall the beta version, start Word, Excel, or PowerPoint, all of which can perform a self-repair that will prevent Outlook from failing. See the next section for details. Otherwise, do the following:
- On the Windows Start menu, point to Settings, choose Control Panel, and then double-click Add/Remove Programs.
- In the list of currently installed programs, select Microsoft Office 2000.
- Click Change. Office 2000 Setup Maintenance Mode should start.
- Click the Repair Office button.
- Click Repair Errors In My Office Installation, and then click Finish.
- Follow any further instructions on the screen.
Installing and Uninstalling Visio 2002 with Office 2000
You can install and run Visio 2002 on a computer with Microsoft Office 2000. That's the good news. The bad news is that if you uninstall Visio 2002 or the Visio 10 beta version, and then run Word, Excel, or Project, an error message might appear, asking you to insert your Office 2000 or Project 2000 CD. Office applications need to re-install components—part of their self-repair functionality—after Visio 2002 is removed from a computer. You must insert the program CD into your CD drive so that the Office 2000 Setup program can perform the necessary repairs, after which all Office 2000 applications should function correctly.
Visio and Office Beta Version Incompatibilities
If you were in the beta programs for Visio 2002 and Office XP, you might have already experienced the lack of compatibility between programs. The released ver-sions of Visio and Office work well together, but some beta combinations didn't. Installing the released version of Office XP onto a computer that includes a beta version of Visio 2002 causes Visio to enter reduced functionality mode. There is no workaround except to acquire the released version of Visio 2002 and install it. You can use the Office Beta 2 Refresh build or Office 2000 with Visio 2002 Beta 2.
Network Installation Issues
Microsoft has documented some known issues with Visio 2002 installations on networked computers.
Visio and UNC Paths
If you are installing Visio 2002 on a computer running Microsoft Windows NT 4, and you are logged on to an account with normal user permissions, you cannot install to a network location using a Universal Naming Convention (UNC) path. To install to the network location, assign the UNC path to a drive letter, and then choose that drive letter as the install location in Visio 2002 Setup. If you are logged in as an administrator, this limitation doesn't occur.
Installing on a Computer with Multiple User Profiles
If you're installing Visio Professional on a Windows NT or Windows 2000 system with multiple user profiles, Visio might display its self-repair message when you open certain templates. The problem happens when you install Visio while logged in as one user (for example, Administrator), log out, and then log in as a different user (for example, your own user name). Then, if you open the Database Model Diagram, Data Flow Model Diagram, or UML Model Diagram template, the self-repair message appears. Click Cancel. If the self-repair message appears again, click Cancel each time it appears. According to the Readme.wri file provided by Microsoft, self-repair messages appear only the first time you open one of these templates, and clicking Cancel solves the problem.
Troubleshooting
After you've installed Visio as the local administrator, Visio prompts for its CD when you log in under a different user name and try to start Visio.
When you install Visio 2002 on a computer running Windows NT 4, you can encounter this message if you install Visio using one type of login account and then run Visio from a different account. For example, if you install Visio using the local administrator account, and later log in using a domain account, Visio prompts for the Visio 2002 CD. This is inconvenient if your CD is not handy, but the message represents expected behavior because of the way Windows NT sets permissions for different types of accounts.
Running the Setup Program to Maintain Visio
After you install Visio, you can run the Setup program at any time to enter what's called maintenance mode, as Figure A-8 shows. You can use maintenance mode to reinstall a feature that's not working properly, to add and remove specific features, or to uninstall Visio.
To start the Setup program in maintenance mode, run the Setup.exe program from the Visio CD or the network installation point, or choose Start, Settings, Control Panel, and then choose the Add/Remove Programs option. Select Microsoft Visio 2002, and then click Change.
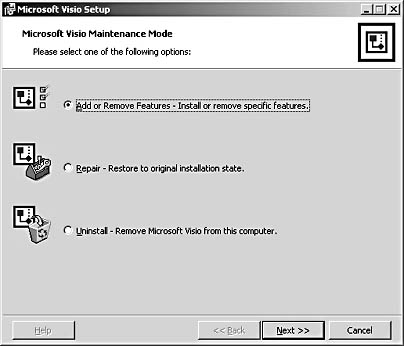
Figure A-8. You can run the Visio Setup program whenever you want to add, remove, or reinstall features or remove Visio from your computer.
EAN: 2147483647
Pages: 211