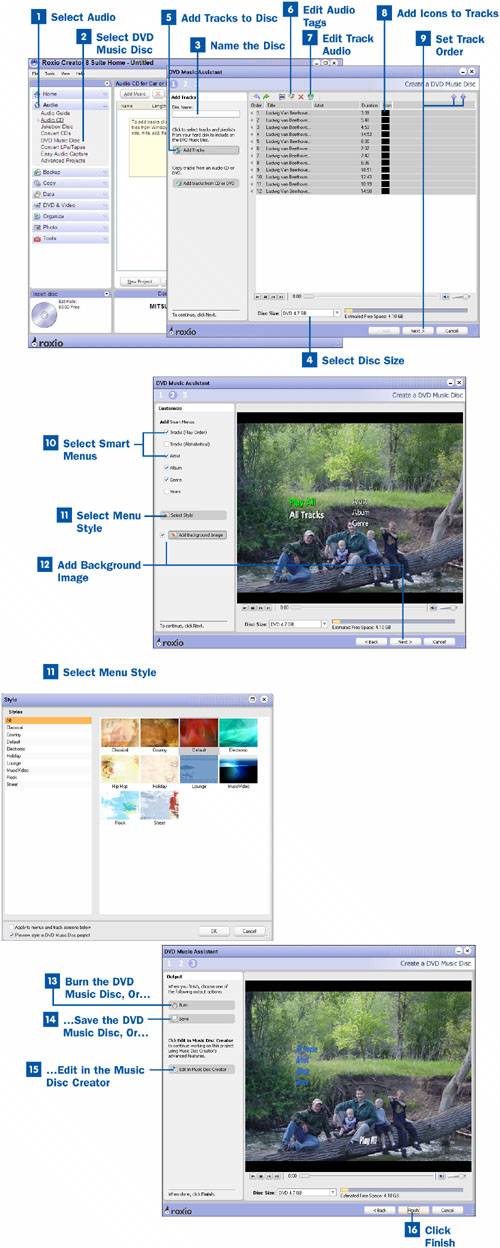
Select Audio
Select Audio in the project pane to open the Audio menu.
 Select DVD Music Disc
After the Audio menu is displayed, select DVD Music Disc to bring up the DVD Music Assistant.
 Name the Disc
When the DVD Music Assistant comes up, type in the name you want to use for the DVD music disc. This name is displayed in the DVD menu as well as the display of some DVD players, so you want to use a name that enables you to recognize the contents of the disc.
 Select Disc Size
After you have started a new disc project, choose the size of the recordable disc you will be using from the Disc Size drop-down menu. The size of the disc is usually printed somewhere on the disc itself.
Selecting the correct size of your disc ensures that the Estimated Free Space status bar is correct so you do not add more files to the project than can actually fit on the disc.
 Add Tracks to Disc
After you have set the disc size, you can start adding audio tracks. There are two ways to add audio tracks. The first is to click on Add Tracks to use the Media Manager to find and add the audio files.
You can also import audio directly into the project by clicking the Add Tracks from CD or DVD and selecting the tracks directly on the disc.
Note
You can only add 97 tracks to a DVD music disc, regardless of the capacity of the media.
 Edit Audio Tags
You can edit the tags of your audio tracks by clicking the Edit Audio Tags button in the taskbar. Follow the steps in  Add Tags to Audio Tracks.
 Edit Track Audio
If necessary, you can also edit the track by clicking on the Edit Audio icon. This brings up Quick Sound Editor. See the tasks in Chapter 3, "Editing Audio," for more information about editing audio.
 Add Icons to Tracks
You can also add graphic icons to the tracks that will make your DVD menus look cool and make it easier to identify tracks. To add icons to the tracks, click on the blank graphic in the Icon column next to the track to which you would like to add an icon. This brings up Media Manager, where you can find a graphic file to use for the track icon.
 Set Track Order
After you have added icons to the tracks, you can re-order the tracks on your disc by dragging and dropping the tracks in the order you would like them to be or by selecting a track and using the up and down arrows to move it up or down one track at a time.
After you have the tracks in the correct order, click the Next button to customize the DVD menu.
 Select Smart Menus
After you have the tracks in order, you can add different types of smart menus that make it easier to navigate the DVD to play audio. Select the smart menus that you want to be displayed on the DVD menu by checking the box next to the appropriate menu.
Key Term
Smart menu A menu that is automatically created based on the content of the DVD.
 Select Menu Style
DVD Music Assistant also includes a number of predefined menu styles that include specific background images and fonts in the DVD menu. Click on Select Style and use the Style window to select a predefined style to use for the DVD menu.
Key Term
Menu style A template for the menu that has predefined elements, such as the background, font, and layout.
 Add Background Image
After you have selected a menu style, you might want to add a different background to the DVD menu. Click on the Smart Objects option in the DVD Music Disc menu and then click the Add Background Image button. Use the Media Manager to select your own image file to use as the background.
After the DVD menu is set, click the Next button to bring up the Output menu. The Output menu gives you several options for continuing with your DVD project.
 Burn the DVD Music Disc, Or...
When you have brought up the Output menu, click on the Burn button to bring up the Burn Setup dialog box. If you have multiple CD/DVD recorders, you need to specify which drive you will be using to burn the disc. After you have selected the disc burner, you can specify options by expanding the Options menu. From the Options menu, you can specify the write speed, number of copies, and other settings. When you have finished setting the burn options, click OK to burn the disc. After the burn process is completed, the disc is automatically ejected.
 ...Save the DVD Music Disc, Or...
You also have the option to save the music disc project to a file by clicking on the Save button.
 ...Edit in the Music Disc Creator
If you want to enhance the DVD music disc more, you can open the project in Music Disc Creator by clicking on the Edit in Music Disc Creator button.
 Click Finish
Click Finish to close the project.